Overview
Once in a while I encounter a question whether C++ is suitable for embedded development and bare metal development in particular. There are multiple articles of how C++ is superior to C, that everything you can do in C you can do in C++ with a lot of extras, and that it should be used even with bare metal development. However, I haven’t found many practical guides or tutorials of how to use C++ superiority and boost development process compared to conventional approach of using “C” programming language. With this book I hope to explain and show examples of how to implement soft real time systems without prioritising interrupts and without any need for complex real time task scheduling. Hopefully it will help someone to get started with using C++ in embedded bare metal development.
This work is licensed under a Commons Attribution-NonCommercial-ShareAlike 4.0 International License.

Audience
The primary intended audience of this document is professional C++ developers who want to understand bare metal development a little bit better, get to know how to use their favourite programming language in an embedded environment, and probably bring their C++ skills to an “expert” level. Why professional? Because bare metal platform has lots of limitations. In most cases no exceptions and no runtime type information (RTTI) support will be available. In many cases the dynamic memory allocation will also be excluded. In order to be able to use C++ effectively you will have to have deep knowledge of existing C++ idioms, constructs and STL contents. You must know how your favourite data structures are implemented and whether it is possible to reuse them in your environment. If it is not possible to use the STL (or any other library) code “as is”, you will have to implement a reduced version of it, and it is better to know how the library developers implemented the feature and how to make it work with the constrains of your environment.
The professional embedded developers with intermediate knowledge of C++ may also find this document useful. They will probably benefit from lots of C++ insights and will have several “eureka” moments with “I didn’t know I could do that!!!” kind of thoughts.
If your C++ knowledge doesn’t go much beyond polymorphism and virtual functions, if template meta-programming doesn’t mean anything to you, probably you are not ready to use C++ in the embedded environment and this document will probably be too complex to understand.
I’d like to emphasise the fact that this is NOT a C++ tutorial. There are lots of resources on the web that teach conventional C++ with OS services, exceptions and RTTI. My personal opinion is that you have to master C++ in regular environment before using it effectively in the bare metal world.
C++ Popularity
C++ is quite popular in the embedded world of Linux-based embedded systems. However, it is not that popular in bare metal development. Why? Probably because of its complexity. Knowing C++ syntax is not enough. To use it effectively the developer must know what Standard Template Library (STL) provides, what can and what cannot be used when developing for specific platform. STL mastery is also not enough, the developer should have some level of proficiency in template meta-programming. Although there is an opinion that templates are dangerous because of executable code bloating, I think that templates are developer’s friends, but the one must know the dangers and know how to use templates effectively. But again, it requires time and effort to get to know how to do it right.
Another reason why C++ is not used in bare metal development is that software in significant number (if not majority) of projects gets written by hardware developers, at least in its first stages just to make sure the hardware works as expected. The “C” programming language is a natural choice for them. And of course majority of hardware developers lack proficiency in software development. They may have some difficulties writing code of good quality in “C”, not to mention “C++”. After software reaches certain level of complexity it is handed over to software engineers who are not allowed to re-implement it from scratch. They are told something like: “This code almost works, just fix a couple of bugs, implement this short set of features and we’re good to go. Throwing away the existing code is a waste, we do not have time to re-implement it.”
The last reason, I think, is psychological one. People prefer to be wrong in a group than right by themselves. When majority of bare metal products being developed using “C”, it feels risky and unnatural to choose “C++”, even though the latter is better choice from the technological perspective.
Benefits of C++
The primary reason to prefer C++ over C is code reuse. Thanks to templates, it is much easier to implement generic piece of code that can be reused between projects in C++ than in C. When implementing everything from scratch, then probably using C++ instead of C won’t give any significant advantage in terms of development effort, maybe even extend it. However, once generic components have been developed, the whole development process for next projects will be much easier and faster, thanks to reuse of the former.
Contents of This Book
This document introduces several concepts that can be used in bare-metal development as well as shows how they can be implemented using features of latest (at the time of writing) C++11 standard.
The code of generic components is implemented as part of “Embedded C++ Library” project called “embxx” and can be found at https://github.com/arobenko/embxx. It has GPLv3 licence.
There is also a project that implements multiple simple bare metal applications using embxx which can run on RaspberryPi platform. The source code can be found at https://github.com/arobenko/embxx_on_rpi. It also has GPLv3 licence.
Both projects require gcc version 4.7 or higher, because of C++11 support requirement. They also use CMake as their build system. The code has been tested with following free toolchains:
The whole document is ARM platform centric. At this moment I do not try to cover anything else.
To compile Raspberry Pi example applications in Linux environment use the following steps:
-
Checkout embxx_on_rpi project
> git clone https://github.com/arobenko/embxx_on_rpi.git
> cd embxx_on_rpi
-
Create separate build directory and cd to it
> mkdir build
> cd build
-
Generate makefiles
> cmake ..
Note that last parameter to cmake is relative or absolute path to the root of the source tree. Also note that embxx library will be checked out as external git submodule during this process.
-
Build the applications
> make
-
Take the generated image from
<build_dir>/image/<app_name>/kernel.img
The CMake provides the following build types, which I believe are self-explanatory:
-
None (default)
-
Debug
-
Release
-
MinSizeRel
-
RelWithDebInfo
To specify the required build type use -DCMAKE_BUILD_TYPE=<value> option of cmake utility:
> cmake -DCMAKE_BUILD_TYPE=Release ..If no build type is specified, the default one is None, which is similar to Debug, but
without -g compilation option, i.e. no optimisations and no debugging information is generated.
It is possible to specify the cross-compilation toolchain prefix. By default arm-none-eabi-
is expected, i.e. arm-none-eabi-gcc, arm-none-eabi-g++ and arm-none-eabi-as are used to
compile the sources. If these utilities cannot be found in environment search paths, then you
should specify the prefix passing -DCROSS_COMPILE=<prefix> option to cmake:
> cmake -DCROSS_COMPILE=/opt/arm-none-eabi-2013.05/bin/arm-none-eabi- ..To see the commands used to compile the sources, prefix make with VERBOSE=1:
> VERBOSE=1 makeThe embxx library has doxygen generated documentation. It can be found at release artifacts.
Contribution
If you have any suggestions, requests, bug fixes, spelling mistakes fixes, or maybe you feel that some things are not explained properly, please feel free to e-mail me to arobenko@gmail.com.
Reading Offline
The source code of this book is hosted on github and both PDF and HTML versions of this book can be downloaded from the release_artifacts.
Know Your Compiler Output
To successfully use C++ language and its libraries in bare metal development it is important to know what binary code compiler generates from the C++ source code. This section will lead you through the process of building simple testing applications and analysis of their binary code.
Test Applications
The embxx_on_rpi project contains several simple test application, which are intended to be used for binary code analysis only and not to be executed on the target platform. This applications reside in src/test_cpp directory. In order to properly analyse the code that compiler produces for production environment, let’s compile all the applications in Release mode:
> git clone https://github.com/arobenko/embxx_on_rpi.git
> mkdir -p <build_dir_somewhere>
> cd <build_dir_somewhere>
> cmake -DCMAKE_BUILD_TYPE=Release <path/to/embxx_on_rpi>
> VERBOSE=1 make
The listing file of every application will be <build_dir_somewhere>/src/test_cpp/<app_name>/kernel.list.
Get Simple Application Compiled
Let’s try to compile simple application of infinite loop, called test_cpp_simple.
A linker script is required to get all the generated objects successfully linked. It states what code/data sections need to be loaded at what addresses as well as defines several symbols that may be required by the sources. Here is a good manual of linker script syntax and here is the linker script I use to get applications linked for Raspberry Pi platform.
Depending on your compiler, the link may fail because some symbols are missing. For example
__exidx_start and __exidx_end are needed when the application is compiled with exceptions
support, or __bss_start__ and __bss_end__ may be required by standard library if it contains
the code for zeroing .bss section.
Every application must have a startup code usually written in Assembler. This startup code must perform the following steps:
-
Write the interrupt vector table at appropriate location (usually at address 0x0000).
-
Set the stack pointers for every runtime mode.
-
Zero the .bss section
-
Call constructors of global (static) objects (applicable only to C++)
-
Call the main function.
It may happen that compiler generates some startup code for you, especially if you haven’t
excluded standard library (stdlib) from compilation. To check whether this is the case,
we need to analyse assembler listing of the successfully compiled and linked image binary.
All the generated files for a test application will reside in <build_dir>/src/test_cpp/<app_name>.
The assembler listing file will have kernel.list name.
Side note: the assembler listing can be generated using the following command:
> arm-none-eabi-objdump -D -S app_binary > app.listOpen the listing file and look for function with CRT string in it. CRT
stands for “C Run-Time”. When using this
compiler, the function that compiler has generated, is called _mainCRTStartup.
Let’s take closer look what this function does.
00008198 <_mainCRTStartup>:Load the address of the end of the RAM and assign its value to stack pointer (sp).
    8198:	e59f30f0 	ldr	r3, [pc, #240]	; 8290 <_mainCRTStartup+0xf8>
    819c:	e3530000 	cmp	r3, #0
    81a0:	059f30e4 	ldreq	r3, [pc, #228]	; 828c <_mainCRTStartup+0xf4>
    81a4:	e1a0d003 	mov	sp, r3
Set the value of sp for various modes, the sizes of the stacks are determined by the compiler itself.
    81a8:	e10f2000 	mrs	r2, CPSR
    81ac:	e312000f 	tst	r2, #15
    81b0:	0a000015 	beq	820c <_mainCRTStartup+0x74>
    81b4:	e321f0d1 	msr	CPSR_c, #209	; 0xd1
    81b8:	e1a0d003 	mov	sp, r3
    81bc:	e24daa01 	sub	sl, sp, #4096	; 0x1000
    81c0:	e1a0300a 	mov	r3, sl
    81c4:	e321f0d7 	msr	CPSR_c, #215	; 0xd7
    81c8:	e1a0d003 	mov	sp, r3
    81cc:	e2433a01 	sub	r3, r3, #4096	; 0x1000
    81d0:	e321f0db 	msr	CPSR_c, #219	; 0xdb
    81d4:	e1a0d003 	mov	sp, r3
    81d8:	e2433a01 	sub	r3, r3, #4096	; 0x1000
    81dc:	e321f0d2 	msr	CPSR_c, #210	; 0xd2
    81e0:	e1a0d003 	mov	sp, r3
    81e4:	e2433a02 	sub	r3, r3, #8192	; 0x2000
    81e8:	e321f0d3 	msr	CPSR_c, #211	; 0xd3
    81ec:	e1a0d003 	mov	sp, r3
    81f0:	e2433902 	sub	r3, r3, #32768	; 0x8000
    81f4:	e3c330ff 	bic	r3, r3, #255	; 0xff
    81f8:	e3c33cff 	bic	r3, r3, #65280	; 0xff00
    81fc:	e5033004 	str	r3, [r3, #-4]
    8200:	e9532000 	ldmdb	r3, {sp}^
    8204:	e38220c0 	orr	r2, r2, #192	; 0xc0
    8208:	e121f002 	msr	CPSR_c, r2
    820c:	e243a801 	sub	sl, r3, #65536	; 0x10000
    8210:	e3b01000 	movs	r1, #0
    8214:	e1a0b001 	mov	fp, r1
    8218:	e1a07001 	mov	r7, r1
Load the addresses of __bss_start__ and __bss_end__ symbols and zero all the area in between.
    821c:	e59f0078 	ldr	r0, [pc, #120]	; 829c <_mainCRTStartup+0x104>
    8220:	e59f2078 	ldr	r2, [pc, #120]	; 82a0 <_mainCRTStartup+0x108>
    8224:	e0522000 	subs	r2, r2, r0
    8228:	eb00004a 	bl	8358 <memset>

   ... Then comes some code, purpose of which is not clear
Call the __libc_init_array function provided by standard library which will initialise all the
global objects. It will treat the area between __init_array_start and __init_array_end as list
of pointers to initialisation functions and call them one by one.
8278: eb000014 bl 82d0 <__libc_init_array>Call the main function.
8284: eb000010 bl 82cc <main>If main function returns for some reason, call the exit function, which probably must be implemented
as infinite loop or jumping back to the beginning of the startup code.
8288: eb000008 bl 82b0 <exit>Here comes local data
    828c:	00080000 	andeq	r0, r8, r0
    8290:	04008000 	streq	r8, [r0], #-0
	...
    829c:	00008458 	andeq	r8, r0, r8, asr r4
    82a0:	00008474 	andeq	r8, r0, r4, ror r4
The only missing stage in the startup process is updating the interrupt vector
table. After the latter is updated properly, it is possible to call the provided
_mainCRTStartup function. However, if your compiler doesn’t provide such
function you have no other choice but to write the whole startup code yourself.
Here
is an example of such code.
Please note, that .bss section by definition contains uninitialised data
that must be zeroed at startup. Even if you don’t have uninitialised variables
in your code, zeroing .bss is a must have operation. This is because compiler
might put variables that are explicitly initialised to 0 into the .bss for
performance reasons and count on this section being zeroed at startup.
Also note, that pointers to initialisation functions of global variables reside
in .init.array section. To initialise your global objects you just iterate
over all entries in this section and call them one by one.
To implement the missing stage for use the following assembler instructions:
_entry:
    ldr pc,reset_handler_ptr        ;@  Processor Reset handler
    ldr pc,undefined_handler_ptr    ;@  Undefined instruction handler
    ldr pc,swi_handler_ptr          ;@  Software interrupt
    ldr pc,prefetch_handler_ptr     ;@  Prefetch/abort handler.
    ldr pc,data_handler_ptr         ;@  Data abort handler/
    ldr pc,unused_handler_ptr       ;@
    ldr pc,irq_handler_ptr          ;@  IRQ handler
    ldr pc,fiq_handler_ptr          ;@  Fast interrupt handler.

    ;@ Set the branch addresses
    reset_handler_ptr:      .word reset
    undefined_handler_ptr:  .word hang
    swi_handler_ptr:        .word hang
    prefetch_handler_ptr:   .word hang
    data_handler_ptr:       .word hang
    unused_handler_ptr:     .word hang
    irq_handler_ptr:        .word irq_handler
    fiq_handler_ptr:        .word hang

reset:
    ;@ Disable interrupts
    cpsid if

    ;@ Copy interrupt vector to its place
    ldr r0,=_entry
    mov r1,#0x0000

    ;@  Here we copy the branching instructions
    ldmia r0!,{r2,r3,r4,r5,r6,r7,r8,r9}
    stmia r1!,{r2,r3,r4,r5,r6,r7,r8,r9}

    ;@  Here we copy the branching addresses
    ldmia r0!,{r2,r3,r4,r5,r6,r7,r8,r9}
    stmia r1!,{r2,r3,r4,r5,r6,r7,r8,r9}
Please note that at interrupt vector table that resides at address 0x0000 contains branch instructions to the appropriate handlers, not just addresses of the handlers. Let’s take a closer look how these branching instructions look in our assembler listing file:
_entry:
    800c:	e59ff018 	ldr	pc, [pc, #24]	; 802c <reset_handler_ptr>
    8010:	e59ff018 	ldr	pc, [pc, #24]	; 8030 <undefined_handler_ptr>
    8014:	e59ff018 	ldr	pc, [pc, #24]	; 8034 <swi_handler_ptr>
    8018:	e59ff018 	ldr	pc, [pc, #24]	; 8038 <prefetch_handler_ptr>
    801c:	e59ff018 	ldr	pc, [pc, #24]	; 803c <data_handler_ptr>
    8020:	e59ff018 	ldr	pc, [pc, #24]	; 8040 <unused_handler_ptr>
    8024:	e59ff018 	ldr	pc, [pc, #24]	; 8044 <irq_handler_ptr>
    8028:	e59ff018 	ldr	pc, [pc, #24]	; 8048 <fiq_handler_ptr>

0000802c <reset_handler_ptr>:
    802c:	0000804c 	andeq	r8, r0, ip, asr #32

00008030 <undefined_handler_ptr>:
    8030:	000082b4 			; <UNDEFINED> instruction: 0x000082b4

00008034 <swi_handler_ptr>:
    8034:	000082b4 			; <UNDEFINED> instruction: 0x000082b4

00008038 <prefetch_handler_ptr>:
    8038:	000082b4 			; <UNDEFINED> instruction: 0x000082b4

0000803c <data_handler_ptr>:
    803c:	000082b4 			; <UNDEFINED> instruction: 0x000082b4

00008040 <unused_handler_ptr>:
    8040:	000082b4 			; <UNDEFINED> instruction: 0x000082b4

00008044 <irq_handler_ptr>:
    8044:	000082b8 			; <UNDEFINED> instruction: 0x000082b8

00008048 <fiq_handler_ptr>:
    8048:	000082b4 			; <UNDEFINED> instruction: 0x000082b4
The branching instructions load address of the interrupt function to “pc” register. However, the address of the function is stored somewhere and compiler generates access to this storage using relative offset to current “pc” register. This is the reason why we have to copy not just the branching instructions, but also the storage area where addresses of interrupt routines are stored:
    ;@ Copy interrupt vector to its place
    ldr r0,=_entry
    mov r1,#0x0000

    ;@  Here we copy the branching instructions
    ldmia r0!,{r2,r3,r4,r5,r6,r7,r8,r9}
    stmia r1!,{r2,r3,r4,r5,r6,r7,r8,r9}

    ;@  Here we copy the branching addresses
    ldmia r0!,{r2,r3,r4,r5,r6,r7,r8,r9}
    stmia r1!,{r2,r3,r4,r5,r6,r7,r8,r9}
Dynamic Memory Allocation
Let’s try to compile simple application that uses dynamic memory allocation. The test_cpp_vector application contains the following code:
std::vector<int> v;
static const int MaxVecSize = 256;
for (int i = 0; i < MaxVecSize; ++i) {
    v.push_back(i);
}
It may happen that linking operation will fail with multiple referenced symbols being undefined:
unwind-arm.c:(.text+0x224): undefined reference to `__exidx_end'
unwind-arm.c:(.text+0x228): undefined reference to `__exidx_start'
/usr/bin/../lib/gcc/arm-none-eabi/4.8.3/../../../../arm-none-eabi/lib/libc.a(lib_a-abort.o): In function `abort':
abort.c:(.text.abort+0x10): undefined reference to `_exit'
/usr/bin/../lib/gcc/arm-none-eabi/4.8.3/../../../../arm-none-eabi/lib/libc.a(lib_a-sbrkr.o): In function `_sbrk_r':
sbrkr.c:(.text._sbrk_r+0x18): undefined reference to `_sbrk'
/usr/bin/../lib/gcc/arm-none-eabi/4.8.3/../../../../arm-none-eabi/lib/libc.a(lib_a-signalr.o): In function `_kill_r':
signalr.c:(.text._kill_r+0x1c): undefined reference to `_kill'
/usr/bin/../lib/gcc/arm-none-eabi/4.8.3/../../../../arm-none-eabi/lib/libc.a(lib_a-signalr.o): In function `_getpid_r':
signalr.c:(.text._getpid_r+0x4): undefined reference to `_getpid'
/usr/bin/../lib/gcc/arm-none-eabi/4.8.3/../../../../arm-none-eabi/lib/libc.a(lib_a-writer.o): In function `_write_r':
writer.c:(.text._write_r+0x20): undefined reference to `_write'
/usr/bin/../lib/gcc/arm-none-eabi/4.8.3/../../../../arm-none-eabi/lib/libc.a(lib_a-closer.o): In function `_close_r':
closer.c:(.text._close_r+0x18): undefined reference to `_close'
/usr/bin/../lib/gcc/arm-none-eabi/4.8.3/../../../../arm-none-eabi/lib/libc.a(lib_a-fstatr.o): In function `_fstat_r':
fstatr.c:(.text._fstat_r+0x1c): undefined reference to `_fstat'
/usr/bin/../lib/gcc/arm-none-eabi/4.8.3/../../../../arm-none-eabi/lib/libc.a(lib_a-isattyr.o): In function `_isatty_r':
isattyr.c:(.text._isatty_r+0x18): undefined reference to `_isatty'
/usr/bin/../lib/gcc/arm-none-eabi/4.8.3/../../../../arm-none-eabi/lib/libc.a(lib_a-lseekr.o): In function `_lseek_r':
lseekr.c:(.text._lseek_r+0x20): undefined reference to `_lseek'
/usr/bin/../lib/gcc/arm-none-eabi/4.8.3/../../../../arm-none-eabi/lib/libc.a(lib_a-readr.o): In function `_read_r':
readr.c:(.text._read_r+0x20): undefined reference to `_read'
collect2: error: ld returned 1 exit status
The symbols __exidx_start and __exidx_end are required to indicate start and end of
.ARM.exidx section. It is used for exception handling. They must be defined in the linker script:
.ARM.exidx :
{
    __exidx_start = .;
    *(.ARM.exidx* .gnu.linkonce.armexidx.*)
    __exidx_end = .;
} >RAM
The dynamic memory allocation will require implementation of _sbrk function which will be used
to allocate chunks of memory for the C/C++ heap management.
All other symbols will be required to properly support exceptions which are used by C++ heap management system. Here is a good resource, that lists all the system calls, the developer may need to implement, to get the application compiled.
Now, after successful compilation, take a good look at the size of the images of two sample applications we compiled. The paths are <build_dir>/src/test_cpp/test_cpp_simple/kernel.img and <build_dir>/src/test_cpp/test_cpp_vector/kernel.img.
Side note: The image can be generated out of elf binary using the following instruction: > arm-none-eabi-objcopy <elf_executable> -O binary <binary_image_path>
You may notice that size of test_cpp_vector image is greater by approximately 100K than test_cpp_simple. It is due to C++ heap management and exceptions handling. Let’s try to see what happens to the size of the application if "C++" heap is replaced with “C” one without exceptions. You will have to override all the global C++ operators responsible for memory allocation/deallocation:
#include <cstdlib>
#include <new>

void* operator new(size_t size) noexcept
{
    return malloc(size);
}

void operator delete(void *p) noexcept
{
    free(p);
}

void* operator new[](size_t size) noexcept
{
    return operator new(size); // Same as regular new
}

void operator delete[](void *p) noexcept
{
    operator delete(p); // Same as regular delete
}

void* operator new(size_t size, std::nothrow_t) noexcept
{
    return operator new(size); // Same as regular new
}

void operator delete(void *p,  std::nothrow_t) noexcept
{
    operator delete(p); // Same as regular delete
}

void* operator new[](size_t size, std::nothrow_t) noexcept
{
    return operator new(size); // Same as regular new
}

void operator delete[](void *p,  std::nothrow_t) noexcept
{
    operator delete(p); // Same as regular delete
}
Please compile the test_cpp_vector application again, create its image and take a look at its size. It will be much closer to the size of the test_cpp_simple image. In fact, you may not even need majority of the system call functions you have implemented before. Try to remove them one by one and see whether linker still reports “undefined reference” to these symbols.
CONCLUSION: Usage of C++ heap brings a significant code size overhead.
It is a good practice to override implementation of new and delete operators
with usage of malloc and free when using C++ in bare metal development.
Note that in this case, if memory allocation fails
nullptr will be returned
instead of throwing
std::bad_alloc exception,
so beware of third party C++ libraries that count on exception been thrown and
do not check the returned value form
operator new.
Excluding Usage of Dynamic Memory
The dynamic memory allocation is a core part of conventional C++. However, in
some bare-metal products the usage of dynamic memory may be problematic and/or
forbidden. The only way (I know of) to make to compilation fail, if dynamic
memory is used, is to exclude standard library altogether. With gcc compiler
it is achieved by using -nostdlib compilation option.
Excluding standard library from the compilation will remove the whole C++ run-time environment, which includes dynamic memory (heap) management and exception handling. The implication of using this compilation option will be described later in Removing Standard Library and C++ Runtime.
Exceptions
Exception handling is also a core feature of the conventional C++. However, this feature is considered to be too dangerous, because of unpredictable code execution time and too expensive (in terms of code size) for bare metal platforms. The usage of single throw statement in the source code will result in more than 120KB of extra binary code in the final binary image. Just try it yourself with your compiler and see the difference in size of the produced binary images.
It is possible to forbid usage of throw statements by providing certain options
to the compiler. For GNU compiler (gcc) please use -fno-exceptions
in conjunction with -fno-unwind-tables options. According to
this page
of gcc manual, all the throw statements are supposed to be replaced with call
to abort(). Unfortunately this information seems to be outdated. The behaviour
I see with my latest (at the moment of writing) gcc version 4.8 is a bit different.
When the compilation is performed with the options specified above and there is
a throw statement in the code (for example throw std::runtime_error("Some error")),
the compilation fails with error message:
main.cpp:34:42: error: exception handling disabled, use -fexceptions to enable
     throw std::runtime_error("Some error");
However, all the throw statements from standard library are compiled in and
cause the whole exception handling support code overhead to be included in the
final binary image, despite the compilation options forbidding the exceptions.
The test application
test_cpp_exceptions
has simple code that causes the exceptions to be thrown:
std::vector<int> v;
v.at(100) = 0;
The generated code of the main function looks like this:
00015f60 <main>:
   15f60:	e92d4008 	push	{r3, lr}
   15f64:	e59f0000 	ldr	r0, [pc]	; 15f6c <main+0xc>
   15f68:	eb0000a8 	bl	16210 <_ZSt20__throw_out_of_rangePKc>
   15f6c:	00013868 	andeq	r3, r1, r8, ror #16
We also can see there are multiple exception related functions in the produced
listing, such as __cxa_allocate_exception, __cxa_throw, _ZSt20__throw_out_of_rangePKc,
_ZSt21__throw_bad_exceptionv, etc… The size of the binary image will also
be huge (about 125KB) due to exceptions handling.
If you would like to use STL classes that may throw exceptions, such as
std::string, std::vector, but refuse to pay the expensive price of extra
code space for exceptions handling, you’ll have to do two things. First, make
sure that exception conditions never occur in your code run, i.e.
if throw statement is about to get executed, it means there is a bug in your
code. Second, override the definition of all the "__throw_*" functions the
compiler tries to use. In order to identify all these functions you’ll have to
temporarily disable usage of standard library by passing -nostdlib compilation
option to your gcc compiler. For the code example above the compilation
without standard library will fail with error message:
main.cpp.o: In function `main':
main.cpp:(.text.startup+0x8): undefined reference to `std::__throw_out_of_range(char const*)'
collect2: error: ld returned 1 exit status
Let’s try to override std::__throw_out_of_range(char const*):
namespace std
{

void __throw_out_of_range(char const*)
{
    while (true) {}
}

}
This time the compilation will succeed. Let’s now compile the result code with
standard library included (without using -nostdlib option) and check the
binary image size. With my compiler the size is 1.3KB, which is much much better
than 120KB when exception handling is used.
CONCLUSION: Excluding exception handling support is a well known and
widely used practice in C++ bare metal development. Even when relevant
compilation options are used (-fno-exceptions and -fno-unwind-tables in GNU compiler),
there is still a need to override various __throw_* functions used by the
compiler and provided by the standard library.
RTTI
Run Time Type Information is also one of the core features of conventional C++. It allows retrieval of the object type information (using typeid operator) as well as checking the inheritance hierarchy (using dynamic_cast) at run time. The RTTI is available only when there is a polymorphic behaviour, i.e. the classes have at least one virtual function.
Let’s try to analyse the generated code when RTTI is in use. The test_cpp_rtti application in embxx_on_rpi project contains the code listed below.
struct SomeClass
{
    virtual void someFunc();
};
Somewhere in *.cpp file:
void SomeClass::someFunc()
{
}
Somewhere in main function:
SomeClass someClass;
someClass.someFunc();
Let’s open the listing file and see what’s going on in there.
The address of SomeClass::someFunc() seems to be 0x8300:
00008300 <_ZN9SomeClass8someFuncEv>:
    8300:	e12fff1e 	bx	lr
The virtual table for SomeClass class must be somewhere in .rodata section and contain
address of SomeClass::someFunc(), i.e. it must have 0x8300 value inside:
Disassembly of section .rodata:

...
00009c10 <_ZTV9SomeClass>:
    9c10:	00000000 	andeq	r0, r0, r0
    9c14:	00009c04 	andeq	r9, r0, r4, lsl #24
    9c18:	00008300 	andeq	r8, r0, r0, lsl #6
    9c1c:	00000000 	andeq	r0, r0, r0
It is visible that compiler added some more entries to the virtual table in addition to the
single virtual function we implemented. The address 0x9c04 is also located in
.rodata section. It is some type related table:
00009c04 <_ZTI9SomeClass>:
    9c04:	00009c28 	andeq	r9, r0, r8, lsr #24
    9c08:	00009bf8 	strdeq	r9, [r0], -r8
    9c0c:	00000000 	andeq	r0, r0, r0
Both 0x9c28 and 0x9bf8 are addresses in .rodata* section(s).
The 0x9bf8 address seems to contain some data:
00009bf8 <_ZTS9SomeClass>:
    9bf8:	6d6f5339 	stclvs	3, cr5, [pc, #-228]!	; 9b1c <strcmp+0x180>
    9bfc:	616c4365 	cmnvs	ip, r5, ror #6
    9c00:	00007373 	andeq	r7, r0, r3, ror r3
After a closer look we may decode this data to be 9SomeClass ascii string.
Address 0x9c28 is in the middle of some type related information table:
00009c20 <_ZTVN10__cxxabiv117__class_type_infoE>:
    9c20:	00000000 	andeq	r0, r0, r0
    9c24:	00009c50 	andeq	r9, r0, r0, asr ip
    9c28:	00009dc0 	andeq	r9, r0, r0, asr #27
    9c2c:	00009de4 	andeq	r9, r0, r4, ror #27
    9c30:	0000a114 	andeq	sl, r0, r4, lsl r1
    9c34:	0000a11c 	andeq	sl, r0, ip, lsl r1
    9c38:	00009e40 	andeq	r9, r0, r0, asr #28
    9c3c:	00009d48 	andeq	r9, r0, r8, asr #26
    9c40:	00009e10 	andeq	r9, r0, r0, lsl lr
    9c44:	00009e94 	muleq	r0, r4, lr
    9c48:	00009dac 	andeq	r9, r0, ip, lsr #27
    9c4c:	00000000 	andeq	r0, r0, r0
How these tables are used by the compiler is of little interest to us. What is interesting is a code size overhead. Lets check the size of the binary image. With my compiler it is a bit more than 13KB.
For some bare metal platforms it may be undesirable or even impossible to have this amount
of extra binary code added to the binary image. The GNU compiler (gcc) provides an ability
to disable RTTI by using -no-rtti option. Let’s check the virtual table of SomeClass
class when this option is used:
Disassembly of section .rodata:

00008320 <_ZTV9SomeClass>:
	...
    8328:	00008300 	andeq	r8, r0, r0, lsl #6
    832c:	00000000 	andeq	r0, r0, r0
The virtual table looks much simpler now with single pointer to the SomeClass::someFunc()
virtual function. There is no extra code size overhead needed to maintain type information.
If the application above is compiled without exceptions (using -fno-exceptions and
-fno-unwind-tables) as well as without RTTI support (using -no-rtti) the binary
image size will be about 1.3KB which is much better.
However, if -no-rtti option is used, the compiler won’t allow usage of
typeid operator as well as
dynamic_cast.
In this case the developer needs to come up with other solutions to differentiate
between objects of different types (but having the same 'ancestor') at run time.
There are multiple idioms that can be used, such as using simple C-like approach
of switch-ing on some type enumerator member, or using polymorphic behaviour
of the objects to perform
double dispatch.
CONCLUSION: Disabling Run Time Type Information (RTTI) in addition to eliminating exception handling is very common in bare metal C++ development. It allows to save about 10KB of space overhead in final binary image.
Removing Standard Library and C++ Runtime
Due to platform RAM/ROM limitations it may be required to exclude not just support for
exceptions and RTTI (compiling with -fno-exceptions -fno-unwind-tables -fno-rtti),
but for dynamic memory allocation too. The latter includes passing -nostdlib option to the compiler.
In case when standard library is excluded, there is no startup code help
provided by the compiler, the developer will have to implement all the startup stages:
-
updating the interrupt vector table
-
setting up correct stack pointers for all the modes of execution
-
zeroing
.bsssection -
calling initialisation functions for global objects
-
calling “main” function.
Here is an example of such startup code.
There also may be a need to provide an implementation of some functions or definition of some global symbols. For example, if std::copy algorithm is used to copy multiple objects from place to place, the compiler might decide to use memcpy function provided by the standard library, and as the result the build process will fail with “undefined reference” error. The same way, usage of std::fill algorithm may require memset function. Be ready to implement them when needed.
Another example is having call to std::bind function with std::placeholders::_1, std::placeholders::_2, etc. There will be a need to define these placeholders as global symbols:
#include <functional>
namespace std
{
namespace placeholders
{

decltype(std::placeholders::_1) _1;
decltype(std::placeholders::_2) _2;
decltype(std::placeholders::_3) _3;
decltype(std::placeholders::_4) _4;

}  // namespace placeholders
}  // namespace std
Even if there is a need for the standard library in the product being developed, it may be a good exercise as well as good debugging technique to temporarily exclude it from the compilation. The compilation will probably fail in the linking stage. The list of missing symbols and/or functions will provide a good indication of what missing functionality is provided by the library. The developer may notice that some components still require exceptions handling, for example, resulting int the binary image being too big.
Static Objects
Let’s analyse the code that initialises static objects. test_cpp_statics is a simple application that has two static objects, one is in the global scope, the other is in the function scope.
class SomeObj
{
public:
   static SomeObj& instanceGlobal();
   static SomeObj& instanceLocal();

private:
    SomeObj(int v1, int v2);
    int m_v1;
    int m_v2;

    static SomeObj globalObj;
};

SomeObj SomeObj::globalObj(1, 2);

SomeObj& SomeObj::instanceGlobal()
{
    return globalObj;
}

SomeObj& SomeObj::instanceLocal()
{
    static SomeObj localObj(3, 4);
    return localObj;
}

int main(int argc, const char** argv)
{
    static_cast<void>(argc);
    static_cast<void>(argv);

    auto& glob = SomeObj::instanceGlobal();
    auto& local = SomeObj::instanceLocal();
    static_cast<void>(glob);
    static_cast<void>(local);

    while (true) {};
    return 0;
}
Note, that compiler will try to inline the code above if implemented in the
same file. To properly analyse the code that initialises global variables,
you should put implementation of constructor and instanceGlobal()/instanceLocal()
functions into separate files. If -nostdlib option is passed to the compiler
to exclude linking with standard library, the compilation of the code above will
fail with following error:
main.cpp:(.text.startup+0x1c): undefined reference to `__cxa_guard_acquire'
main.cpp:(.text.startup+0x3c): undefined reference to `__cxa_guard_release'
It means that compiler attempts to make static variables initialisation thread-safe.
The get it compiled you have to either implement the locking functionality yourself or
allow compiler to do it in an unsafe way by adding -fno-threadsafe-statics compilation option.
I think it is quite safe to use this option in the bare-metal development if you make sure the
statics are not accessed in the interrupt context or have been initialised at the beginning
of main() function before any interrupts are enabled. To grab a reference to such object
without any use is enough:
    auto& local = SomeObj::instanceLocal();
    static_cast<void>(local);
Now, let’s analyse the initialisation of globalObj. The .init.array section contains
pointer to initialisation function _GLOBAL__sub_I__ZN7SomeObj9globalObjE.
Disassembly of section .init.array:
00008180 <__init_array_start>:
    8180:	00008154 	andeq	r8, r0, r4, asr r1
The initialisation function loads the address of the object and passes it to the constructor
of SomeObj together with the initialisation parameters (“1” and “2” integer values).
00008154 <_GLOBAL__sub_I__ZN7SomeObj9globalObjE>:
    8154:	e59f0008 	ldr	r0, [pc, #8]	; 8164 <_GLOBAL__sub_I__ZN7SomeObj9globalObjE+0x10>
    8158:	e3a01001 	mov	r1, #1
    815c:	e3a02002 	mov	r2, #2
    8160:	eaffffee 	b	8120 <_ZN7SomeObjC1Eii>
    8164:	00008168 	andeq	r8, r0, r8, ror #2

00008168 <_ZN7SomeObj9globalObjE>:
	...
The code above loads the address of the global object (0x00008168) into r0, and
initialisation parameters into r1 and r2, then invokes the constructor of SomeObj.
Please remember to call all the initialisation functions from .init.array section in
your startup code before calling the main() function.
In the linker file:
    .init.array :
    {
        __init_array_start = .;
        *(.init_array)
        *(.init_array.*)
        __init_array_end = .;
    } > RAM
In the startup code:
    ;@ Call constructors of all global objects
    ldr r0, =__init_array_start
    ldr r1, =__init_array_end

globals_init_loop:
    cmp     r0,r1
    it      lt
    ldrlt   r2, [r0], #4
    blxlt   r2
    blt     globals_init_loop

    ;@ Main function
    bl main
    b reset ;@ restart if main function returns
However, if standard library is NOT excluded explicitly from the compilation,
the __libc_init_array provided by the standard library may be used:
    ;@ Call constructors of all global objects
    bl	__libc_init_array

    ;@ Main function
    bl main
    b reset ;@ restart if main function returns
Let’s also perform analysis of initialisation of localObj in SomeObj::instanceLocal().
000080e4 <_ZN7SomeObj13instanceLocalEv>:
    80e4:	e92d4010 	push	{r4, lr}
    80e8:	e59f4028 	ldr	r4, [pc, #40]	; 8118 <_ZN7SomeObj13instanceLocalEv+0x34>
    80ec:	e5943008 	ldr	r3, [r4, #8]
    80f0:	e3130001 	tst	r3, #1
    80f4:	1a000005 	bne	8110 <_ZN7SomeObj13instanceLocalEv+0x2c>
    80f8:	e284000c 	add	r0, r4, #12
    80fc:	e3a01003 	mov	r1, #3
    8100:	e3a02004 	mov	r2, #4
    8104:	eb000005 	bl	8120 <_ZN7SomeObjC1Eii>
    8108:	e3a03001 	mov	r3, #1
    810c:	e5843008 	str	r3, [r4, #8]
    8110:	e59f0004 	ldr	r0, [pc, #4]	; 811c <_ZN7SomeObj13instanceLocalEv+0x38>
    8114:	e8bd8010 	pop	{r4, pc}
    8118:	00008168 	andeq	r8, r0, r8, ror #2
    811c:	00008174 	andeq	r8, r0, r4, ror r1
The code above loads the address of the flag that indicates that the object was already
initialised into r4, then loads the value into r3 and checks it using tst instruction.
If the flag indicates that the object wasn’t initialised, the constructor of the object is
called and the flag value is updated prior to returning address of the object. Note that
tst r3, #1 instruction performs binary AND between value r3 and integer value #1,
then next bne instruction performs branch if result is not 0, i.e. the object was already initialised.
CONCLUSION: Access to global objects are a bit cheaper than access to local static ones, because access to the latter involves a check whether the object was already initialised.
Custom Destructors
And what about destruction of static objects with non-trivial destructors? Let’s add a destructor to the above class and try to compile:
class SomeObj
{
public:
   ~SomeObj();
    …
}
Somewhere in *.cpp file:
SomeObj::~SomeObj() {}This time the compilation will fail with following errors:
CMakeFiles/03_test_statics.dir/SomeObj.cpp.o: In function `SomeObj::instanceLocal()':
SomeObj.cpp:(.text+0x44): undefined reference to `__aeabi_atexit'
SomeObj.cpp:(.text+0x58): undefined reference to `__dso_handle'
CMakeFiles/03_test_statics.dir/SomeObj.cpp.o: In function `_GLOBAL__sub_I__ZN7SomeObj9globalObjE':
SomeObj.cpp:(.text.startup+0x28): undefined reference to `__aeabi_atexit'
SomeObj.cpp:(.text.startup+0x34): undefined reference to `__dso_handle'
According to this
document, the __aeabi_atexit function is used to register pointer to the
destructor function together with pointer to the relevant static object to be
destructed after main function returns. The reason for this behaviour is that
these objects must be destructed in the opposite order to which they were
constructed. The compiler cannot know the exact construction order for local
static objects. There may even be some static objects are not constructed at all.
The __dso_handle is a global pointer to the current address where the next
{destructor_ptr, object_ptr} pair will be stored.
The main function of most bare metal applications is not supposed to return
and global/static objects will not be destructed. In this case it will be enough
to implement the required function the following way:
extern "C" int __aeabi_atexit(
    void *object,
    void (*destructor)(void *),
    void *dso_handle)
{
    static_cast<void>(object);
    static_cast<void>(destructor);
    static_cast<void>(dso_handle);
    return 0;
}

void* __dso_handle = nullptr;
However, if your main function returns and then the code jumps back to the
initialisation/reset routine, there is a need to properly perform destruction of
global/static objects. You’ll have to allocate enough space to store all the
necessary {destructor_ptr, object_ptr} pairs, then in __aeabi_atexit
function store the pair in the area pointed by __dso_handle, while incrementing
value of later. Note, that dso_handle parameter to the __aeabi_atexit function
is actually a pointer to the global __dso_handle value. Then, when the
main function returns, invoke the stored destructors in the opposite order
while passing addresses of the relevant objects as their first arguments.
To verify all the stated above let’s take a look again at the generated code of initialisation function (after the destructor was added):
00008170 <_GLOBAL__sub_I__ZN7SomeObj9globalObjE>:
    8170:	e92d4010 	push	{r4, lr}
    8174:	e59f4020 	ldr	r4, [pc, #32]	; 819c <_GLOBAL__sub_I__ZN7SomeObj9globalObjE+0x2c>
    8178:	e3a01001 	mov	r1, #1
    817c:	e1a00004 	mov	r0, r4
    8180:	e3a02002 	mov	r2, #2
    8184:	ebffffeb 	bl	8138 <_ZN7SomeObjC1Eii>
    8188:	e1a00004 	mov	r0, r4
    818c:	e59f100c 	ldr	r1, [pc, #12]	; 81a0 <_GLOBAL__sub_I__ZN7SomeObj9globalObjE+0x30>
    8190:	e59f200c 	ldr	r2, [pc, #12]	; 81a4 <_GLOBAL__sub_I__ZN7SomeObj9globalObjE+0x34>
    8194:	e8bd4010 	pop	{r4, lr}
    8198:	eaffffe9 	b	8144 <__aeabi_atexit>
    819c:	000081a8 	andeq	r8, r0, r8, lsr #3
    81a0:	00008140 	andeq	r8, r0, r0, asr #2
    81a4:	000081bc 			; <UNDEFINED> instruction: 0x000081bc

00008140 <_ZN7SomeObjD1Ev>:
    8140:	e12fff1e 	bx	lr

000081bc <__dso_handle>:
    81bc:	00000000 	andeq	r0, r0, r0
Indeed, the call to the constructor immediately followed by the call to
__aeabi_atexit with address of the object in r0 (first parameter),
address of the destructor in r1 (second parameter) and address of
__dso_handle in r2 (third parameter).
CONCLUSION: It is better to design the “main” function to contain infinite loop and never return to save the implementation of destructing global/static objects functionality.
Abstract Classes
The next thing to test is having abstract classes with pure virtual functions
while excluding linkage to standard library (using -nostdlib compilation option).
Below is an excerpt from
test_cpp_abstract_class
application.
class AbstractBase
{
public:
    virtual ~AbstractBase();
    virtual void func() = 0;
    virtual void nonOverridenFunc() final;
};

class Derived : public AbstractBase
{
public:
    virtual ~Derived();
    virtual void func() override;
};

AbstractBase::~AbstractBase()
{
}

void AbstractBase::nonOverridenFunc()
{
}

Derived::~Derived()
{
}

void Derived::func()
{
}
[source, c++]
Somewhere in the “main” function:
Derived obj;
AbstractBase* basePtr = &obj;
basePtr->func();
The compilation will fail with following errors:
CMakeFiles/04_test_abstract_class.dir/AbstractBase.cpp.o: In function `AbstractBase::~AbstractBase()':
AbstractBase.cpp:(.text+0x24): undefined reference to `operator delete(void*)'
CMakeFiles/04_test_abstract_class.dir/AbstractBase.cpp.o:(.rodata+0x10): undefined reference to `__cxa_pure_virtual'
CMakeFiles/04_test_abstract_class.dir/Derived.cpp.o: In function `Derived::~Derived()':
Derived.cpp:(.text+0x3c): undefined reference to `operator delete(void*)'
The __cxa_pure_virtual is a function, address of which compiler writes in the
virtual table when the function is pure virtual. It may be called due to some
unnatural pointer abuse or when trying to invoke pure virtual function in the
destructor of the abstract base class. The call to this function should never
happen in the normal application run. If it happens it means there is a bug.
It is quite safe to implement this function with infinite loop or some way to
report the error to the developer, by flashing leds for example.
extern "C" void __cxa_pure_virtual()
{
    while (true) {}
}
The requirement for operator delete(void*) is quite strange though, there is no dynamic
memory allocation in the source code. It has to be investigated. Let’s stub the
function and check the output of the compiler:
void operator delete(void *)
{
}
The virtual tables for the classes reside in .rodata section:
Disassembly of section .rodata:

000081a0 <_ZTV12AbstractBase>:
	...
    81a8:	000080d8 	ldrdeq	r8, [r0], -r8	; <UNPREDICTABLE>
    81ac:	000080ec 	andeq	r8, r0, ip, ror #1
    81b0:	0000815c 	andeq	r8, r0, ip, asr r1
    81b4:	000080e8 	andeq	r8, r0, r8, ror #1

000081b8 <_ZTV7Derived>:
	...
    81c0:	00008110 	andeq	r8, r0, r0, lsl r1
    81c4:	00008130 	andeq	r8, r0, r0, lsr r1
    81c8:	0000810c 	andeq	r8, r0, ip, lsl #2
    81cc:	000080e8 	andeq	r8, r0, r8, ror #1
The last entry for both classes has the address of AbstractBase::nonOverridenFunc function:
000080e8 <_ZN12AbstractBase16nonOverridenFuncEv>:
    80e8:	e12fff1e 	bx	lr
The third entry in the virtual table of Derived class has the address of
Derived::func function, while the third entry in the virtual table of
AbstractBase class has the address of __cxa_pure_virtual,
just like expected.
0000810c <_ZN7Derived4funcEv>:
    810c:	e12fff1e 	bx	lr

0000815c <__cxa_pure_virtual>:
    815c:	eafffffe 	b	815c <__cxa_pure_virtual>
The first two entries in the virtual tables point to two different
implementations of the destructor. The first entry has the address of normal
destructor implementation, and the second one has an address of the second
destructor implementation, that invokes operator delete
(has _ZdlPv symbol) after the destruction of the object:
000080d8 <_ZN12AbstractBaseD1Ev>:
    80d8:	e59f3004 	ldr	r3, [pc, #4]	; 80e4 <_ZN12AbstractBaseD1Ev+0xc>
    80dc:	e5803000 	str	r3, [r0]
    80e0:	e12fff1e 	bx	lr
    80e4:	000081a8 	andeq	r8, r0, r8, lsr #3

000080ec <_ZN12AbstractBaseD0Ev>:
    80ec:	e59f3014 	ldr	r3, [pc, #20]	; 8108 <_ZN12AbstractBaseD0Ev+0x1c>
    80f0:	e92d4010 	push	{r4, lr}
    80f4:	e1a04000 	mov	r4, r0
    80f8:	e5803000 	str	r3, [r0]
    80fc:	eb000015 	bl	8158 <_ZdlPv>
    8100:	e1a00004 	mov	r0, r4
    8104:	e8bd8010 	pop	{r4, pc}
    8108:	000081a8 	andeq	r8, r0, r8, lsr #3

00008110 <_ZN7DerivedD1Ev>:
    8110:	e59f3014 	ldr	r3, [pc, #20]	; 812c <_ZN7DerivedD1Ev+0x1c>
    8114:	e92d4010 	push	{r4, lr}
    8118:	e1a04000 	mov	r4, r0
    811c:	e5803000 	str	r3, [r0]
    8120:	ebffffec 	bl	80d8 <_ZN12AbstractBaseD1Ev>
    8124:	e1a00004 	mov	r0, r4
    8128:	e8bd8010 	pop	{r4, pc}
    812c:	000081c0 	andeq	r8, r0, r0, asr #3

00008130 <_ZN7DerivedD0Ev>:
    8130:	e59f301c 	ldr	r3, [pc, #28]	; 8154 <_ZN7DerivedD0Ev+0x24>
    8134:	e92d4010 	push	{r4, lr}
    8138:	e1a04000 	mov	r4, r0
    813c:	e5803000 	str	r3, [r0]
    8140:	ebffffe4 	bl	80d8 <_ZN12AbstractBaseD1Ev>
    8144:	e1a00004 	mov	r0, r4
    8148:	eb000002 	bl	8158 <_ZdlPv>
    814c:	e1a00004 	mov	r0, r4
    8150:	e8bd8010 	pop	{r4, pc}
    8154:	000081c0 	andeq	r8, r0, r0, asr #3

00008158 <_ZdlPv>:
    8158:	e12fff1e 	bx	lr
It seems that when there is a virtual destructor, the compiler will have to
support direct invocation of the destructor as well as usage of operator delete.
In case of the former the compiler will use the first entry in the virtual table
for the destructor invocation, and in case of the latter the compiler will use
the second entry. Let’s try to add the following lines to our main function:
basePtr->~AbstractBase();
delete basePtr;
The compiler will add the following instructions to the main function:
    8190:	e59d3004 	ldr	r3, [sp, #4]
    8194:	e1a00004 	mov	r0, r4
    8198:	e5933000 	ldr	r3, [r3]
    819c:	e12fff33 	blx	r3
    81a0:	e59d3004 	ldr	r3, [sp, #4]
    81a4:	e1a00004 	mov	r0, r4
    81a8:	e5933004 	ldr	r3, [r3, #4]
    81ac:	e12fff33 	blx	r3
The address of the virtual table is written into r3, then value of r3
is overwritten with address of the destructor function to call, and the call is
executed using blx instruction. The first invocation takes the address of
destructor function from the first entry of virtual table, while the second
invocation takes the address from second entry (offseted by #4).
This is just like expected.
CONCLUSION: Having virtual destructor may require an implementation of
operator delete(void*) even if there is no dynamic memory allocation.
Templates
Templates are notorious for the code bloating they produce. Some organisations explicitly forbid usage of templates in their internal C++ coding standards. However, templates is a very powerful tool, it is very difficult (if not impossible) to write generic source code, that can be reused in multiple independent projects/platforms without using templates, and without incurring any significant performance penalties. I think developers, who are afraid or not allowed to use templates, will have to implement the same concepts/modules over and over again with minor differences, which are project/platform specific. To properly master the templates we have to see the Assembler code duplication, that is generated by the compiler when templates are used. Let’s try to compile a simple application test_cpp_templates that uses templated function with different type of input parameters:
template <typename T>
void func(T startValue)
{
    for (volatile T i = startValue; i < startValue * 2; i += 1) {}
    for (volatile T i = startValue; i < startValue * 2; i += 2) {}
    for (volatile T i = startValue; i < startValue * 2; i += 3) {}
    for (volatile T i = startValue; i < startValue * 2; i += 4) {}
    for (volatile T i = startValue; i < startValue * 2; i += 5) {}
    for (volatile T i = startValue; i < startValue * 2; i += 6) {}
}

int main(int argc, const char** argv)
{
    static_cast<void>(argc);
    static_cast<void>(argv);

    int start1 = 100;
    unsigned start2 = 200;

    func(start1);
    func(start2);

    while (true) {};
    return 0;
}
You may notice that function func is called with two parameters, one of type
int the other of type unsigned. These types have both the same size and
should generate more or less identical code. Let’s take a look at the generated
code of main function:
00008504 <main>:
    8504:	e92d4008 	push	{r3, lr}
    8508:	e3a00064 	mov	r0, #100	; 0x64
    850c:	ebfffefc 	bl	8104 <_Z4funcIiEvT_>
    8510:	e3a000c8 	mov	r0, #200	; 0xc8
    8514:	ebffff3a 	bl	8204 <_Z4funcIjEvT_>
    ...
Yes, indeed, there are two calls to two different functions. However, the assembler code of these functions is almost identical. Let’s also try to reuse the same function with the same types but from different source file:
void other()
{
    int start1 = 300;
    unsigned start2 = 500;

    func(start1);
    func(start2);
}
The generated code is:
000080d8 <_Z5otherv>:
    80d8:	e92d4008 	push	{r3, lr}
    80dc:	e3a00f4b 	mov	r0, #300	; 0x12c
    80e0:	eb000007 	bl	8104 <_Z4funcIiEvT_>
    80e4:	e3a00f7d 	mov	r0, #500	; 0x1f4
    80e8:	eb000045 	bl	8204 <_Z4funcIjEvT_>
    80ec:	e8bd8008 	pop	{r3, pc}
We see that the same functions at the same addresses are called, i. e. the linker does its job of removing duplicates of the same functions from different object files.
Let’s also try to wrap the same function with a class and add one more template argument:
template <typename T, std::size_t TDummy>
struct SomeTemplateClass
{
    static void func(T startValue)
    {
        for (volatile T i = startValue; i < startValue * 2; i += 1) {}
        for (volatile T i = startValue; i < startValue * 2; i += 2) {}
        for (volatile T i = startValue; i < startValue * 2; i += 3) {}
        for (volatile T i = startValue; i < startValue * 2; i += 4) {}
        for (volatile T i = startValue; i < startValue * 2; i += 5) {}
        for (volatile T i = startValue; i < startValue * 2; i += 6) {}
    }
};
Please note the dummy template parameter TDummy that is not used. Now, we
add two more calls to the main function:
int main(int argc, const char** argv)
{
    ...
    SomeTemplateClass<int, 5>::func(500);
    SomeTemplateClass<int, 10>::func(500);

    while (true) {};
    return 0;
}
Note, that the functionality of the calls is identical. The only difference is the dummy template argument. Let’s take a look at the generated code:
00008504 <main>:
    ...
    8518:	e3a00f7d 	mov	r0, #500	; 0x1f4
    851c:	ebffff78 	bl	8304 <_ZN17SomeTemplateClassIiLj5EE4funcEi>
    8520:	e3a00f7d 	mov	r0, #500	; 0x1f4
    8524:	ebffffb6 	bl	8404 <_ZN17SomeTemplateClassIiLj10EE4funcEi>
    8528:	eafffffe 	b	8528 <main+0x24>
The compiler generated calls to two different functions, binary code of which is identical.
CONCLUSION: The templates indeed require extra care and consideration. It is also important not to overthink things. The well known notion of “Do not do premature optimisations. It is much easier to make correct code faster, than fast code correct.” is also applicable to code size. Do not try to optimise your template code before the need arises. Make it work and work correctly first.
Tag Dispatching
The tag dispatching is a widely used idiom in C++ development. It used extensively in the following chapters of this book.
Let’s try to compile test_cpp_tag_dispatch application in embxx_on_rpi project and take a look at the code generated by the compiler.
struct Tag1 {};
struct Tag2 {};

class Dispatcher
{
public:

    template <typename TTag>
    static void func()
    {
        funcInternal(TTag());
    }

private:
    static void funcInternal(Tag1 tag);
    static void funcInternal(Tag2 tag);

};
Somewhere in the main function:
Dispatcher::func<Tag1>();
Dispatcher::func<Tag2>();
The code generated by the compiler looks like this:
000080fc <main>:
    80fc:	e92d4008 	push	{r3, lr}
    8100:	e3a00000 	mov	r0, #0
    8104:	ebfffff3 	bl	80d8 <_ZN10Dispatcher12funcInternalE4Tag1>
    8108:	e3a00000 	mov	r0, #0
    810c:	ebfffff2 	bl	80dc <_ZN10Dispatcher12funcInternalE4Tag2>
    ...
Although the Tag1 and Tag2 are empty classes, the compiler still uses
integer value 0 as a first parameter to the function.
Let’s try to optimise this redundant mov r0, #0 instruction away by making
it visible to the compiler that the tag parameter is not used:
class Dispatcher
{
public:

    template <typename TTag>
    static void otherFunc()
    {
        otherFuncInternal(TTag());
    }

private:

    static void otherFuncInternal(Tag1 tag)
    {
        static_cast<void>(tag);
        otherFuncTag1();
    }

    static void otherFuncInternal(Tag2 tag)
    {
        static_cast<void>(tag);
        otherFuncTag2();
    }


    static void otherFuncTag1();
    static void otherFuncTag2();
};
Somewhere in the main function:
Dispatcher::otherFunc<Tag1>();
Dispatcher::otherFunc<Tag2>();
The code generated by the compiler looks like this:
000080fc <main>:
    ...
    8110:	ebfffff2 	bl	80e0 <_ZN10Dispatcher13otherFuncTag1Ev>
    8114:	ebfffff2 	bl	80e4 <_ZN10Dispatcher13otherFuncTag2Ev>
In this case the compiler optimises away the tag parameter.
Based on the above we may make a CONCLUSION: When the tag dispatching idiom is used, the function that receives a dummy (tag) parameter should be a simple inline wrapper around other function that implements the required functionality. In this case the compiler will optimise away the creation of tag object and will call the wrapped function directly.
Basic Needs
Prior to describing various embedded (bare metal) development concepts I’d like to cover several basic needs that, I think, most developers will have to use in their products.
Assertion
One of the basic needs during the development is having an ability to test various assumptions
and invariants in runtime when compiling the application in DEBUG mode and remove the checks
when compiling the application in RELEASE mode. The standard C++ reuses assert() macro from
standard C library.
#include <cassert>
…
assert(some_condition);
The assert() macro evaluates to nothing in case NDEBUG symbol is defined, otherwise it
evaluates the condition. If the condition doesn’t return true, it calls the
__assert_fail function, provided by standard library, which in turn calls printf
to print error message to standard output followed by the call to abort function,
which is supposed to terminate an application.
Both printf and abort functions are provided by standard library. However, printf
will require the implementation of _write function to print characters to the debug
output terminal, and abort will require implementation of _exit function to
terminate the application.
If standard library is excluded from the compilation (using -nostdlib compilation option),
the compilation will fail with undefined reference to __assert_func error message.
The developer will have to implement this function with correct signature. To retrieve
the correct signature you will have to open assert.h standard header provided by your
compiler. It will be something like this:
void __assert_fail (const char *expr, const char *file, unsigned int line, const char *function) __attribute__ ((__noreturn__));The attribute specifies that this function doesn’t return, so the compiler will generate a call to it without setting any address to return to.
The conclusion from all the stated above is that using standard assert() macro is possible,
but somewhat inflexible. It is possible to access only global variables from the functions
described above, i.e. if there is a need to flash a led to indicate assertion failure, then its
control must be accessible through global variables, which is a bit ugly. Another disadvantage
of this approach is that there are no convenient means to change the behaviour of the assert
failure functionality and after a while restore the original behaviour. Such behaviour may be
helpful to better identify the location of the assert that has failed. For example, override
the default assert failure behaviour with activating a specific led at the entrance of some
function, and restore the original assertion failure behaviour when function returns.
Below is a short description of a better way to handle assert checks and failures. The code is in embxx library and can be reviewed here.
To resolve the problems described above and to handle the assertions C++ way we will have to create generic assertion failure handling abstract class:
class Assert
{
public:
    virtual void fail(
        const char* expr,
        const char* file,
        unsigned int line,
        const char* function) = 0;
};
When implementing custom project specific assertion failure behaviour inherit from the class above:
#include "embxx/util/Assert.h"

typedef ... Led;
class LedOnAssert : public embxx::util::Assert
{
public:

    LedOnAssert(Led& led)
        : led_(led)
    {
    }

    virtual void fail(
        const char* expr,
        const char* file,
        unsigned int line,
        const char* function)
    {
        led_.on();
        while (true) {;}
    }

private:
    Led& led_;
};
To manage an object of the class above, we will have to create a singleton class with static instance. It will store a pointer to the currently registered assertion failure behaviour:
class AssertManager
{
public:
   static AssertManager& instance()
    {
        static AssertManager mgr;
        return mgr;
    }

    Assert* reset(Assert* newAssert = nullptr)
    {
        auto prevAssert = assert_;
        assert_ = newAssert;
        return prevAssert;
    }

    Assert* getAssert()
    {
        return assert_;
    }

    bool hasAssertRegistered() const
    {
        return assert_ != nullptr;
    }

    void infiniteLoop()
    {
        while (true) {};
    }

private:
    AssertManager() : assert_(nullptr) {}

    Assert* assert_;
};
The reset member function registers new object that manages assertion failure behaviour and
returns previous one, which can be used later to restore original behaviour.
We will require a new macro to check assertion condition and invoke registered failing behaviour:
#ifndef NDEBUG

#define GASSERT(expr) \
    ((expr)                               \
      ? static_cast<void>(0)                     \
      : (embxx::util::AssertManager::instance().hasAssertRegistered() \
            ? embxx::util::AssertManager::instance().getAssert()->fail( \
                #expr, __FILE__, __LINE__, GASSERT_FUNCTION_STR) \
            : embxx::util::AssertManager::instance().infiniteLoop()))

#else // #ifndef NDEBUG

#define GASSERT(expr) static_cast<void>(0)

#endif // #ifndef NDEBUG
Then in case of condition check failure, the GASSERT() macro checks whether any custom assertion
failure functionality registered and invokes its virtual fail function. If not, then infinite
loop is executed.
To complete the whole picture we have to provide a convenient way to register new assertion failure behaviours:
template < typename TAssert>
class EnableAssert
{
    static_assert(std::is_base_of<Assert, TAssert>::value,
        "TAssert class must be derived class of Assert");
public:
    typedef TAssert AssertType;

    template<typename... Params>
    EnableAssert(Params&&... args)
        : assert_(std::forward<Params>(args)...),
          prevAssert_(AssertManager::instance().reset(&assert_))
    {
    }

    ~EnableAssert()
    {
        AssertManager::instance().reset(prevAssert_);
    }

private:
    AssertType assert_;
    Assert* prevAssert_;
};
From now on, all we have do is to instantiate object of EnableAssert with the behaviour that
we want. Note that constructor of EnableAssert class can receive any number of parameters and
forwards them to the constructor of the internal assert_ object.
int main (int argc, const char* argv[])
{
    ...
    Led led;
    embxx::util::EnableAssert<LedOnAssert> assertion(led);

    ... // Rest of the code
}
If there is a need to temporarily override the previous assertion failure behaviour, just create
another EnableAssert object. Once the latter is out of scope (the object is destructed), previous
behaviour will be restored.
int main (int argc, const char* argv[])
{
    ...
    Led led;
    embxx::util::EnableAssert<LedOnAssert> assertion(led);

    ...
    {
        embxx::util::EnableAssert<OtherAssert> otherAssertion(.../* some params */);
        ...
    }  // restore previous registered behaviour – LedOnAssert.
}SUMMARY: The approach described above provides a flexible and convenient way to control how the
failures of various debug mode checks are reported to the developer. All the modules in
embxx library use the GASSERT() macro to verify their pre- and
post-conditions as well as internal assumptions.
Callback
As has been mentioned in the Benefits of C++ chapter, the main reason for choosing C++ over C is code reuse. When having some generic piece of code that tries to use platform specific code and needs to receive some kind of notifications from the latter, the need for some generic callback facility arises. C++ provides std::function class for this purpose, it is possible to provide any callable object, such as lambda function or std::bind expression:
class LowLevelPeripheral {
public:
    template <typename TFunc>
    void setEventCallback(TFunc&& func)
    {
        eventCallback_ = std::forward<TFunc>(func);
    }

    void eventHandler()
    {
        if (eventCallback_) {
            eventCallback_(); // invoke registered callback object
        }
    }
private:
    std::function<void ()> eventCallback_;
};

class SomeGenericControl
{
public:
    SomeGenericControl()
    {
        periph_.setEventCallback(
            std::bind(&SomeGenericControl::eventCallbackHandler, this));
    }

    void eventCallbackHandler()
    {
        … // Handle the reported event.
    }

private:
     LowLevelPeripheral periph_;
};
There are two problems with using std::function.
It uses dynamic memory allocation and throws exception in case the function is invoked without
assigning callable object to it first. As a result
std::function may be not suitable for use in
most of the bare metal projects. We will have to implement something similar, but without dynamic memory
allocations and without exceptions. Below is some short explanation of how to implement such a function
class. The implementation of the StaticFunction class is part of
embxx library and its full code listing can be viewed
here.
The restriction of inability to use dynamic memory allocation requires to use additional parameter of storage size:
template <typename TSignature, std::size_t TSize = sizeof(void*) * 3>
class StaticFunction;
It seems that in most cases the callback object will contain pointer to member function, pointer to handling object and some additional single parameter. This is the reason for specifying the default storage space as equal to the size of 3 pointers. The “signature” template parameter is exactly the same as with std::function plus an optional storage area size template parameter:
typedef embxx::util::StaticFunction<void (int)> MyCallback;
typedef embxx::util::StaticFunction<
    void (int, int), sizeof(void*) * 4> MyOtherCallback;
To properly implement operator(), there is a need to split the signature into the return type and
rest of parameters. To achieve this the following template specialisation trick is used:
template <std::size_t TSize, typename TRet, typename... TArgs>
class StaticFunction<TRet (TArgs...), TSize>
{
public:
    ...
    TRet operator()(TArgs... args) const {...}
    ...
private:
    typedef … StorageType; // Type of the storage area,
                           // will be explained later.
    StorageType handler_; // Storage area where the callback object
                          // is stored
    bool valid_; // flag indicating whether storage are contains
                 // valid callback, initialised to false in
                 // default constructor
};
The StaticFunction object needs an ability to store any type of callable object as its internal
data member and then invoke it in its operator() member function. To support this functionality we
will require additional helper classes:
class StaticFunction<TRet (TArgs...), TSize>
{
    ...
private:

    class Invoker
    {
    public:
        virtual ~Invoker() {}

        // virtual invocation function
        virtual TRet exec(TArgs... args) const = 0;
    };


    template <typename TBound>
    class InvokerBound : public Invoker
    {
    public:

        template <typename TFunc>
        InvokerBound(TFunc&& func)
            : func_(std::forward<TFunc>(func))
        {
        }

        virtual ~InvokerBound() {}

        virtual TRet exec(TArgs... args) const
        {
            return func_(std::forward<TArgs>(args)...);
        }

    private:
        TBound func_;
    };

    ...
};
The callable object that will be stored in handler_ data area and it will be of type
InvokerBound<…> while invoked through interface of its base class Invoker.
There is a need to properly define StorageType for the handler_ data member:
static const std::size_t StorageAreaSize = TSize + sizeof(Invoker);
typedef typename
    std::aligned_storage<
        StorageAreaSize,
        std::alignment_of<Invoker>::value
   >::type StorageType;
Note that StorageType is an uninitialised storage with alignment required to be able to store
object of type Invoker. The InvokerBound<…> class will have the same alignment requirements
as its base class Invoker, so it is safe to store any object of type InvokerBound<…> in the
same area, as long as its size doesn’t exceed the size of the StorageType.
Also note that the actual size of the storage area is the requested TSize plus the area required
to store the object of Invoker class. The size of InvokerBound<…> object is size of its private
member plus the size of its base class Invoker, which will contain a single (hidden) pointer to
its virtual table.
Any callable object may be assigned to StaticFunction using either constructor or assignment
operator:
template <std::size_t TSize, typename TRet, typename... TArgs>
class StaticFunction<TRet (TArgs...), TSize>
{
public:
    ...

    template <typename TFunc>
    StaticFunction(TFunc&& func)
        : valid_(true)
    {
        assignHandler(std::forward<TFunc>(func));
    }

    StaticFunction& operator=(TFunc&& func)
    {
        destroyHandler();
        assignHandler(std::forward<TFunc>(func));
        valid_ = true;
        return *this;
    }

    ...

private:
    template <typename TFunc>
    void assignHandler(TFunc&& func)
    {
        typedef typename std::decay<TFunc>::type DecayedFuncType;
        typedef InvokerBound<DecayedFuncType> InvokerBoundType;

        static_assert(sizeof(InvokerBoundType) <= StorageAreaSize,
            "Increase the TSize template argument of the StaticFucntion");

        static_assert(alignof(Invoker) == alignof(InvokerBoundType),
            "Alignment requirement for Invoker object must be the same "
            "as alignment requirement for InvokerBoundType type object");

        new (&handler_) InvokerBoundType(std::forward<TFunc>(func));
    }

    void destroyHandler()
    {
        if (valid_) {
            auto invoker = reinterpret_cast<Invoker*>(&handler_);
            invoker->~Invoker();
        }
    }
};
Please pay attention that assignment operator has to call the destructor of previous function, that was assigned to it, before storing a new callable object in its place.
Also note that there are compile time checks using static_assert that the size of the object to store in the storage area doesn’t exceed the allocated size as well as alignment requirements still hold.
The invocation of the function will be implemented like this:
template <std::size_t TSize, typename TRet, typename... TArgs>
class StaticFunction<TRet (TArgs...), TSize>
{
public:
    ...
    TRet operator()(TArgs... args) const
    {
        GASSERT(valid_);
        auto invoker = reinterpret_cast<Invoker*>(&handler_);
        return invoker->exec(std::forward<TArgs>(args)...);
    }
    ...
};
Note that there are no exceptions in use and then the “must have” pre-condition for function invocation is that a valid callable object has been assigned to it. That is the reason for assertion check in the body of the function.
To complete the implementation of StaticFunction class the following logic must also be implemented:
-
Check whether the
StaticFunctionobject is valid, i.e has any callable object assigned to it. -
Default construction - the function is invalid and cannot be invoked.
-
Copy/move construction + copy/move assignment functionality.
-
Clearing the function (invalidating).
-
Supporting both const and non-const
operator()in the assigned callable object. It requires both const and non-constoperator()implementation ofStaticFunctionas well as its internalInvokerandInvokerBound<…>classes.
All this I leave as an exercise to to the reader. To see the complete implementation of the functionality described above open this link.
Data Serialisation
Another essential need in embedded development is an ability to serialise data. Most embedded products read data from some kind of sensors and/or communicate with the control centre via some wired or wireless serial interface.
Before data is sent via a communication link, it must be serialised into a buffer, and when received, deserialised from bytes also in a different buffer on the other end. The data may be serialised using big or little endian, based on the communication protocol used. The embxx library provides a generic code with an ability to read and write integral values from/to any buffer. Here is the source code for the functions described below.
The functions below (defined in namespace embxx::io) support read and write of an integral
value using any type of iterator:
template <typename T, typename TIter>
void writeBig(T value, TIter& iter);

template <typename T, typename TIter>
T readBig(TIter& iter);

template <typename T, typename TIter>
void writeLittle(T value, TIter& iter);

template <typename T, typename TIter>
T readLittle(TIter& iter);
These functions receive reference to iterator of a buffer/container. When bytes are read/written
from/to the buffer, the iterator is incremented. The iterator can be of any type as long as it
supports dereferencing (operator*()), pre-increment (operator++) and assignment to dereferenced
object. For example, serialising several values of various lengths into the array using big endian:
std::uint8_t buf[128];
auto iter = &buf[0];

std::uint16_t value1 = 0x0102;
std::uint32_t value2 = 0x03040506;
std::uint64_t value3 = 0x0708090a0b0c0d0e;

embxx::io::writeBig(value1, iter);
embxx::io::writeBig(value2, iter);
embxx::io::writeBig(value3, iter);
The contents of the buffer will be:
{0x01, 0x02, 0x03, 0x04, 0x05, 0x06, 0x07, 0x08, 0x09, 0x0a, 0x0b, 0x0c 0x0d, 0x0e, …}
Similar code of reading values from the buffer would be:
std::uint8_t buf[128];
auto iter = &buf[0];

auto value1 = embxx::io::readBig<std::uint16_t>(iter);
auto value2 = embxx::io::readBig<std::uint32_t>(iter);
auto value3 = embxx::io::readBig<std::uint64_t>(iter);
Another example is serialising data into a container that has push_back() member functions,
such as std::vector or circular buffer.
The data will be added at the end of the existing one:
std::vector<std::uint8_t> buf;
auto iter = std::back_inserter(buf); // Will call push_back
                                     // on assignment
…
// The writes below will use push_back for every byte.
embxx::io::writeBig(value1, iter);
embxx::io::writeBig(value2, iter);
embxx::io::writeBig(value3, iter);
Depending on a communication protocol there may be a need to serialise only part of the value.
For example some field of communication protocol is defined having only 3 bytes. In this case
the value will probably be stored in a variable of std::uint32_t type. There is similar set of
functions, but with additional template parameter that specifies how many bytes to read/write:
template <std::size_t TSize, typename T, typename TIter>
void writeBig(T value, TIter& iter);

template <typename T, std::size_t TSize, typename TIter>
T readBig(TIter& iter);

template <std::size_t TSize, typename T, typename TIter>
void writeLittle(T value, TIter& iter);

template <typename T, std::size_t TSize, typename TIter>
T readLittle(TIter& iter);
So to read/write 3 bytes will look like the following:
auto value = embxx::io::readBig<std::uint32_t, 3>(iter);
embxx::io::writeBig<3>(value, iter);
Sometimes the endianness of data serialisation may depend on some traits class parameters. In order to be able to choose “Little” or “Big” variant functions at compile time instead of runtime the tag parameter dispatch idiom must be used.
There are similar read/write functions, but instead of being differentiated by name they have additional tag parameter to specify the endianness of serialisation:
/// Same as writeBig<T, TIter>(value, iter);
template <typename T, typename TIter>
void writeData(
    T value,
    TIter& iter,
    const traits::endian::Big& endian);

/// Same as writeBig<TSize, T, TIter>(value, iter)
template <std::size_t TSize, typename T, typename TIter>
void writeData(
    T value,
    TIter& iter,
    const traits::endian::Big& endian);

/// Same as writeLittle<T, TIter>(value, iter)
template <typename T, typename TIter>
void writeData(
    T value,
    TIter& iter,
    const traits::endian::Little& endian);

/// Same as writeLittle<TSize, T, TIter>(value, iter)
template <std::size_t TSize, typename T, typename TIter>
void writeData(
    T value,
    TIter& iter,
    const traits::endian::Little& endian);

/// Same as readBig<T, TIter>(iter)
template <typename T, typename TIter>
T readData(TIter& iter, const traits::endian::Big& endian);

/// Same as readBig<TSize, T, TIter>(iter)
template <typename T, std::size_t TSize, typename TIter>
T readData(TIter& iter, const traits::endian::Big& endian);

/// Same as readLittle<T, TIter>(iter)
template <typename T, typename TIter>
T readData(TIter& iter, const traits::endian::Little& endian);

/// Same as readLittle<TSize, T, TIter>(iter)
template <typename T, std::size_t TSize, typename TIter>
T readData(TIter& iter, const traits::endian::Little& endian);
The traits::endian::Big and traits::endian::Little are defined as empty tag classes:
namespace traits
{

namespace endian
{

struct Big {};

struct Little {};

}  // namespace endian

}  // namespace traits
For example:
template <typename TTraits>
class SomeClass
{
public:
    typedef typename TTraits::Endianness Endianness;

    template <typename TIter>
    void serialise(TIter& iter) const
    {
        embxx::io::writeData(data_, iter, Endianness());
    }

private:
    std::uint32_t data_;
};
So the code above is not aware what endianness is used to serialise the data. It is provided as
internal type of Traits class named Endianness. The compiler will generate the call to
appropriate writeData() function, which in turn forward it to writeBig() or writeLittle().
To serialise data using big endian the traits should be defined as following:
struct MyTraits
{
    typedef embxx::io::traits::endian::Big Endianness;
};

SomeClass<MyTraits> someClassObj;
…
someClassObj.serialise(iter); // Will serialise using big endian
The interface described above is very easy and convenient to use and quite easy to implement using straightforward approach. However, any variation of template parameters create an instantiation of new binary code which may create significant code bloat if not used carefully. Consider the following:
-
Read/write of signed vs unsigned integer values. The serialisation/deserialisation code is identical for both cases, but won’t be considered as such when instantiating the functions. To optimise this case, there is a need to implement read/write operations only for unsigned value, while the “signed” functions become wrappers around the former. Don’t forget a sign extension operation when retrieving partial signed value.
-
The read/write operations are more or less the same for any length of the values, i.e of any types:
(unsigned) char,(unsigned) short,(unsigned) int, etc… To optimise this case, there is a need for internal function that receives length of serialised value as a run time parameter, while the functions described above are mere wrappers around it. -
Usage of the iterators also require caution. For example reading values may be performed using regular
iteratoras well asconst_iterator, i.e. iterator pointing to const values. These are two different iterator types that will duplicate the “read” functionality if both of them are used:
char buf[128] = {…};
const char* iter1 = &buf[0];
char* iter2 = &buf[0];

// Instantiation 1
auto value1 = embxx::io::readBig<std::uint16_t>(iter1);

// Instantiation 2
auto value2 = embxx::io::readBig<std::uint16_t>(iter2);
It is possible to optimise the case above for random access iterator by using temporary pointers to unsigned characters to read the required value. After retrieval is complete, just increment the value of the passed iterator with number of characters read.
All the consideration points stated above require quite complex implementation of the serialisation/deserialisation functionality with multiple levels of abstraction which is beyond the scope of this book. It would be a nice exercise to try and implement it yourself. Another option is to use the code as is from embxx library.
Static (Fixed Size) Queue
There is almost always a need to have some kind of a queuing functionality. A circular buffer is
a good compromise between speed of execution and memory consumption (vs
std::deque for example). If your product allows
usage of dynamic memory allocation and/or exceptions than
boost::circular_buffer can be a
good choice. However, if using dynamic memory allocation is not an option, then there is no other
choice but to implement a circular buffer with maximum length known at compile time over C array
or std::array.
Here is the implementation
of StaticQueue functionality from embxx library. I won’t go into
too much details or explain every line of code. Instead I will emphasise several important points
that must be taken into consideration.
Invalid operations
There can always be an attempt to perform an invalid operation, such as access an element outside the
queue boundaries, or inserting new element when the queue is full, or popping an element when queue is
empty, etc… The conventional way in C++ to handle these cases is to throw an exception.
However, in embedded and especially in bare metal programming it’s not an option. The right way to
handle these errors would be asserting on pre-conditions. The StaticQueue implementation in
embxx library uses GASSERT() macro described earlier.
The checks will be compiled only in non-Release mode (NDEBUG not defined) and in case of the
failure it will invoke the project specific code the developer has written to report assertion failure.
template <typename T, std::size_t TSize>
class StaticQueue
{
public:
    ...
    void popFront()
    {
        GASSERT(!empty());
        ...
    }
};
Construction/Destruction of the elements
When the queue is created it doesn’t contain any elements. However, it must contain uninitialised space where elements can be created in the future. The space must be of sufficient size and be properly aligned.
template <typename T, std::size_t TSize>
class StaticQueue
{
public:
    typedef T ValueType;
    ...
private:
    typedef
        typename std::aligned_storage<
            sizeof(ValueType),
            std::alignment_of<ValueType>::value
        >::type StorageType;

    typedef std::array<StorageType, TSize> ArrayType;

    ArrayType array_;
    ...
};
When adding a new element to the queue, the “in-place” construction must be performed:
template <typename T, std::size_t TSize>
class StaticQueue
{
public:
    ...
    typedef T ValueType;
    ...

    template <typename U>
    void pushBack(U&& newElem)
    {
        auto* spacePtr = ...; // get pointer to the right place
        new (spacePtr) ValueType(std::forward<U>(newElem));
        ...
    }
};
When an element removed from the queue, explicit destruction must be performed:
template <typename T, std::size_t TSize>
class StaticQueue
{
public:
    ...
    typedef T ValueType;
    ...
   void popBack()
    {
        auto* spacePtr = ...; // get pointer to the right place
        auto* elemPtr = reinterpret_cast<ValueType*>(spacePtr);
        elemPtr->~T(); // call the destructor;
        ...
    }
};
Iteration
There is often a need to iterate over the elements of the queue. The standard sequential random access containers such as std::array, std::vector or std::deque may use a simple pointer (or a wrapper class around it) as iterator because address of every element is greater than address of its predecessor. Incrementing a pointer during the iteration would be enough to get an access to the next element. However, in circular queue/buffer there may be a case when address of the beginning of the queue is greater than address of the end of the queue:
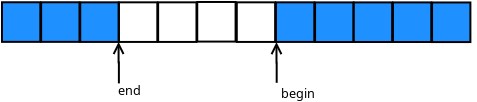
In this case having a simple pointer as iterator is not enough. There is a need to check a wrap-around case when incrementing an iterator. However always using this kind of iterator may incur undesired performance penalties. That is when “leniarisation” concept pops up. When the queue is linearised, address of every element is greater than the address of its predecessor and simple pointer (linearised iterator) may be used to iterate over all the elements in the queue:
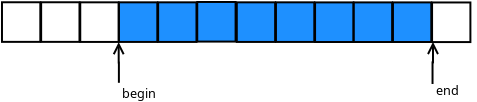
When the queue is not linearised, it either must be linearised (may be a bit expensive, depending on the
size of the queue) or iterate over all the elements in two stages: first on the first (top) part, then
on the second (bottom) part. The StaticQueue implementation in
embxx library provides two functions arrayOne() and
arrayTwo() that return these two ranges.
However, there may be a need to read/write data from/to the queue without worrying about the wrap-around
case. Good example of such case would be having such circular queue/buffer to contain data read from some
communication interface, such as serial port, and there is a need to deserialise 4 byte value from this
buffer. The most convenient way would be to use embxx::io::readBig<4>(iter) described previously.
To properly support this case we will need to have a bit more expensive iterator that properly handles
wrap-around when incremented and/or dereferenced. This is the reason for having two types of iterators
for StaticQueue: LinearisedIterator and Iterator. The former is a simple typedef for a pointer
which can be used only on the linearised part of the queue and the latter may be used when iterating
without any knowledge whether there is a wrap-around case during the iteration.
When defining a new custom iterator class, there is a need to properly support std::iterator_traits for it. The traits are used to implement functions such as std::advance or std::distance). The requirement is to define the following internal types:
template <typename T, std::size_t TSize>
class StaticQueue
{
public:
    class Iterator
    {
    public:
        typedef std::random_access_iterator_tag iterator_category;
        typedef T value_type;
        typedef T* pointer;
        typedef T& reference;
        typedef typename std::iterator_traits<pointer>::difference_type difference_type;
        ...
    };

    ...
};
Copying queues
Care must be taken when copying/moving elements between the queues. The compiler is not aware of the right type of the elements that are stored in the queue as well as number of valid elements in the queue is unknown at compile time. When using default copy/move constructor and/or assignment operator the compiler will generate a code that copies raw bytes in the storage space between the queues. It may work for the basic type or POD structs, but it is not the right way to do the copying. There is a need to use copy/move constructors in case of constructions or copy/move assignment operator in case of assignment of the valid elements and not copy/move garbage data from unused space.
In addition to regular copy/move constructors and assignment operators, there may also be a need to provide copy/move construction and/or copy/move assignment from the queue that contains elements of the same type, but has different capacity:
template <typename T, std::size_t TSize>
class StaticQueue
{
public:
    ...

    template <std::size_t TAnySize>
    StaticQueue(const StaticQueue<T, TAnySize>& queue)
        : Base(&array_[0], TSize)
    {
        ... // Copy all the elements from other queue
    }

    template <std::size_t TAnySize>
    StaticQueue(StaticQueue<T, TAnySize>&& queue)
        : Base(&array_[0], TSize)
    {
        ... // Move all the elements from other queue
    }

    template <std::size_t TAnySize>
    StaticQueue& operator=(const StaticQueue<T, TAnySize>& queue)
    {
        ... // Copy all the elements from other queueu
    }

    template <std::size_t TAnySize>
    StaticQueue& operator=(StaticQueue<T, TAnySize>&& queue)
    {
        ... // Move all the elements from other queue
    }
    ...
};
Optimising code generation
As we all know and confirmed in Templates chapter, any difference in the value of
template parameter will create new instantiation of executable code. It means that having multiple
queues of the same type, but different sizes may bloat the executable in an unacceptable way. The best
way to solve this problem would be defining a base class that is templated only on the type of the stored
values and implements the whole logic of the queue while the derived StaticQueue class will just
provide the necessary storage area and reuse (wrap) all the functions implemented in the base class:
namespace details
{

template <typename T>
class StaticQueueBase
{
protected:
    typedef T ValueType;
    typedef
        typename std::aligned_storage<
            sizeof(ValueType),
            std::alignment_of<ValueType>::value
        >::type StorageType;
    typedef StorageType* StorageTypePtr;

    StaticQueueBase(StorageTypePtr data, std::size_t capacity)
        : data_(data),
          capacity_(capacity),
          startIdx_(0),
          count_(0)
    {
    }

    template <typename U>
    void pushBack(U&& value) {...}

    ... // All other API functions

private:
    StorageTypePtr data_; // Pointer to storage area
    std::size_t capacity_; // Capacity of the storage area
    std::size_t startIdx_; // Index of the beginning of the queue
    std::size_t count_; // Number of elements in the queue
};

} // namespace details

template <typename T, std::size_t TSize>
class StaticQueue : public details::StaticQueueBase<T>
{
    typedef details::StaticQueueBaseOptimised<T> Base;
    typedef typename Base::StorageType StorageType;

public:
   StaticQueue()
        : Base(&array_[0], TSize)
    {
    }

    template <typename U>
    void pushBack(U&& value)
    {
        Base::pushBack(std::forward<U>(value));
    }

    ... // Wrap all other API functions

private:
    typedef std::array<StorageType, TSize> ArrayType;
    ArrayType array_;
};
There are ways to optimise even more. Let’s take queues of int and unsigned values for example.
They have the same size and from the queue implementation perspective there is no difference in
handling them, so it would be a waste of code space to allow the instantiation of the same binary
code for the queue to handle both of these types. Using template specialisation tricks we may implement
queues of signed integral types to be a mere wrappers around queues that contain unsigned integral types.
Additional example would be storage of the pointers to any types. It would be wise to specialise
StaticQueue of pointers to be a wrapper around queue of void* pointers or even integral unsigned
values of the same size as pointers (such as std::uint32_t on 32 bit architecture or std::uint64_t on 64 bit architecture).
Thanks to the template specialisation there are virtually no limits to optimisations we may apply.
However I would like to remind you the well known saying “Premature optimisations are the root of all evil”.
Please avoid optimising your StaticQueue implementation until the need arises.
Basic Concepts
As already mentioned in Overview, this book explains and shows examples of how to implement soft real time systems. This chapter will explain basic concepts of asynchronous event handling as well as how to implement required functionality without complex state machines, and/or task scheduing.
Event Loop
Most bare-metal embedded products require only two modes of operation:
-
Interrupt (or service) mode
-
Non-interrupt (or user) mode.
The job of the code, that is executed in interrupt mode, is to respond to hardware events (interrupts) by performing minimal job of updating various status registers and schedule proper handling of event (if applicable) to be executed in non-interrupt mode. In most projects the interrupt handlers are not prioritised, and the next hardware event (interrupt) won’t be handled until the previously called interrupt handler returns, i.e. CPU is ready to return to non-interrupt mode. Therefore, it is important for the interrupt handler to do its job as quickly as possible.
There are multiple ways to schedule the execution of event handling code in non-interrupt mode from code being executed in interrupt mode. One of the easiest and straightforward ones is to have some kind of global flag that indicates that event has occurred and the processing is required:
bool g_buttonPressed = false;

void gpioInterruptHandler()
{
    ...
    if (/*button_gpio_recognised*/) {
        g_buttonPressed = true;
    }
}

int main(int argc, const char* argv[])
{
    ...
    while (true) { // infinite event processing loop
        enableInterrupts();
        ...
        if (g_buttonPressed) {
            disableInterrupt(); // avoid races
            g_buttonPressed = false;
            enableInterrupts();
            ... // Handle button press
        }
        ...
        disableInterrupts();
        if (/* no_more_events */) {
            WFI(); // “Wait for interrupt” assembler instruction,
                   // instruction will exit when there is pending
                   // interrupt.
        }
    }
}
It is quite clear that this approach is not scalable, i.e. will quickly become a mess when number of hardware events the code needs to handle grows. The events may also be handled not in the same order they occurred, which may create undesired races and side effects on some systems.
Another widely used approach is to create a queue-like container (linked list or circular buffer) of event IDs which are handled in the similar event loop:
enum EventId
{
    EventId_ClockTick,
    EventId_ButtonPress,
    ....
}

Queue<EventId> events;


void gpioInterruptHandler()
{
    ...
    if (/*button_gpio_recognised*/) {
        events.push_back(EventId_ButtonPress);
    }
}


int main(int argc, const char* argv[])
{
    ...
    while (true) { // infinite event processing loop
        enableInterrupts();
        ...
        switch (events.front()) {
        case EventId_ClockTick:
            ... // handle clock tick
            break;

        case EventId_ButtonPress:
            ... // handle button press
            break;
            ...
        }
        ...
        disableInterrupts();
        events.pop_front(); // Remove processed event from queue
       if (events.empty()) {
            WFI(); // “Wait for interrupt” assembler instruction,
                   // instruction will exit when there is pending interrupt.
        }
    }
}
The approach above is a bit better, it processes events in the same order they occur, but still has its own disadvantages. Sometimes there is a need to attach some extra information for the processing of the event. Usually it is done using global variables, which introduces some extra complexity to the code and possibility for races. The handling of some events may have several internal stages and require busy wait(s) during the processing. These busy waits may significantly delay the processing of other pending events. The usual way to resolve this kind of problem is to create several state machines, that process this kind of events in stages. Most of Real-Time OSes provide an ability to create independent tasks (threads), that can be used to perform independent complex multiple staged workflows while the OS performs context switching between them. Still, the code can very quickly become too complex and difficult to maintain.
The approaches above are widely used in bare metal projects developed using C programming language. Using C++ language built-in features as well as ready to use classes from STL it is possible to simplify the complexity of the code and implement proper asynchronous handling of events, which is easier to debug and maintain.
I would recommend using a queue of callable objects created by std::bind() expressions or lambda functions. The conventional C++ way would be using std::list of std::function objects. However, these classes use dynamic memory allocation and throw exceptions, which may be not suitable for every bare metal project. Anyway, let’s just demonstrate the idea using these two classes:
typedef std::list<std::function<void ()> > Queue;
Queue handlers;

template <typename TFunc>
void addHandlerFromInterrupt(TFunc&& func)
{
    // No need to disable interrupts.
    handlers.push_back(std::forward<TFunc>(func));
}

template <typename TFunc>
void addHandler(TFunc&& func)
{
   // Protect against races with interrupt handlers
    disableInterrupts();
    handlers.push_back(std::forward<TFunc>(func));
    enableInterrupts();
}

void handleButtonPressStart()
{
    ...// Start handling of button press event
    handleButtonPressBusyWait();
}

void handleButtonPressBusyWait()
{
    if (/* some_condition */) {
        handleButtonPressFinish();
        return;
    }

    // The condition is not true, need to wait,
    // reschedule the execution of the same function.
    addHandler(
        []()
        {
             handleButtonPressBusyWait();
        });
}

void handleButtonPressFinish()
{
    ...// Finalise handling of button press event.
}

void gpioInterruptHandler()
{
    ...
    if (/*button_gpio_recognised*/) {
        addHandlerFromInterrupt(
            []()
            {
		 // Will be executed in non-interrupt event loop.
                 handleButtonPressStart();
            });
    }
}

int main(int argc, const char* argv[])
{
    ...
    while (true) { // infinite event processing loop
        enableInterrupts();
        ...
        auto& firstHandler = handlers.front();
        firstHandler(); // Execute scheduled callable object
        ...
        disableInterrupts();
        handlers.pop_front(); // Remove executed callable object
                              // (function) from queue of handlers.

        if (handlers.empty()) {
            WFI(); // “Wait for interrupt” assembler instruction,
                   // instruction will exit when there is pending
                   // interrupt.
        }
    }
}
This approach allows having complex processing of some events with many sub-stages and busy waits while still allowing other independent events being processed. All the handlers are executed in the same order they were pushed to the queue. There is an ability to bind multiples additional parameters together with the function call, which reduces a necessity to have global variables to pass values around. There is no need to maintain a list of various event IDs, explicitly define stages of state machine(s) or implement complex task switching between independent threads (tasks).
Now, let’s try to get rid of dynamic memory allocation and possible exceptions. The only way to achieve this is to have a compile time constant that specifies the maximal size of the queue. The naive implementation would be using StaticQueue of StaticFunction objects described in Basic Needs chapter. However, the StaticFunction class definition requires compile time constant to specify the size of the area to store all the data of the callable object. It must be big enough to contain any possible callable object that will be pushed to the queue. For example:
typedef embxx::util::StaticFunction<void (), sizeof(void*) * 10>  Func;
typedef embxx::container::StaticQueue<Func, 1024> Queue;

Queue handlers;
…
handlers.push_back(std::bind(&func1, param1, param2)); // Will require size of only 3 values
...
handlers.push_back(
    std::bind(
        &func2,
        param1,
        param2,
        param3,
        param4)); // Will require size of only 5 values

handlers.push_back(
    std::bind(
        &func3,
        param1,
        param2,
        param3,
        param4,
        param5,
        param6,
        param7,
        param8,
        param9)); // Will consume the whole available space.
The queue will look like this:
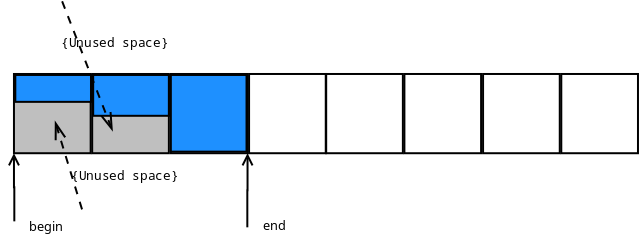
It is quite clear that lots of space may be wasted and this approach must be optimised. What if we could push the callable object to the queue one after another regardless of their actual size with a bit of extra space overhead (such as pointer to v-table), that will help us to retrieve size of the object at runtime and remove appropriate number of bytes from such queue after the callable object did its job?

It looks much better. The space consumption is much more efficient.
To properly support this type of queue we must:
-
implement polymorphic behaviour when calling every handler with same interface.
-
implement polymorphic behaviour to retrieve the size of single handler in order to know how many bytes are to be removed from the queue after the handler has been called.
-
properly handle wrap-around cases when the pushed handler cannot fit into the area between the end of the queue and end of the allocated space.
The code of required classes will be like this:
class Task
{
public:
    virtual ~Task() {}

    virtual std::size_t getSize() const
    {
        return 1U;
    }

    virtual void exec() {}
};

template <typename TTask>
class TaskBound : public Task
{
public:

    // Size is minimal number of elements of size equal to sizeof(Task)
    // that will be able to store this TaskBound object
    static const std::size_t Size =
        ((sizeof(TaskBound<typename std::decay<TTask>::type>) - 1) /
                                                     sizeof(Task)) + 1;

    explicit TaskBound(const TTask& task)
      : task_(task)
    {
    }

    explicit TaskBound(TTask&& task)
      : task_(std::move(task))
    {
    }

    virtual ~TaskBound() {}

    virtual std::size_t getSize() const
    {
        return Size;
    }

    virtual void exec()
    {
        task_();
    }

private:
    TTask task_;
};
The definition of the Queue type will be:
typedef typename
    std::aligned_storage<
        sizeof(Task),
        std::alignment_of<Task>::value
   >::type ArrayElemType;

static const std::size_t ArraySize = TSize / sizeof(Task);
typedef embxx::container::StaticQueue<ArrayElemType, ArraySize> Queue;
TSize is a template parameter that specifies maximum size (in bytes) of the queue storage area.
The code of pushing new handler to the queue will look like this:
template <typename TTask>
bool addHandler(TTask&& task)
{
    typedef TaskBound<typename std::decay<TTask>::type> TaskBoundType;
    static_assert(
        std::alignment_of<Task>::value == std::alignment_of<TaskBoundType>::value,
        "Alignment of TaskBound must be same as alignment of Task");

    static const std::size_t requiredQueueSize = TaskBoundType::Size;

    auto placePtr = getAllocPlace(requiredQueueSize);
    if (placePtr == nullptr) {
        return false;
    }

    new (placePtr) TaskBoundType(std::forward<TTask>(task));
    return true;
}
Note, that job of getAllocPlace() function is to make sure that continuous storage area that is
able to store the required callable object is created (by resizing the queue) and return pointer to this area.
ArrayElemType* getAllocPlace(std::size_t requiredQueueSize)
{
    auto invalidIter = queue_.invalidIter();
    while (true)
    {
        if ((queue_.capacity() - queue_.size()) < requiredQueueSize) {
            return nullptr;
        }

        auto curSize = queue_.size();
        if (queue_.isLinearised()) {
            auto dist =
                static_cast<std::size_t>(
                    std::distance(queue_.arrayTwo().second, invalidIter));
            if ((0 < dist) && (dist < requiredQueueSize)) {
                queue_.resize(curSize + 1);
                auto placePtr = static_cast<void*>(&queue_.back());
                new (placePtr) Task();
                continue;
            }
        }

        queue_.resize(curSize + requiredQueueSize);
        return &queue_[curSize];
    }
}
In case of wrap-around, when there is not enough space between the end of the queue and end of its
storage area, number of simple Task objects which do nothing (the body of exec() function is empty)
are pushed to fill the space till the end of storage area to make the queue non-linearised, which in
turn will allow creation of continuous area of required size in the second half of the circular queue.
The event handling loop will be something like this:
while (true) {
    ...
    // Get an access pointer to next handler
    auto taskPtr = reinterpret_cast<Task*>(&queue_.front());
    auto sizeToRemove = taskPtr->getSize();

    // Execute the handler while allowing interrutps
    enableInterrupts();
    taskPtr->exec();

    // Remove the handler information from the queue
    taskPtr->~Task();
    disableInterrupts();
    queue_.popFront(sizeToRemove);

    ...
}
The only remaining thing is to create a convenient and generic interface to be able to add new handlers for execution from both interrupt and non-interrupt contexts.
Analogy with Threads
Before diving into implementation of such interface, I’d like to make an analogy between interrupt/non-interrupt execution modes and two threads. The inter-threads communication is managed using locks (such as std::mutex) and condition variables (such as std::condition_variable_any). Using this analogy the handlers execution loop (executed in non-interrupt thread) can be implemented like this:
std::mutex lock_;
std::condition_variable_any cond_;
...

while (true) {
    lock_.lock();

    while (!queue_.isEmpty()) {
        auto taskPtr = reinterpret_cast<Task*>(&queue_.front());
        auto sizeToRemove = taskPtr->getSize();
        lock_.unlock();

        // Executed with interrupts enabled
        taskPtr->exec();
        taskPtr->~Task();

        lock_.lock();
        queue_.popFront(sizeToRemove);
    }

    // Still locked prior to wait
    cond_.wait(lock_);
    lock_.unlock();
}
And adding new execution handler from any thread can be:
template <typename TTask>
bool addHandler(TTask&& task)
{
   std::lock_guard<decltype(lock_)> guard(lock_);
   ... // adding handler functionality
   cond_.notify_all(); // notify the condition variable
}
If we think about interrupt and non-interrupt execution modes as two threads, the locking in non-interrupt
thread is equivalent to disabling interrupts; and waiting for condition variable to be notified is equivalent
for waiting for interrupts (using WFI or WFE instructions in ARM architecture) while notification can
be automatic due to pending interrupts or implemented using SEV instruction. However, our interrupt
and non-interrupt mode threads differ slightly from conventional threads. The non-interrupt mode one can be
interrupted at any time by interrupt mode, while the interrupt mode “thread” won’t be interrupted and doesn’t
actually need to protect itself from other thread’s intervention.
The whole logic of event handling loop in non-interrupt context described above is generic except locking (disabling interrupts) and waiting for new handlers to be added (waiting for interrupts) which are platform and architecture specific. As I’ve mentioned before, the whole idea of using C++ instead of C in bare metal development is to be able to write and reuse generic code while providing minimal platform specific hardware control functionality. The embxx library provides EventLoop class that receives the locking and condition variable classes as template parameters and manages safe addition of new handlers and in-order execution of the latter in non-interrupt context.
The class definition looks like this:
template <std::size_t TSize, typename Tlock, typename TCond>
class EventLoop
{
    ...
};
The TLock class must expose the following public interface:
class PlatformLock
{
public:
    // Locks out interrupt "thread". The function is called
    // in non-interrupt context
    void lock() {...}

    // Restore previous state changed by "lock()" function, i.e.
    // allow interrupts if they were disabled by lock().
    void unlock() {...}

    // Same as lock(), but will be called when new handler is about to
    // be added from interrupt handler. In normal case it should be an
    // empty function, unless the interrupts are prioritised and there
    // is a need to disable other interrupts from an interrupt handler
    void lockInterruptCtx() {...}

    // Same as unlock, but will be called in interrupt context. Should
    // also be empty function when interrupts are not prioritised.
    void unlockInterruptCtx() {...}
};
The TCond class must expose the following public interface:
class PlatformCond
{
public:
    // Receives the reference to lockable object that is locked
    // (has lock() and unlock() member functions) and
    // responsible to release the lock if needed and wait for
    // notifications from other thread(s). After the notification
    // occurs it must re-acquire the lock prior to returning.
    template <typename TLock>
    void wait(TLock& lock) {...}

    // This function is used to notify condition that wait should
    // be terminated.
    void notify() {...}
};
The example of such classes for Raspberry Pi platform may be found here.
class InterruptLock
{
public:
    InterruptLock()
        : flags_(0) {}

    void lock()
    {
        __asm volatile("mrs %0, cpsr" : "=r" (flags_)); // store flags
        __asm volatile("cpsid i"); // disable interrupts
    }

    void unlock()
    {
        if ((flags_ & IntMask) == 0) {
            // Was previously enabled
            __asm volatile("cpsie i"); // enable interrupts
        }
    }

    void lockInterruptCtx()
    {
        // Nothing to do
    }

    void unlockInterruptCtx()
    {
        // Nothing to do
    }

private:
    volatile std::uint32_t flags_;
    static const std::uint32_t IntMask = 1U << 7;
};

class WaitCond
{
public:
    template <typename TLock>
    void wait(TLock& lock)
    {
        // no need to unlock (re-enable interrupts)
        static_cast<void>(lock);
        __asm volatile("wfi");
    }

    void notify()
    {
        // Nothing to do, pending interrupt will cause wfi
        // to exit even with interrupts disabled
    }
};
The EventLoop class exposes the following public interface:
template <std::size_t TSize, typename Tlock, typename TCond>
class EventLoop
{
public:
    ...
    /// @brief Post new handler for execution.
    /// @details Acquires regular context lock. The task is added to
    ///          the execution queue. If the execution queue is empty
    ///          before the new handler is added, the condition
    ///          variable is signalled by calling its notify() member
    ///          function.
    /// @param[in] task R-value reference to new handler functor.
    /// @return true in case the handler was successfully posted,
    ///         false if there is not enough space in the execution
    ///         queue.
    template <typename TTask>
    bool post(TTask&& task);

    /// @brief Post new handler for execution from interrupt context.
    /// @details Acquires interrupt context lock. The task is added to
    ///          the execution queue. If the execution queue is empty
    ///          before the new handler is added, the condition variable
    ///          is signalled by calling its notify() member function.
    /// @param[in] task R-value reference to new handler functor.
    /// @return true in case the handler was successfully posted, false
    ///         if there is not enough space in the execution queue.
    template <typename TTask>
    bool postInterruptCtx(TTask&& task);

    /// @brief Event loop execution function.
    /// @details The function keeps executing posted handlers until
    ///          none are left. When execution queue becomes empty the
    ///          wait(...) member function of the condition variable
    ///          gets called to execute blocking wait for new handlers.
    ///          When new handler is added, the condition variable will
    ///          be signalled and blocking wait is expected to be
    ///          terminated to continue execution of the event loop.
    ///          This function never exits unless stop() was called to
    ///          terminate the execution. After stopping the main
    ///          loop, use reset() member function to enable the loop
    ///          to be executed again.
    void run();

    /// @brief Stop execution of the event loop.
    /// @details The execution may not be stopped immediately. If there
    ///          is an event handler being executed, the loop will be
    ///          stopped after the execution of the handler is finished.
    void stop();

    /// @brief Reset the state of the event loop.
    /// @details Clear the queue of registered event handlers and
    ///          resets the "stopped" flag to allow new event loop
    ///          execution.
    void reset();
}:
I’ll leave the implementation of the functions above as an exercise to the reader. Don’t
forget to call notify() member function of condition variable when adding new handler to
the empty queue.
If needed, the reference implementation can be found here.
Busy Loops
The event loop described above is an easy and convenient way to implement soft real-time systems.
However, the main rule with such architecture is: DON’T DO BUSY LOOPS! It means, if there is a
real need to perform a busy wait before proceeding to the next stage, do it by letting other events
being handled as well. The EventLoop class also provides busyWait() member function that does exactly that.
template <std::size_t TSize, typename Tlock, typename TCond>
class EventLoop
{
public:
    ...
    /// @brief Perform busy wait.
    /// @details Executes busy wait while allowing other event handlers
    ///          posted by interrupt handlers being processed.
    /// @tparam TPred Predicate class type, must define
    ///         @code bool operator()(); @endcode
    ///         that return true in case busy wait must be terminated.
    /// @tparam TFunc Functor class that will be executed when wait is
    ///         complete. It must define
    ///         @code void operator()(); @endcode
    /// @param pred Any type of reference to predicate object
    /// @param func Any type of reference to "wait complete" function.
    /// @pre The event loop must have enough space to repost the call
    ///      to busyWait(). Note that there is no wait to notify the
    ///      caller if post operation fails. In debug compilation mode
    ///      there will be an assertion failure in case call to post()
    ///      returned false, in release compilation mode the failure
    ///      will be silent.
    template <typename TPred, typename TFunc>
    void busyWait(TPred&& pred, TFunc&& func)
    {
        if (pred()) {
            bool result = post(std::forward<TFunc>(func));
            GASSERT(result);
            static_cast<void>(result);
            return;
        }

        bool result = post(
            [this, pred, func]()
            {
                busyWait(std::move(pred), std::move(func));
            });
        GASSERT(result);
        static_cast<void>(result);
    }
};
Device-Driver-Component
Now, after understanding what the event loop is and how to implement it in C++, I’d like to describe Device-Driver-Component stack concept before proceeding to practical examples.
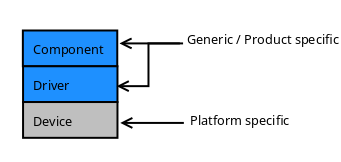
The Device is a platform specific peripheral(s) control layer. Sometimes it is called HAL - Hardware Abstraction Layer. It has an access to platform specific peripheral control registers. Its job is to implement predefined interface required by upper Driver layer, handle the relevant interrupts and report them to the Driver via callbacks.
The Driver is a generic platform independent layer. Its job is to receive requests for asynchronous operation from the Component layer and forward the request to the Device. It is also responsible for receiving notifications about the interrupts from the Device via callbacks, perform minimal processing of the hardware event if necessary and schedule the execution of proper event handling callback from the Component in non interrupt context using Event Loop.
The Component is a generic or product specific layer that works fully in event loop (non-interrupt) context. It initiates asynchronous operations using Driver while providing a callback object to be called in event loop context when the asynchronous operation is complete.
There are several main operations required for any asynchronous event handling:
-
Start the operation.
-
Complete the operation.
-
Cancel the operation.
-
Suspend the operation.
-
Resume suspended operation.
All the peripherals described in Peripherals chapter will follow the same scheme for these operations with minor changes, such as having extra parameters or intermediate stages.
Starting Asynchronous Operation

Any non-interrupt context operation is initiated from some event handler executed by the
Event Loop or from the main() function before the event loop started
its execution. The handler being executed invokes some function in some Component, which
requests the Driver to perform some asynchronous operation while providing a callback
object to be executed when such operation is complete. The Driver stores the provided
callback object and other parameters in its internal data structures, then forwards the
request to the Device, which configures the hardware accordingly and enables all the required interrupts.
Completing Asynchronous Operation
The first entity, that is aware of asynchronous operation completion, is Device when appropriate interrupt occurs. It must report the completion to the Driver somehow. As was described earlier, the Device is a platform specific layer that resides at the bottom of the Device-Driver-Component stack and is not aware of the generic Driver layer that uses it. The Device must provide a way to set an operation completion report object. The Driver will usually assign such object during construction/initialisation stage:

When the expected interrupt occurs, the Device reports operation completion to the Driver, which in turn schedules execution of the callback object from the Component in non-interrupt context using Event Loop.
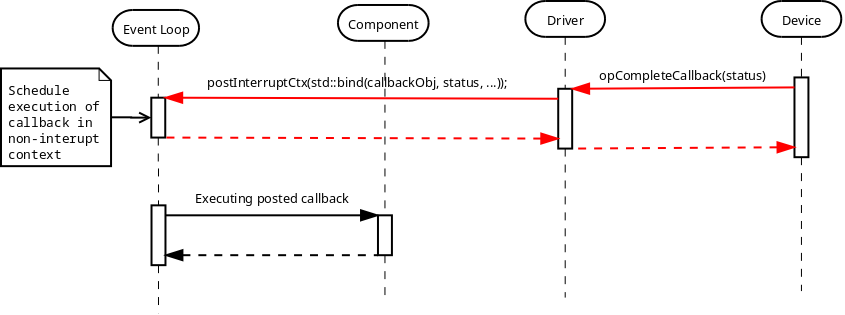
Note that the operation may fail, due to some hardware faults, This is the reason to have
status parameter reporting success and/or error condition in both callback invocations.
Canceling Asynchronous Operation
There must be an ability to cancel asynchronous operations in progress. For example some Component activates asynchronous operation request on some hardware peripheral together with asynchronous wait request to the timer to measure the operation timeout. If timeout callback is invoked first, then there is a need to cancel the outstanding asynchronous operation. Or the opposite, once the read is successful, the timeout measure should be canceled. However, the cancellation may be a bit tricky. One of the main requirements for asynchronous events handling is that the Component's callback MUST be called and called only ONCE. It creates a situation when cancellation may become unsuccessful. For instance, the callback of the asynchronous operation was posted for execution in Event Loop, but hasn’t been executed by the latter yet. It brings us to the necessity to provide an indication whether the cancellation request was successful. Simple boolean return value is enough.
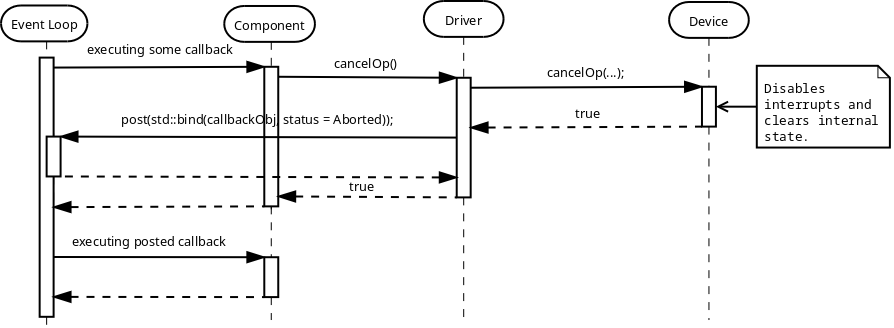
When the cancellation is successful the Component's callback object is invoked with status
specifying that operation was Aborted.
One possible case of unsuccessful cancellation is when callback was posted for execution in event
loop, but hasn’t been executed yet when cancellation is attempted. In this case Driver is aware
that there is no pending asynchronous operation and can return false immediately.
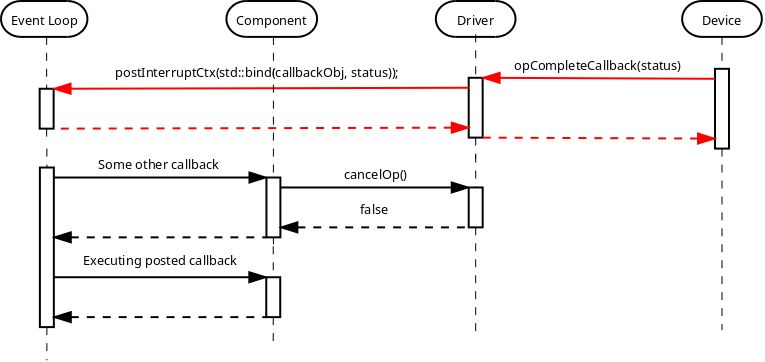
Another possible case of unsuccessful cancellation is when completion interrupt occurs in the middle of cancellation request:

In this case the Device must be able to handle such race condition appropriately, by temporarily disabling interrupts before checking whether the completion callback was executed. The Driver must also be able to handle interrupt context execution in the middle on non-interrupt one.
Suspend / Resume Asynchronous Operation
There may be a Driver, that is required to support multiple asynchronous operations at the same
time, while managing internal queue of such requests and issuing them one by one to the Device.
In this case there is a need to prevent "operation complete" callback being invoked in interrupt
mode context, while trying to access the internal data structures in the event loop (non-interrupt)
context. The Device must provide both suspendOp() and resumeOp() to suppress invocation of the
callback and allow it back again respectively. Usually suspension means disabling the interrupts
without stopping current operation, while resume means re-enabling them again.
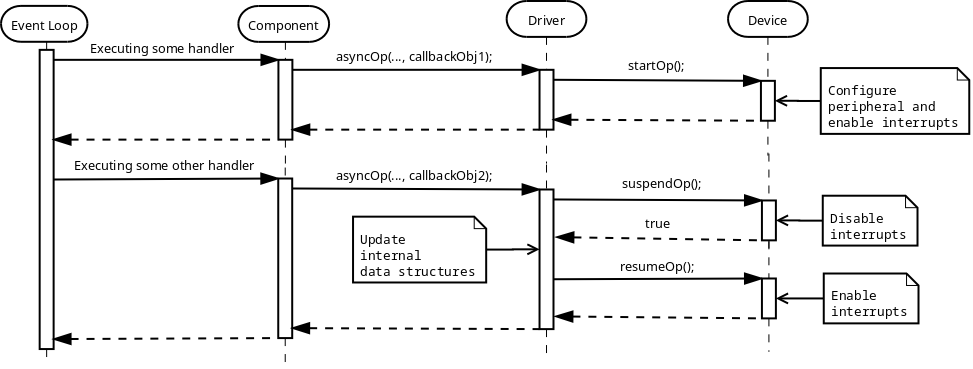
Note that the suspendOp() request must also indicate whether the suspension was successful or the
completion callback has been already invoked in interrupt mode, just like with the cancellation.
After the operation being successfully suspended, it must be either resumed or canceled.
Device Function Invocation Context
Let’s think about the case when Driver supports multiple asynchronous operations at the same time and queuing them internally while issueing start requests to the Device one by one.
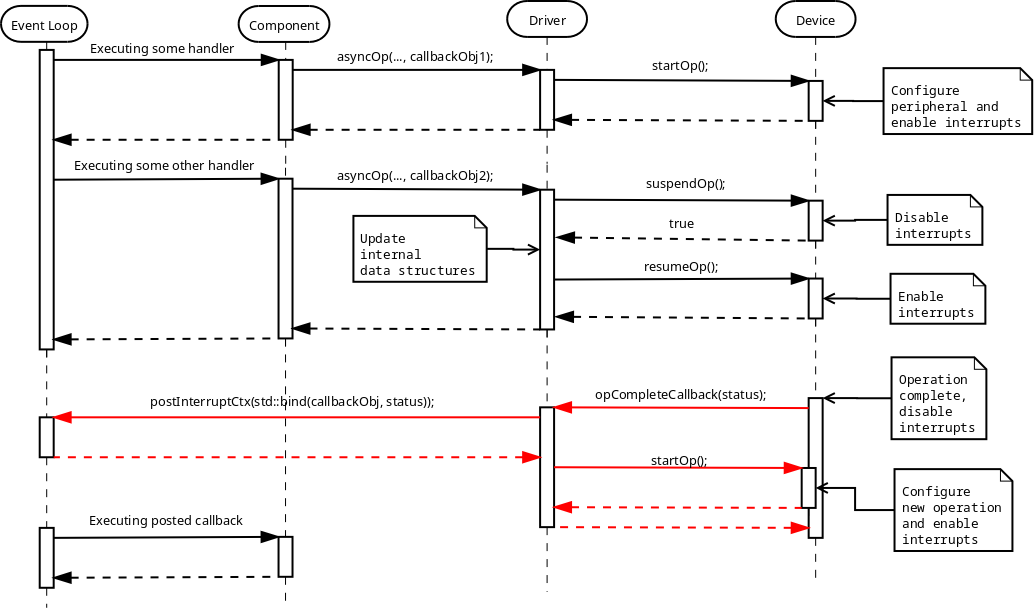
The reader may notice that the startOp() member function of the Device was invoked in event
loop (non-interrupt) context while the second time it was in interrupt context right after the
completion of the first operation was reported. There may be a need for the Device's implementation
to differentiate between these calls.
One of the ways to do so is to have different names and make the Driver use them depending on the current execution context:
class MyDevice
{
public:
    void startOp();
    void startOpInterruptCtx();
}
Another way is to use a tag dispatching idiom, which I decided to use in embxx library.
It defines two extra tag structs in embxx/device/context.h:
namespace embxx
{

namespace device
{

namespace context
{

// Event loop context tag class.
struct EventLoop {};

// Interrupt context tag class.
struct Interrupt {};

} // namespace context

} // namespace device

} // namespace embxx
Then, almost every member function defined by Device class has to specify extra tag parameter indicating context:
class MyDevice
{
public:
    typedef embxx::device::context::EventLoop EventLoopCtx;
    typedef embxx::device::context::Interrupt InterruptCtx;

    void startOp(EventLoopCtx context)
    {
        static_cast<void>(context); // unused parameter
        ... // Perform operation when called in event loop context
    }

    void startOp(InterruptCtx context)
    {
        static_cast<void>(context); // unused parameter
        ... // Perform operation when called in interrupt context
    }
};
The Driver class will invoke the Device functions using relevant temporary context object passed as the last parameter:
class MyDriver
{
public:
    typedef embxx::device::context::EventLoop EventLoopCtx;
    typedef embxx::device::context::Interrupt InterruptCtx;

    // Invoked by some Component object in Event Loop Context
    void asyncOp(...)
    {
        ...
        device_.startOp(EventLoopCtx());
        ...
    }

private:

   // Some registered event callback handler,
   // invoked in interrupt context
   void interruptCallbackHandler()
   {
       ...
       device_.startOp(InterruptCtx());
   }
};
If some function needs to be called only in, say EventLoop context, and not supported in
Interrupt context, then it is enough to implement only supported variant. If Driver layer
tries to invoke the function with unsupported context tag parameter, the compilation will fail:
class MyDevice
{
public:
    typedef embxx::device::context::EventLoop EventLoopCtx;

    void cancelOp(EventLoopCtx context)
    {
        static_cast<void>(context); // unused parameter
        ... // Cancel recent operation
    }
};
If there is no need to differentiate between the contexts the function is invoked in, then it is quite easy to unify them:
class SomeDevice
{
public:

    template <typename TContext>
    void startOp(TContext context)
    {
        static_cast<void>(context); // unused parameter
        startOpInternal();
    }

private:
    void startOpInternal()
    {
        ...
    }
};
Reporting Errors
When issuing asynchronous operation request to the Driver and/or Component, there must be a way to report success / failure status of the operation, and if it failed provide some extra information about the reason of the failure. Providing such information as first parameter to the callback functor object is a widely used convention among the developers.
In most cases, the numeric value of error code is good enough.
The embxx library provides a short list of such values in enumeration class defined in embxx/error/ErrorCode.h:
namespace embxx
{

namespace error
{

enum class ErrorCode
{
    Success, ///< Successful completion of operation.
    Aborted, ///< The operation was cancelled/aborted.
    BufferOverflow, /// The buffer is full with read termination condition being false
    HwProtocolError, ///< Hardware peripheral reported protocol error.
    Timeout, ///< The operation takes too much time.
    NumOfStatuses ///< Number of available statuses. Must be last
};

}  // namespace error

}  // namespace embxx
There is also a wrapper class around the embxx::error::ErrorCode, called
embxx::error::ErrorStatus (defined in
embxx/error/ErrorStatus.h):
namespace embxx
{

namespace error
{

template <typename TErrorCode = ErrorCode>
class ErrorStatusT
{
public:
    /// @brief Error code enum type
    typedef TErrorCode ErrorCodeType;

    /// @brief Default constructor.
    /// @details The code value is 0, which is "success".
    ErrorStatusT();

    /// @brief Constructor
    /// @details This constructor may be used for implicit
    ///          construction of error status object out
    ///          of error code value.
    /// @param code Numeric error code value.
    ErrorStatusT(ErrorCodeType code);

    /// @brief Copy constructor is default
    ErrorStatusT(const ErrorStatusT&) = default;

    /// @brief Destructor is default
    ~ErrorStatusT() = default;

    /// @brief Copy assignment is default
    ErrorStatusT& operator=(const ErrorStatusT&) = default;

    /// @brief Retrieve error code value.
    const ErrorCodeType code() const;

    /// @brief boolean conversion operator.
    /// @details Returns true if error code is not equal 0,
    ///          i.e. any error will return true, success
    ///          value will return false.
    operator bool() const;

    /// @brief Same as !(static_cast<bool>(*this)).
    bool operator!() const;

private:
    ErrorCodeType code_;
};

typedef ErrorStatusT<ErrorCode> ErrorStatus;

}  // namespace error

}  // namespace embxx
It allows implicit conversion from embxx::error::ErrorCode to embxx::error::ErrorStatus
and convenient evaluation whether error has occurred in if sentences:
embxx::error::ErrorStatus es;
GASSERT(!es); // No error
...
if (/* some condition */) {
    es = embxx::error::ErrorCode::BufferOverflow;
}
...
if (es) {
    ... // Error occurred, access the arror code by calling es.code()
}
By convention every callback function provided with any asynchronous request to any Driver
and/or Component implemented in embxx library will
receive const embxx::error::ErrorStatus& as its first argument:
void callback(const embxx::error::ErrorStatus& es, ... /* some other parameters */)
{
    if (es == embxx::error::ErrorCode::Aborted) {
        return; // Nothing to do
    }

    if (es) {
        ... // Error occurred
        return;
    }
    ... // Success
}
Cooperation
As it is seen in the charts above, the Driver must have an access to the Device as well as Event Loop objects. However, the former is not aware of the exact type of the latter. In order to write fully generic code, the Device and Event Loop types must be provided as template arguments:
template <typename TDevice, typename TEventLoop>
class MyDriver
{
public:
    // During the construction store references to Device
    // and Event Loop objects.
    MyDriver(TDevice& device, TEventLoop& el)
      : device_(device),
        el_(el)
    {
    }

    ...

private:

    TDevice& device_;
    TEventLoop& el_;
};
The Component needs an access only to the Device and maybe Event Loop. The reference to the latter may be retrieved from the Device object itself:
template <typename TDevice, typename TEventLoop>
class MyDriver
{
public:
    TEventLoop& getEventLoop()
    {
        return el_;
    }

private:
    TEventLoop& el_;
};

template <typename TDriver>
class MyComponent
{
public:
    MyComponent(TDriver& driver)
      : driver_(driver)
    {
    }

    void someFunc()
    {
        auto& el = driver_.getEventLoop();
        el.post(...);
    }

private:
    TDriver& driver_;
};
Storing Callback Object
The Driver needs to provide a callback object to the Device to be called when appropriate interrupt occurs. The Component also provides a callback object to be invoked in non-interrupt context when the asynchronous operation is complete, aborted or terminated due to some error condition. These callback objects need to be stored somewhere. The best way to do so in conventional C++ is using std::function.
template <typename TDevice, typename TEventLoop>
class MyDriver
{
public:
    template <typename TFunc>
    void asyncOp(TFunc&& callbackObj)
    {
        callback_ = std::forward<TFunc>(callbackObj);
        ... // Start the operation
    }

private:
    typedef std::function<void embxx::error::ErrorStatus&> CallbackType;

    void opCompleteInterruptCallback(void embxx::error::ErrorStatus& es)
    {
        ... // Complete the operation
        el_.postInterruptCtx(std::bind(std::move(callback_), es));
    }

    EventLoop& el_;
    CallbackType callback_;
};
There are two problems with using std::function:
exceptions and dynamic memory allocation. It is possible to suppress the usage of exceptions by
making sure that function object is never invoked without proper object being assigned to it, and by
overriding appropriate __throw_* function(s) to remove exception handling code from binary image
(described in Exceptions chapter). However, it is impossible to get rid of
dynamic memory allocation in this case, which reduces number of bare metal products the Driver code
can be reused in, i.e. it makes the Driver class not fully generic.
The problem is resolved by defining the callback storage type as a template parameter to the Driver:
template <typename TDevice,
          typename TEventLoop,
          typename TCallbackType>
class MyDriver
{
private:
    ...
    TCallbackType callback_;
};
For projects that allow dynamic memory allocation std::function<…> can be passed, for
others embxx::util::StaticFunction<…> or similar must be used.
Peripherals
It this chapter I will describe and give multiple examples of how to drive and control multiple hardware peripherals while using Device-Driver-Component model in conjunction with Event Loop.
All the generic, platform independent code provided here is implemented as part of embxx library while platform (Raspberry Pi) specific code is taken from embxx_on_rpi project.
All the platform specific peripheral control classes reside in src/device directory.
The src/app directory contains several simple applications, such as flashing the led or responding to button presses.
There are also common Component classes shared between the applications. They reside in src/component directory.
In order to compile all the applications please follow the instructions described in Contents of This Book.
Function Configuration
In ARM platform every pin needs to be configured as either gpio input, gpio output or having one of
several alternative functions the microcontroller supports. The device::Function class defined in
src/device/Function.h and
src/device/Function.cpp
implements simple interface which allows every Device class configure the pins it uses.
class Function
{
public:
    enum class FuncSel {
        Input,  // b000
        Output, // b001
        Alt5,   // b010
        Alt4,   // b011
        Alt0,   // b100
        Alt1,   // b101
        Alt2,   // b110
        Alt3    // b111
    };

    typedef unsigned PinIdxType;

    static const std::size_t NumOfLines = 54;

    void configure(PinIdxType idx, FuncSel sel);
};
Every implemented Device class will receive reference to Function object in its constructor
and will have to use it to configure the pins as required.
Interrupts Management
There is one more componenet that every Device will use. It’s device::InterruptMgr defined in
src/device/InterruptMgr.h.
The main responsibility of the object of this class is to control global level interrupts, register
interrupt handlers from various Devices and invoke the appropriate handler when interrupt occurs.
The interface of the device::InterruptMgr is defined as following:
template <typename THandler = embxx::util::StaticFunction<void ()> >
class InterruptMgr
{
public:
    typedef THandler HandlerFunc;
    enum IrqId {
        IrqId_Timer,
        IrqId_AuxInt,
        IrqId_Gpio1,
        IrqId_Gpio2,
        IrqId_Gpio3,
        IrqId_Gpio4,
        IrqId_I2C,
        IrqId_SPI,
        IrqId_NumOfIds // Must be last
    };

    InterruptMgr();

    template <typename TFunc>
    void registerHandler(IrqId id, TFunc&& handler);

    void enableInterrupt(IrqId id);

    void disableInterrupt(IrqId id);

    void handleInterrupt();

private:
    typedef std::uint32_t EntryType;

    struct IrqInfo {
        ... // Contains interrupt related information
            // per single IrqId
    };

    typedef std::array<IrqInfo, IrqId_NumOfIds> IrqsArray;

    IrqsArray irqs_;
};
Every Driver will use registerHandler() member function to register its member function
as the handler for its IrqId. The enableInterrupt() and disableInterrupt() are also used by
the Device objects to control their interrupts on global level.
In order to use the Interrupt Manager described above every application has to implement proper
interrupt handler that will retrieve the reference to device::InterruptMgr object (via global/static
variables) and invoke its handleInterrupt() function, which in turn check the appropriate status
register(s) and invoke registered handler(s). Please note, that the handler will be executed in
interrupt context.
The code will look something like this:
extern "C"
void interruptHandler()
{
    System::instance().interruptMgr().handleInterrupt();
}
There may also be a need to enable/disable all the interrupts by toggling i flag in CPS
register. The same
src/device/InterruptMgr.h file
provides two function for this purpose:
namespace device
{

namespace interrupt
{

inline
void enable()
{
    __asm volatile("cpsie i");
}

inline
void disable()
{
    __asm volatile("cpsid i");
}

}  // namespace interrupt

}  // namespace device
Timer
It is customary in bare metal development to flash leds in the first application (instead of writing "Hello world"). However most tutorials show how to do it synchronously using loops to wait some time before changing state of the led. I’m going to describe how to do it asynchronously using timer interrupt in conjunction with Event Loop.
Almost every embedded platform has usually one or two timer peripherals. One such peripheral can be programmed to provide an interrupt after some period of time. However, there may be a need to have multiple timers that can be activated independently at the same time. It is quite clear that there should be an entity that receives all the wait requests from various Components in non-interrupt context, then queues the wait requests internally, programs the timer peripheral to provide an interrupt after some time, and finally reports the completion to appropriate Component via callback also in non-interrupt (event loop) context.
Such entity can be a generic (platform independent) Driver, if it is provided with platform specific Device object, that exposes some predefined public interface and controls the actual platform specific hardware.
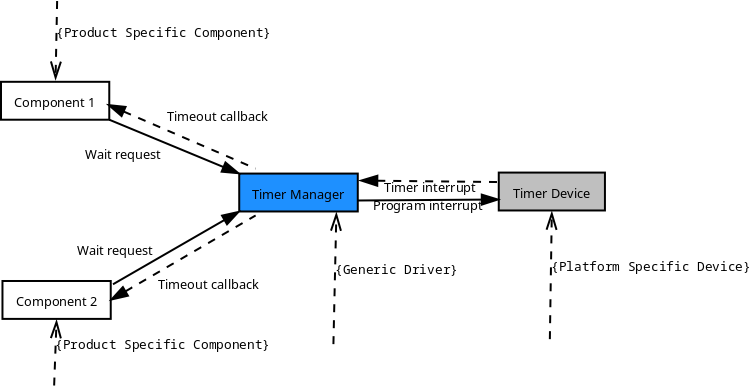
The asynchronous timer event handling follows the same pattern described in Device-Driver-Component chapter.
Assigning Wait Complete Callback
Just like described in Device-Driver-Component chapter the Driver needs to provide the "Wait Complete" callback object to be called when timer interrupt occurs. The assignment is usually performed during initialisation/construction stage of the Driver:
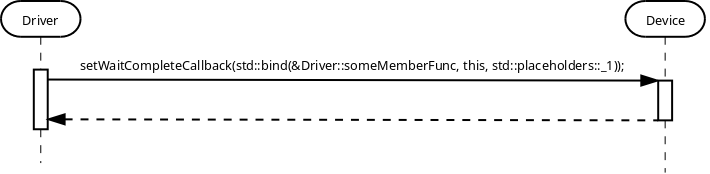
Starting Asynchronous Wait
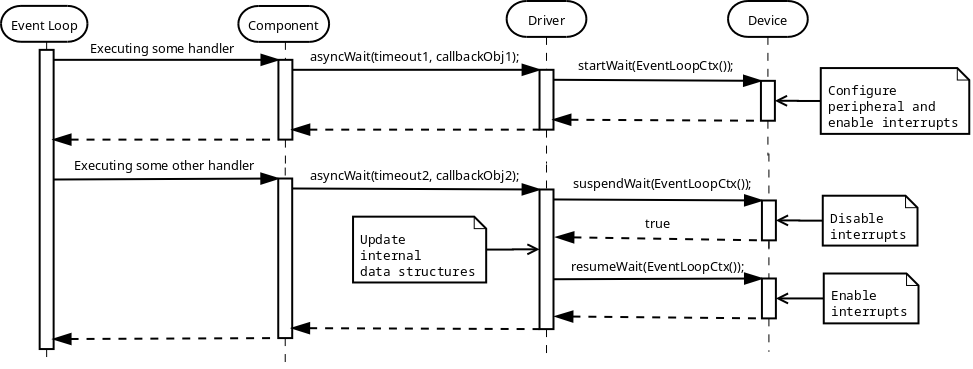
The Driver must be able to support multiple wait requests from various Components and manage
the internal queue accordingly. In the chart above the timer peripheral activated on the first
asyncWait() request. When the second request is issued (assuming timeout1 < timeout2 and
existing wait mustn’t be stopped), the Driver must prevent the completion of the currently
scheduled timer countdown being reported in interrupt context while interfering with an update
to internal data structures. The interrupts are disabled by calling suspendWait() member function
of the Device. The call to the suspendWait() returns true, which means the interrupts are
successfully disabled and it is safe to update internal data structures. If the call to suspendWait()
returns false, it means that the interrupt has already occurred and there is no existing wait
in progress, i.e. the second asyncWait() actually becomes a first one in the new sequence.
There also may be a case when timeout2 < timeout1 which means the order of the timeout requests
must be re-evaluated, and new wait re-programmed.
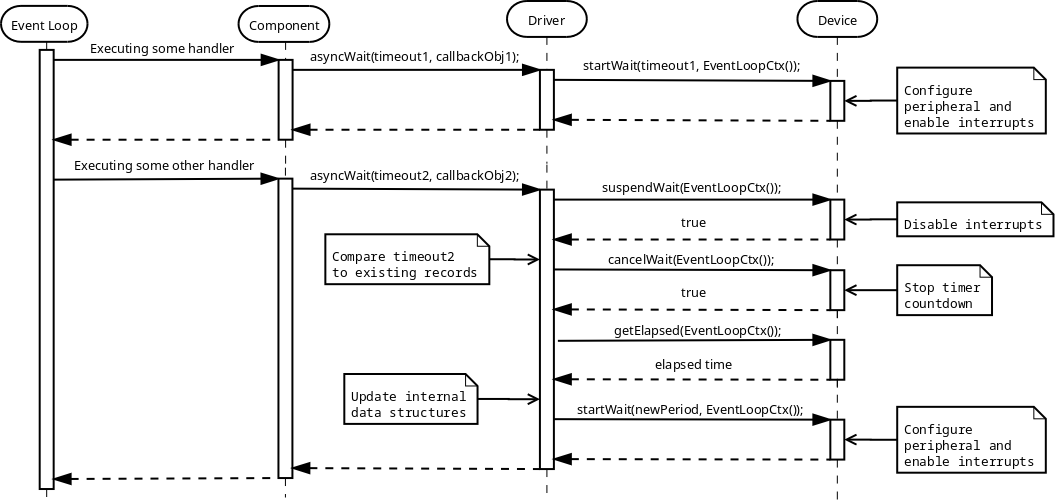
The Driver must be able to cancel the existing timer countdown, evaluate how much time has passed since the first request, evaluate the new values to reprogram the timer Device countdown again.
Completing Asynchronous Wait
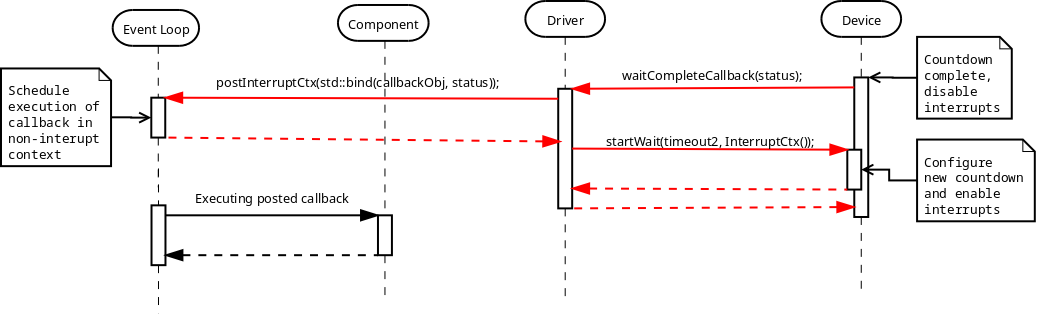
Due to the fact that Driver may receive multiple independent wait requests, it must reprogram the
next wait (if such exists) while running in interrupt mode. Please pay attention to InterruptCtx()
tag parameter passed to the startWait() member function of the Device. It indicates that the request
is executed in interrupt context, while the same request used EventLoopCtx() as the tag parameter
to specify that the call was performed in event loop (non-interrupt) context.
Canceling Asynchronous Wait
If there is a request to cancel the currently executed wait, the Driver must receive the information about the elapsed time and reprogram the next wait if such exists.
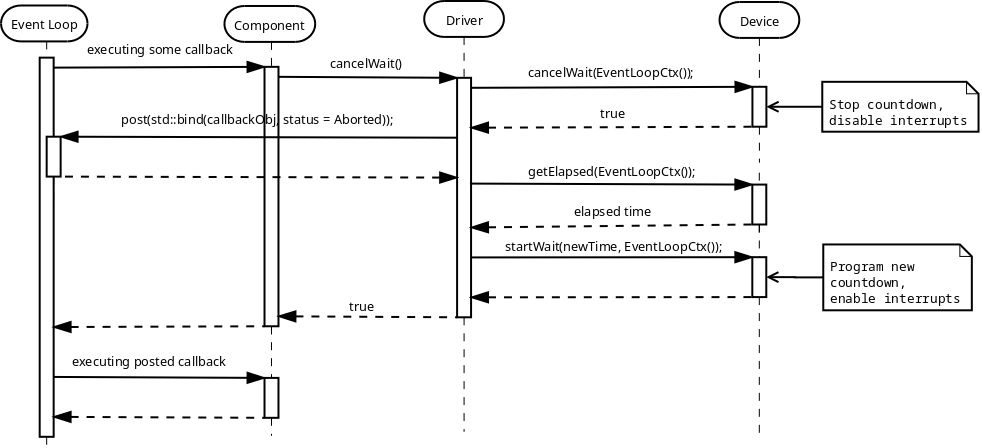
If the cancellation request to some other wait, that hasn’t been forwarded to the Device, the Driver just needs to update its internal data structures without canceling currently performed timer countdown.
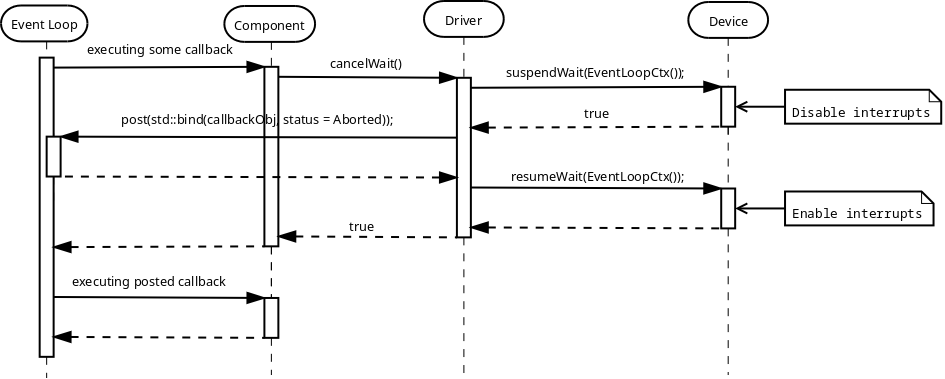
The unsuccessful attempts to cancel wait is performed in exactly the same way as described in Device-Driver-Component chapter.
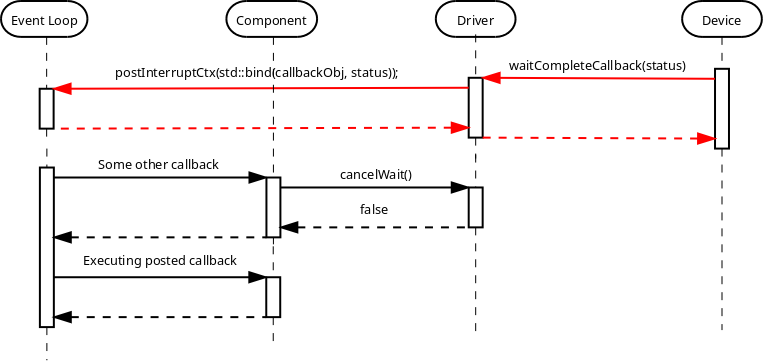
Identifying Wait Requests
There is obviously a need to have some kind of identification of the wait requests in order to be able to cancel some specific request while keeping the rest in waiting queue. One approach would be to have some kind of a handle which can be used during the cancellation request:
class MyTimerDriver
{
public:
    typedef ... Handle;

    Handle asyncWait(...);

    void cancelWait(Handle handle);
};
Another one is to hide the handle in some wrapper class, which makes it a bit safer to use:
class MyTimerDriver
{
public:

    typedef ... Handle;

    class Timer
    {
    public:
        Timer(MyTimerDriver& mgr, Handle handle)
          : mgr_(mgr),
            handle_(handle)
        {
        }

        ~Timer()
        {
            ... // Invalidate the allocated handle
        }

        void asyncWait(...)
        {
            mgr_.asyncWait(handle_, ...)
        }

        void cancelWait()
        {
            mgr_.cancelWait(handle_);
        }

    private:
	MyTimerDriver& mgr_;
        Handle handle_;
    };

    Timer allocTimer()
    {
        auto someHandle = ...;
        return Timer(*this, someHandle)
    }

private:

    friend class TimerMgr::Timer;

    void asyncWait(Handle handle, ...);

    void cancelWait(Handle handle);
};
The Driver itself has only one public function allocTimer(). It is used to allocate the Timer
object. All the wait and/or cancel requests are issued to this timer object directly, which is declared
to be a friend of the Driver class, i.e. it is able to call private functions of the latter using the
handle it has. The destructor of the Timer makes sure that the handle is properly invalidated.
MyTimerDriver driver(...);
auto timer = driver.allocTimer();
timer.asyncWait(...);
...
timer.cancelWait();
...
The second approach is a bit safer than the first one and it is used in the implementation of such generic "Timer Management Driver" in embxx library.
Specifying the Wait Duration
The timer Device is platform specific. Some platforms may support wait duration granularity of a microsecond, others can achieve only a millisecond. It usually depends on the system clock speed. However, when using generic Driver and/or Component there is a need to be able to write platform independent code that performs wait of the specified duration regardless of the Device in use. The Standard Template Library (STL) of C++11 standard provides convenient Date and Time Utilities that make such usage possible.
In case the Device declares a minimal wait duration unit using std::chrono::duration type, the Driver may use std::chrono::duration_cast to convert the requested wait duration to supported duration units.
class MyTimerDevice
{
public:
    typedef std::chrono::duration<unsigned, std::milli>
                                                WaitTimeUnitDuration;

    typedef embxx::device::context::EventLoop EventLoopCtx;

    void startWait(WaitTimeUnitDuration::rep count, EventLoopCtx) {...}
    ...
};
In the example above the minimal supported duration unit (WaitTimeUnitDuration) is declared to be
1 millisecond. Please note that startWait() member function expects to receive number of wait units,
i.e. milliseconds as its first parameter.
Then the definition of the asyncWait() member function of the Driver may be defined like this:
template <typename TDevice, ...>
class MyTimerDriver
{
public:
    typedef typename TDevice::WaitTimeUnitDuration WaitTimeUnitDuration
    class Timer
    {
    public:
        template <typename TRep, typename TPeriod, typename TFunc>
        void asyncWait(
            const std::chrono::duration<TRep, TPeriod>& waitTime,
            TFunc&& func)
        {
            auto castedWaitDuration =
                std::chrono::duration_cast<WaitTimeUnitDuration>(waitTime);
            auto waitUnits = castedWaitDuration.count();
            ... // Call the asyncWait() of the driver with waitUnits as
                // first parameter.
        }

    };
};
In the example above the call below will perform correct adjustment of the duration and will measure
the same timeout with any Device whether the latter expects milliseconds or microseconds in its
startWait() member function.
timer.asyncWait(std::chrono::seconds(5), ...);In case the developer tries to execute a wait of several microseconds when Driver supports only milliseconds granularity, the compilation will fail.
timer.asyncWait(std::chrono::microseconds(5), ...);Driver Implementation
The timer management Driver is a generic layer. It must work on any platform with any timer Device object that exposes the right interface.
Such Driver is already implemented in embxx library as
embxx::driver::TimerMgr and resides in
embxx/driver/TimerMgr.h while
platform specific (Raspberry Pi) peripheral control object is implemented in
embxx_on_rpi project as device::Timer and resides in
src/device/Timer.h.
The embxx::driver::TimerMgr is defined like this:
template <typename TDevice,
          typename TEventLoop,
          std::size_t TMaxTimers,
          typename TTimeoutHandler = embxx::util::StaticFunction<void (const embxx::error::ErrorStatus&)> >
class TimerMgr
{
public:
    TimerMgr(TDevice& device, TEventLoop& el);
      : device_(device),
        el_(el)
    {
        ...
    }

    ...

private:
    struct TimerInfo {
        TTimeoutHandler handler_; //
        ...;                      // Some other internal data
    }

    // Internal data structures to track all the scheduled
    // wait requests.
    std::array<TimerInfo, TMaxTimers> infos_;

    TDevice& device_;
    TEventLoop& el_;
    ...
};
The TDevice template parameter is Platform specific control class for timer peripheral.
The TEventLoop template parameter is the class of the Event Loop.
The TMaxTimers template parameters specifies the maximal number of timer objects the TimerMgr
will be able to allocate. This parameter is required because embxx::driver::TimerMgr was designed
to be used in the systems without dynamic memory allocation. If dynamic memory allocation is allowed,
then it is quite easy to implement similar functionality without this limitation.
The TTimeoutHandler template parameter specifies type of the timeout callback object.
This object must have void (const embxx::error::ErrorStatus&) signature and expose similar interface to
std::function or
embxx::util::StaticFunction.
The embxx::driver::TimerMgr exposes the following public interface:
template <...>
class TimerMgr
{
public:
    class Timer
    {
    public:
        // Destructor, removes Timer record from internal
        // data structures of TimerMgr
        ~Timer() {...}

        // Activates asyncrhonous wait
        void asyncWait(...) {...}

        // Cancels scheduled asynchronous wait
        void cancel() {...}
    };

    // Allocate timer object
    Timer allocTimer() {...}

private:
    // Allows usage of non-exposed private functions of
    // TimerMgr
    friend class TimerMgr::Timer;
    ...
};
The reader may notice that embxx::driver::TimerMgr exposes only one public function: Timer allocTimer();.
This function returns simple TimerMgr::Timer object which can be used to schedule new wait as well as
cancel the previous wait request.
Also note that TimerMgr::Timer class is declared to be a friend of TimerMgr. This is required to
allow seamless delegation of the wait/cancel request from TimerMgr::Timer to TimerMgr
which is responsible for managing multiple simultaneous wait requests and delegating them one by one
to the the actual hardware control object.
Then the led flashing application (implemented in src/app/app_led_flash) can be as simple as the code below:
namespace
{

const auto LedChangeStateTimeout = std::chrono::milliseconds(500);

template <typename TTimer>
void ledOff(
    TTimer& timer,
    System::Led& led);

template <typename TTimer>
void ledOn(
    TTimer& timer,
    System::Led& led)
{
    led.on();

    timer.asyncWait(
        LedChangeStateTimeout,
        [&timer, &led](const embxx::error::ErrorStatus& status)
        {
            static_cast<void>(status);
            ledOff(timer, led);
        });
}

template <typename TTimer>
void ledOff(
    TTimer& timer,
    System::Led& led)
{
    led.off();

    timer.asyncWait(
        std::chrono::milliseconds(LedChangeStateTimeout),
        [&timer, &led](const embxx::error::ErrorStatus& status)
        {
            static_cast<void>(status);
            ledOn(timer, led);
        });
}

}  // namespace

int main() {
    // Get reference to TimerMgr object
    auto& system = System::instance();
    auto& timerMgr = system.timerMgr();

    // Allocate timer
    auto timer = timerMgr.allocTimer();

    // Start flashing with initial state to be OFF
    device::interrupt::enable();
    ledOff(timer, led);

    // Run the event loop
    auto& el = system.eventLoop();
    el.run();

    GASSERT(0); // Mustn't exit
    return 0;
}
Platform Specific Timer Device
As it was already mentioned earlier, the embxx::driver::TimerMgr is a generic Driver class that does most
of the work of managing and scheduling independent wait requests. It requires support from low level timer
Device object to program the actual hardware of the platform the code runs on. The
embxx::driver::TimerMgr is defined to receive the Device class as template parameter as well as reference
to the Device timer object in the constructor. The Driver doesn’t know the exact Device type, but
expects it to expose certain public interface:
template <typename TDevice, typename TEventLoop, ...>
class TimerMgr
{
public:
    TimerMgr(TDevice& device, TEventLoop& el);
    ...
};
The timer control Device class must expose the following public interface:
-
Define
WaitTimeUnitDurationtype as variation of std::chrono::duration that specifies duration of single wait unit supported by the Device.typedef std::chrono::duration<...> WaitTimeUnitDuration; -
Function to set the callback object to be invoked from timer interrupt:
template <typename TFunc> void setWaitCompleteCallback(TFunc&& func); -
Functions to start timer countdown in both event loop (non-interrupt) and interrupt contexts:
void startWait( WaitTimeUnitDuration::rep waitTime, // num of wait units embxx::device::context::EventLoop context); void startWait( WaitTimeUnitDuration::rep waitTime, // num of wait units embxx::device::context::Interrupt context); -
Function to cancel timer countdown in event loop (non-interrupt) context. The function must return true in case the wait was actually canceled and false when there is no wait in progress.
bool cancelWait(embxx::device::context::EventLoop context); -
Function to suspend countdown (disable interrupts while the actual wait countdown is not stopped) in event loop (non-interrupt) context. The function must return true in case the wait was actually suspended and false when there is no wait in progress. The call to this function will be followed either by
resumeWait()or bycancelWait().bool suspendWait(embxx::device::context::EventLoop context); -
Function to resume countdown in event loop (non-interrupt) context.
void resumeWait(embxx::device::context::EventLoop context); -
Function to retrieve elapsed time of the last executed wait. It will be called right after the
cancelWait().WaitTimeUnitDuration::rep getElapsed(embxx::device::context::EventLoop context) const;
The definition and implementation of such timer device for Raspberry Pi platform can be found in src/device/Timer.h file of embxx_on_rpi project.
UART
Our next stage will be to support debug logging via UART interface. In conventional C++ logging is performed using either printf function or output streams (such as std::cout or std::cerr).
If printf is used the compilation may fail at the linking stage with following errors:
/usr/bin/../lib/gcc/arm-none-eabi/4.8.3/../../../../arm-none-eabi/lib/libc.a(lib_a-sbrkr.o): In function `_sbrk_r':
sbrkr.c:(.text._sbrk_r+0x18): undefined reference to `_sbrk'
/usr/bin/../lib/gcc/arm-none-eabi/4.8.3/../../../../arm-none-eabi/lib/libc.a(lib_a-writer.o): In function `_write_r':
writer.c:(.text._write_r+0x20): undefined reference to `_write'
/usr/bin/../lib/gcc/arm-none-eabi/4.8.3/../../../../arm-none-eabi/lib/libc.a(lib_a-closer.o): In function `_close_r':
closer.c:(.text._close_r+0x18): undefined reference to `_close'
/usr/bin/../lib/gcc/arm-none-eabi/4.8.3/../../../../arm-none-eabi/lib/libc.a(lib_a-fstatr.o): In function `_fstat_r':
fstatr.c:(.text._fstat_r+0x1c): undefined reference to `_fstat'
/usr/bin/../lib/gcc/arm-none-eabi/4.8.3/../../../../arm-none-eabi/lib/libc.a(lib_a-isattyr.o): In function `_isatty_r':
isattyr.c:(.text._isatty_r+0x18): undefined reference to `_isatty'
/usr/bin/../lib/gcc/arm-none-eabi/4.8.3/../../../../arm-none-eabi/lib/libc.a(lib_a-lseekr.o): In function `_lseek_r':
lseekr.c:(.text._lseek_r+0x20): undefined reference to `_lseek'
/usr/bin/../lib/gcc/arm-none-eabi/4.8.3/../../../../arm-none-eabi/lib/libc.a(lib_a-readr.o): In function `_read_r':
readr.c:(.text._read_r+0x20): undefined reference to `_read'
collect2: error: ld returned 1 exit status
Once these functions are stubbed with empty bodies, the compilation will succeed, but the image size will be quite big (around 45KB).
The _sbrk function is required to support dynamic memory allocation. The printf function probably
uses malloc() to allocate some temporary buffers. If we open the assembly listing file we will see
calls to <malloc> and <free>.
The _write function is used to write characters into the standard output consol, which doesn’t
exist in embedded product. The developer must use this function implementation to write all the provided
characters to UART serial interface. Many developers implement this function in a straightforward
synchronous way with busy loop:
extern "C" int _write(int file, char *ptr, int len)
{
    int count = len;
    if (file == 1) { // stdout
        while (count > 0) {
            while (... /* poll the status bit */) {} // just wait
            TX_REG = *ptr;
            ++ptr;
            --count;
        }
    }
    return len;
}
In this case the call to printf function will be blocking and won’t return until all the characters
are written one by one to UART, which takes a lot of execution time. This approach is suitable for
quick and dirty debugging, but will quickly become impractical when the project grows.
In order to make the execution of printf quick, there must be some kind of interrupt driven component that
is responsible to buffer all the provided characters and forward it to UART asynchronously one by one using
"TX buffer register is free" kind of interrupts.
One of disadvantages in using printf for logging is a necessity to specify an output format of
the printed variables:
std::int32_t i = ...; // some value
printf("Value = %d\n");
In case the type of the printed variable changes, the developer must remember to update type in the
format string too. This is the reason why many C++ developers prefer using streams instead
of printf:
std::int32_t i = ...; // some value
std::cout << "Value = " << i << std::endl;
Even if type of printed variable changes the compiler will generate a call to appropriate
overloaded operator<< of std::ostream
and the value will be printed correctly. The developer will also have to implement the missing
_write function to write provided characters somewhere (UART interface in our case).
However using C++ streams in bare metal development is often not an option. They use exceptions to handle error cases as well as locales for formatting. The compilation of simple output statement with streams above created image of more than 500KB using GNU Tools for ARM Embedded Processors compiler.
To summarise all the stated above, there may be a problem to use standard printf function or output streams for debug logging, especially in systems with small memory and where dynamic memory allocations and exceptions mustn’t be used. Our ultimate goal will be creation of standard output stream like interface for debug logging while using asynchronous event handling with Device-Driver-Component model and Event Loop where most of the code is generic and only smal part of managing write of a single character to the UART interface is platform specific.
Asyncrhonous read and write operations on the UART interface are very similar to the generic way of programming and handling asynchronous events described earlier in Device-Driver-Component chapter.
Writing to UART
Stage1 - Sending asynchronous buffer write request from the Component layer to Driver in event loop (non-interrupt) context.

The Component calls asyncWrite() member function of the Driver and provides pointer to the buffer,
size of the buffer and the callback object to invoke when the write is complete. The asyncWrite() function
needs to be able to receive any type of callable object, such as
std::bind expression or
lambda function. To achieve this the function must
be templated:
class CharacterDriver
{
public:
    typedef ... CharType;

    template <typename TCallbackFunc>
    void asyncWrite(
        const CharType* buf,
        std::size_t bufSize,
        TCallbackFunc&& func);
};
According to the convention mentioned earlier,
the callback must receive an error status of whether the operation is successful as its first parameter.
When performing asynchronous operation on the buffer, it can be required to know how many characters have
been read / written before the error occurred, in case the operation wasn’t successful. For this purpose
such callback object must receive number of bytes written as the second parameter, i.e. expose
the void (const embxx::error::ErrorStatus& err, std::size_t bytesTransferred) signature.
When the Driver receives the asynchronous operation request, it forwards it to the Device,
letting the latter know how many bytes will be written during the whole process. Please note that Driver uses embxx::device::context::EventLoop tag parameter to specify that startWrite() member function of
Device is invoked in event loop (non-interrut) context. The job of the Device object is to enable
appropriate interrupts and return immediately. Once the interrupt occurs, the stage of writing the data begins.
Stage2 - Writing provided data.
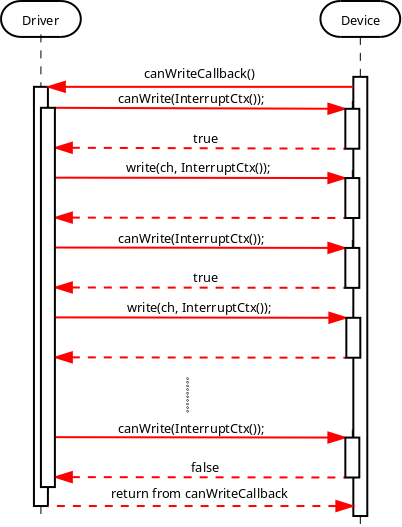
Once the interrupt of "TX available" occurs, the Device must let the Driver know. There must obviously be some kind of callback involved, which Driver must provide during its construction / initialisation stage. Let’s assume at this moment that such assignment was successfully done, and Device is capable of successfully notifying the Driver, that there is an ability to write character to TX FIFO of the peripheral.
When the Driver receives such notification, it attempts to write as many characters as possible:
typedef embxx::device::context::Interrupt InterruptContext;

void canWriteCallback()
{
    // Executed in interrupt context, must be quick
    while(device_.canWrite(InterruptContext())) {
        if ((writeBufStart_ + writeBufSize_) <= currentWriteBufPtr_) {
            break;
        }

        device_.write(*currentWriteBufPtr_, InterruptContext());
        ++currentWriteBufPtr_;
    }
}
This is because when "TX available" interrupt occurs, there may be a place for multiple characters to be sent, not just one. Doing checks and writes in a loop may save many CPU cycles.
Please note, that all these calls are performed in interrupt context. They are marked in red in the picture above.
Once the Tx FIFO of the underlying Device is full or there are no more characters to write, the callback returns. The whole cycle described above is repeated on every "TX available" interrupt until the whole provided buffer is sent to the Device for writing.
Stage3 - Notifying caller about completion:
Once the whole buffer is sent to the Device for writing, the Driver is aware that there will be no more writes performed. However it doesn’t report completion until the Device itself calls appropriate callback indicating that the operation has been indeed completed. Shifting the responsibility of identifying when the operation is complete to Device will be needed later when we will want to reuse the same Driver for I2C and SPI peripherals. It will be important to know when internal Tx FIFO of the peripheral becomes empty after all the characters from previous operation have been written.
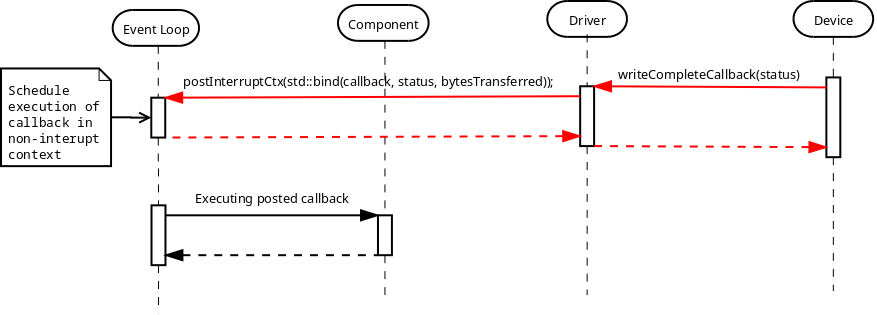
Once the Driver receives notification from the Device (still in interrupt context), that the write operation
is complete, it bundles the callback object, provided with initial asyncWrite() request, together with error
status and number of actual bytes transferred using
std::bind expression and sends the callable object
to Event Loop for execution in event loop (non-interrupt) context.
Reading from UART
The reading from UART is done in a very similar manner.
Stage1 - Sending asynchronous buffer read request from the Component layer to Driver in event loop (non-interrupt) context.

The asyncRead() member function of the Driver should allow callback to be callable object of any type
(but one that exposes predefined signature of course).
class CharacterDriver
{
public:
    typedef ... CharType;

    template <typename TCallbackFunc>
    void asyncRead(
        CharType* buf,
        std::size_t bufSize,
        TCallbackFunc&& func);
};
Stage2 - Reading data into the buffer.
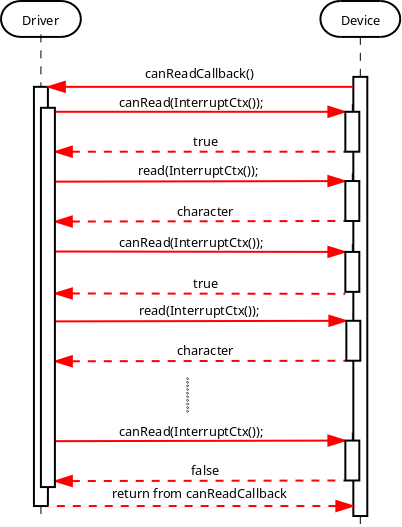
The callback’s implementation will be something like:
    void canReadCallback()
    {
        while(device_.canRead(InterruptContext())) {
            if ((readBufStart_ + readBufSize_) <= currentReadBufPtr_) {
                break;
            }

            auto ch = device_.read(InterruptContext());
            *currentReadBufPtr_ = ch;
            ++currentReadBufPtr_;
        }
    }
Stage3 - Notifying caller about completion:

Cancelling Asynchronous Operations
The cancellation flow is very similar to the one described in Device-Driver-Component chapter:
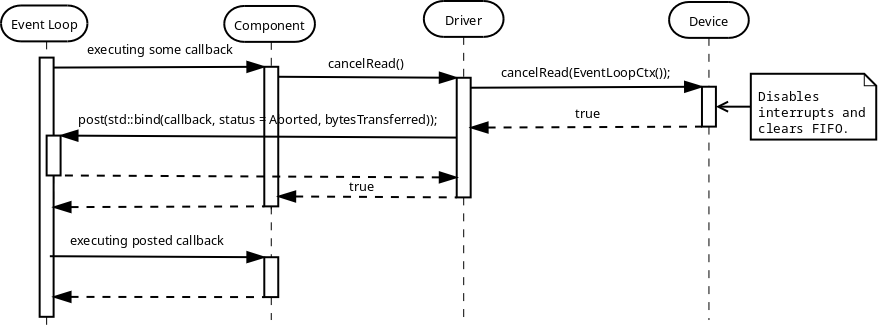
If the cancellation is successful, the callback must be invoked with error code indicating that the
operation was aborted (embxx::error::ErrorCode::Aborted).
One possible case of unsuccessful cancellation is when callback was posted for execution in event loop,
but hasn’t been executed yet when cancellation is attempted. In this case Driver is aware that there
is no pending asynchronous operation and can return false immediately.
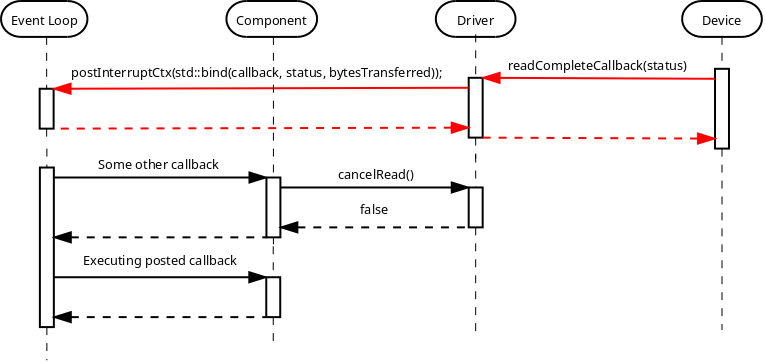
Another possible case of unsuccessful cancellation is when completion interrupt occurs in the middle of cancellation request:
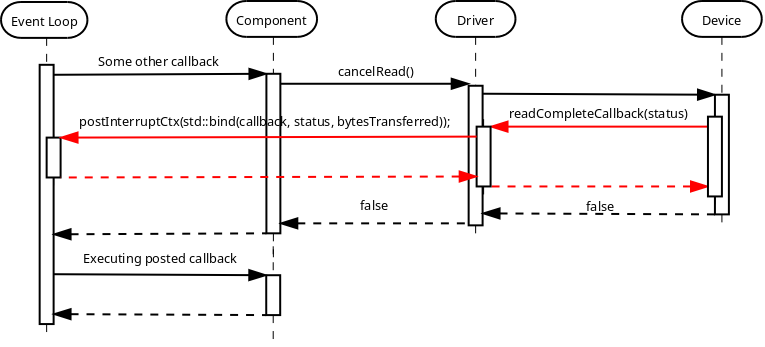
Reading "Until"
There may be a case, when partial read needs to be performed, for example until specific character is encountered. In this case the Driver is responsible to monitor incoming characters and cancel the read into the buffer operation before its completion:

Note, that previously Driver called cancelRead() member function of the Device in event
loop (non-interrupt) context, while in "read until" situation the cancellation happens in interrupt mode.
That requires Device to implement these functions for both modes:
class MyDevice
{
public:
    bool cancelRead(embxx::device::context::EventLoop) {...}
    bool cancelRead(embxx::device::context::Interrupt) {...}
};
The asyncReadUntil() member function of the Driver should be able to receive any stateless
predicate object that defines bool operator()(CharType ch) const. The predicate invocation should
return true when expected character is received and reading operation must be stopped.
class MyDriver
{
public:
    template <typename TPred, typename TFunc>
    void asyncReadUntil(
        CharType* buf,
        std::size_t size,
        TPred&& pred,
        TFunc&& func)
    {
        ...
    }
};
It allows using complex conditions in evaluating the character. For example, stopping when either
'\r' or '\n' is encountered:
typedef embxx::error::ErrorStatus EmbxxErrorStatus;

driver_.asyncReadUntil(
    buf,
    bufSize,
    [](CharType ch) -> bool
        {
            return (ch == '\r') || (ch == '\n');
        },
    [](const EmbxxErrorStatus& es, std::size_t bytesTransferred)
        {
            ...
        });
Device Implementation
In this section I will try to describe in more details what Device class needs to provide for the Driver to work correctly. First of all it needs to define the type of characters used:
class MyDevice
{
public:
    typedef std::uint8_t CharType;
};
The Driver layer will reuse the definition of the character in its internal functions:
template<typename TDevice, ...>
class MyDriver
{
public:
    typedef typename TDevice::CharType CharType;

    void asyncRead(CharType* buf, std::size_t bufSize, ...) {}
};
There is a need for Device to be able to record callback objects from the Driver in order to notify the latter about an ability to read/write next character and about operation completion.
class MyDevice
{
public:
    template <typename TFunc>
    void setCanReadHandler(TFunc&& func)
    {
        canReadHandler_ = std::forward<TFunc>(func);
    }

    template <typename TFunc>
    void setCanWriteHandler(TFunc&& func)
    {
        canWriteHandler_ = std::forward<TFunc>(func);
    }

    template <typename TFunc>
    void setReadCompleteHandler(TFunc&& func)
    {
        readCompleteHandler_ = std::forward<TFunc>(func);
    }

    template <typename TFunc>
    void setWriteCompleteHandler(TFunc&& func)
    {
        writeCompleteHandler_ = std::forward<TFunc>(func);
    }

private:
    typedef ... OpAvailableHandler;
    typedef ... OpCompleteHandler;

    OpAvailableHandler canReadHandler_;
    OpCompleteHandler readCompleteHandler_;

    OpAvailableHandler canWriteHandler_;
    OpCompleteHandler writeCompleteHandler_;

};
The OpAvailableHandler and OpCompleteHandler type may be either hard coded to be std::function<void ()>
and std::function<void (const embxx::error::ErrorStatus&)> respectively or passed as template parameters:
template <typename TCanReadHandler,
          typename TCanWriteHandler,
          typename TReadCompleteHandler,
          typename TWriteCompleteHandler>
class MyDevice
{
public:
    ... // setters are as above

private:

    TCanReadHandler canReadHandler_;
    TReadCompleteHandler readCompleteHandler_;

    TCanWriteHandler canWriteHandler_;
    TWriteCompleteHandler writeCompleteHandler_;
};
Choosing the "template parameters option" is useful when the same Device class is reused between multiple applications for the same product line.
The next stage would be implementing all the required functions:
class MyDevice
{
public:

    typedef embxx::device::context::EventLoop EventLoopContext;
    typedef embxx::device::context::Interrupt InterruptContext;

    // Start read operation - enables interrupts
    void startRead(std::size_t length, EventLoopContext context);

    // Cancel read in event loop context
    bool cancelRead(EventLoopContext context);

    // Cancel read in interrupt context - used only if
    // asyncReadUntil() function was used in Device
    bool cancelRead(InterruptContext context);

    // Start write operation - enables interrupts
    void startWrite(std::size_t length, EventLoopContext context);

    // Cancell write operation
    bool cancelWrite(EventLoopContext context);

    // Check whether there is a character available to be read.
    bool canRead(InterruptContext context);

    // Check whether there is space for one character to be written.
    bool canWrite(InterruptContext context);

    // Read the available character from Rx FIFO of the peripheral
    CharType read(InterruptContext context);

    // Write one more character to Tx FIFO of the peripheral
    void write(CharType value, InterruptContext context);
};
Note, that there may be extra configuration functions specific for the peripheral being controlled. For example baud rate, parity, flow control for UART. Such configuration is almost always platform and/or product specific and usually performed at application startup. It is irrelevant to the Device-Driver-Component model introduced in this book.
class MyDevice
{
public:
    void configBaud(unsigned value) { ... }
    ...
};
The embxx_on_rpi project has multiple applications that use UART1 interface for logging. The peripheral control code is the same for all of them and is implemented in src/device/Uart1.h.
Driver Implementation
Driver must be a generic piece of code, that can be reused with any Device control object (as long as it exposed right public interface) and in any application, including ones without dynamic memory allocation.
First of all, we will need references to Device as well as Event Loop objects:
template <typename TDevice, typename TEventLoop>
class MyDriver
{
public:
    // Reuse definition of character type from the Device
    typedef TDevice::CharType CharType;

    // During the construction store references to Device
    // and Event Loop objects.
    MyDriver(TDevice& device, TEventLoop& el)
      : device_(device),
        el_(el)
    {
        // Register appropriate callbacks with device
        device_.setCanReadHandler(
            std::bind(
                &MyDriver::canReadInterruptHandler, this));
        device_.setReadCompleteHandler(
            std::bind(
                &MyDriver::readCompleteInterruptHandler,
                this,
                std::placeholders::_1));

        device_.setCanWriteHandler(
            std::bind(
                &MyDriver::canWriteInterruptHandler, this));
        device_.setWriteCompleteHandler(
            std::bind(
                &MyDriver::writeCompleteInterruptHandler,
                this,
                std::placeholders::_1));

    }

    ...

private:

    void canReadInterruptHandler() {...}
    void readCompleteInterruptHandler(
        const embxx::error::ErrorStatus& es) {...}

    void canWriteInterruptHandler() {...}
    void writeCompleteInterruptHandler(
        const embxx::error::ErrorStatus& es) {...}

    TDevice& device_;
    TEventLoop& el_;
};
We will also need to store callbacks provided with any asynchronous operation. Note that the "read" and
"write" are independent operations and it should be possible to perform asyncRead() and asyncWrite()
calls at the same time.
The only way to make Driver generic is to move responsibility of specifying callback storage type up one level, i.e. we must put them as template parameters:
template <typename TDevice,
          typename TEventLoop,
          typename TReadCompleteCallback,
          typename TWriteCompleteCallback>
class MyDriver
{
public:
    ...

    typedef embxx::device::context::EventLoop EventLoopContext;

    template <typename TFunc>
    void asyncRead(
        CharType* buf,
        std::size_t bufSize,
        TFunc&& func)
    {
        readBufStart_ = buf;
        currentReadBufPtr = buf;
        readBufSize_ = bufSize;
        readCompleteCallback_ = std::forward<TFunc>(func);
        driver_.startRead(bufSize, EventLoopContext());
    }

    template <typename TFunc>
    void asyncWrite(
        const CharType* buf,
        std::size_t bufSize,
        TFunc&& func)
    {
        writeBufStart_ = buf;
        currentWriteBufPtr = buf;
        writeBufSize_ = bufSize;
        writeCompleteCallback_ = std::forward<TFunc>(func);
        driver_.startWrite(bufSize, EventLoopContext());
    }

private:
    ...

    // Read info
    CharType* readBufStart_;
    CharType* currentReadBufPtr_;
    std::size_t readBufSize_;
    TReadCompleteCallback readCompleteCallback_;

    // Write info
    const CharType* writeBufStart_;
    const CharType* currentWriteBufPtr_;
    std::size_t writeBufSize_;
    TWriteCompleteCallback writeCompleteCallback_;
};
As it was mentioned earlier in Reading "Until" section, there is quite often a need to stop reading characters into the provided buffer when some condition evaluates to true. It means there is also a need to provide storage for the character evaluation predicate:
template <typename TDevice,
          typename TEventLoop,
          typename TReadCompleteCallback,
          typename TWriteCompleteCallback,
          typename TReadUntilPred>
class MyDriver
{
public:
    ...

    typedef embxx::device::context::EventLoop EventLoopContext;

    template <typename TPred, typename TFunc>
    void asyncReadUntil(
        CharType* buf,
        std::size_t bufSize,
        TPred&& pred,
        TFunc&& func)
    {
        readBufStart_ = buf;
        currentReadBufPtr = buf;
        readBufSize_ = bufSize;
        readCompleteCallback_ = std::forward<TFunc>(func);
        readUntilPred_ = std::forward<TPred>(pred)
        driver_.startRead(bufSize, EventLoopContext());
    }

private:
    ...

    // Read info
    CharType* readBufStart_;
    CharType* currentReadBufPtr_;
    std::size_t readBufSize_;
    TReadCompleteCallback readCompleteCallback_;
    TReadUntilPred readUntilPred_;

    ...
};
The example code above may work, but it contradicts to one of the basic principles of C++: "You should pay only for what you use". In case of using UART for logging, there is no input from the peripheral and it is a waist to keep data members for "read" required to manage "read" operations. Let’s try to improve the situation a little bit by using template specialisation as well as reduce number of template parameters by using "Traits" aggregation struct.
struct MyOutputTraits
{
    // The "read" handler storage type.
    typedef std::nullptr_t ReadHandler;

    // The "write" handler storage type.
    // The valid handler must have the following signature:
    //  "void handler(const embxx::error::ErrorStatus&, std::size_t);"
    typedef embxx::util::StaticFunction<
        void(const embxx::error::ErrorStatus&, std::size_t)> WriteHandler;

    // The "read until" predicate storage type
    typedef std::nullptr_t ReadUntilPred;

    // Read queue size
    static const std::size_t ReadQueueSize = 0;

    // Write queue size
    static const std::size_t WriteQueueSize = 1;
};
Please note, that allowed number of pending "read" requests is specified as 0 in the traits struct above, i.e. the read operations are not allowed. The "read complete" and "read until predicate" types are irrelevant and specified as std::nullptr_t. The instantiation of the Driver object must take it into account and not include any "read" related functionality. In order to achieve this the Driver class needs to have two independent sub-functionalities of "read" and "write". It may be achieved by inheriting from two base classes.
template <typename TDevice,
          typename TEventLoop,
          typename TTraits = MyOutputTraits>
class MyDriver :
    public ReadSupportBase<
                TDevice,
                TEventLoop,
                typename TTraits::ReadHandler,
                typename TTraits::ReadUntilPred,
                TTraits::ReadQueueSize>,
    public WriteSupportBase<
                TDevice,
                TEventLoop,
                typename TTraits::WriteHandler,
                TTraits::WriteQueueSize>
{
    typedef ReadSupportBase<...> ReadBase;
    typedef WriteSupportBase<...> WriteBase;
public:
    template <typename TPred, typename TFunc>
    void asyncRead(
        CharType* buf,
        std::size_t bufSize,
        TFunc&& func)
    {
        ReadBase::asyncRead(buf, bufSize, std::forward<TFunc>(func);
    }

    template <typename TPred, typename TFunc>
    void asyncWrite(
        const CharType* buf,
        std::size_t bufSize,
        TFunc&& func)
    {
        WriteBase::asyncWrite(buf, bufSize, std::forward<TFunc>(func);
    }
};
Now, the template specialisation based on queue size should do the job:
template <typename TDevice,
          typename TEventLoop,
          typename TReadHandler,
          typename TReadUntilPred,
          std::size_t ReadQueueSize>;
class ReadSupportBase;


template <typename TDevice,
          typename TEventLoop,
          typename TReadHandler,
          typename TReadUntilPred>;
class ReadSupportBase<TDevice, TEventLoop, TReadHandler, TReadUntilPred, 1>
{
public:
    ReadSupportBase(TDevice& device, TEventLoop& el) {...}
    ... // Implements the "read" related API
private:
    ... // Read related data members
};

template <typename TDevice,
          typename TEventLoop,
          typename TReadHandler,
          typename TReadUntilPred>;
class ReadSupportBase<TDevice, TEventLoop, TReadHandler, TReadUntilPred, 0>
{
public:
    ReadSupportBase(TDevice& device, TEventLoop& el) {}
    // No need for any "read" related API and data members
};

template <typename TDevice,
          typename TEventLoop,
          typename TWriteHandler,
          std::size_t WriteQueueSize>;
class WriteSupportBase;


template <typename TDevice,
          typename TEventLoop,
          typename TReadHandler>;
class WriteSupportBase<TDevice, TEventLoop, TWriteHandler, 1>
{
public:
    WriteSupportBase(TDevice& device, TEventLoop& el) {...}
    ... // Implements the "write" related API
private:
    ... // Write related data members
};

template <typename TDevice,
          typename TEventLoop,
          typename TWriteHandler>;
class WriteSupportBase<TDevice, TEventLoop, TWriteHandler, 0>
{
public:
    WriteSupportBase(TDevice& device, TEventLoop& el) {}
    // No need for any "write" related API and data members
};
Note, that it is possible to implement general case when read/write queue size is greater than 1. It will require some kind of request queuing (using Static (Fixed Size) Queue for example) and will allow issuing multiple asynchronous read/write requests at the same time.
In order to support this extension, the Device class must implement some extra functionality too:
-
The new read/write request can be issued by the Driver in interrupt context, after previous operation reported completion.
class MyDevice { public: void startRead(std::size_t length, InterruptContext context); void startWrite(std::size_t length, InterruptContext context); }; -
When new asynchronous read/write request is issued to the Driver it must be able to prevent interrupt context callbacks from being invoked to avoid races on the internal data structure:
class MyDevice
{
public:
    bool suspendRead(EventLoopContext context);
    void resumeRead(EventLoopContext context)
    bool suspendWrite(EventLoopContext context);
    void resumeWrite(EventLoopContext context);
};
Please pay attention to the boolean return value of
suspend*()functions. They are likecancel*()ones, there is an indication whether the invocation of the callbacks is suspended or there is no operation currently in progress.
Such generic Driver is already implemented in embxx/driver/Character.h file of embxx library. The Driver is called "Character", because it reads/writes the provided buffer one character at a time.
Character Echo Application
Now, it is time to do something practical. The app_uart1_echo application in embxx_on_rpi project implements simple single character echo.
The System class in System.h
file defines the Device and Driver layers:
class System
{
public:
    static const std::size_t EventLoopSpaceSize = 1024;
    typedef embxx::util::EventLoop<
        EventLoopSpaceSize,
        device::InterruptLock,
        device::WaitCond> EventLoop;

    typedef device::InterruptMgr<> InterruptMgr;

    typedef device::Uart1<InterruptMgr> Uart;

    typedef embxx::driver::Character<Uart, EventLoop> UartSocket;

    ...

private:

    ...
    EventLoop el_;
    Uart uart_;
    UartSocket uartSocket_;
};
Note that UartSocket uses default "TTraits" template parameter of embxx::driver::Character, which is defined to be:
struct DefaultCharacterTraits
{
    typedef embxx::util::StaticFunction<
        void(const embxx::error::ErrorStatus&, std::size_t)> ReadHandler;
    typedef embxx::util::StaticFunction<
        void(const embxx::error::ErrorStatus&, std::size_t)> WriteHandler;
    typedef std::nullptr_t ReadUntilPred;
    static const std::size_t ReadQueueSize = 1;
    static const std::size_t WriteQueueSize = 1;
};
It allows usage of both "read" and "write" operations at the same time. Having the definitions in place it is quite easy to implement the "echo" functionality:
// Forward declaration
void writeChar(System::UartSocket& uartSocket, System::Uart::CharType& ch);

void readChar(System::UartSocket& uartSocket, System::Uart::CharType& ch)
{
    uartSocket.asyncRead(&ch, 1,
        [&uartSocket, &ch](const embxx::error::ErrorStatus& es, std::size_t bytesRead)
        {
            GASSERT(!es);
            GASSERT(bytesRead == 1);
            static_cast<void>(es);
            static_cast<void>(bytesRead);
            writeChar(uartSocket, ch);
        });
}

void writeChar(System::UartSocket& uartSocket, System::Uart::CharType& ch)
{
    uartSocket.asyncWrite(&ch, 1,
        [&uartSocket, &ch](const embxx::error::ErrorStatus& es, std::size_t bytesWritten)
        {
            GASSERT(!es);
            GASSERT(bytesWritten == 1);
            static_cast<void>(es);
            static_cast<void>(bytesWritten);
            readChar(uartSocket, ch);
        });
}

int main() {
    auto& system = System::instance();
    auto& uart = system.uart();

    // Configure serial interface
    uart.configBaud(115200);
    uart.setReadEnabled(true);
    uart.setWriteEnabled(true);

    // Start with asynchronous read
    auto& uartSocket = system.uartSocket();
    System::Uart::CharType ch = 0;
    readChar(uartSocket, ch);

    // Run the event loop
    device::interrupt::enable();
    auto& el = system.eventLoop();
    el.run();

    GASSERT(0); // Mustn't exit
    return 0;
Stream-like Printing Interface
As was mentioned earlier, our ultimate goal would be having standard output stream like interface for debug output, which works asynchronously without any blocking busy waits. Such interface must be a generic Component, which works in non-interrupt context, while using recently covered generic "Character" Driver in conjunction with platform specific "Uart" Device.
Such Component should be implemented as two sub-Components. One is "Stream Buffer" which is responsible to maintain circular buffer of written characters and flush them to the peripheral using "Character" Driver when needed. The characters, that have been successfully written, are removed from the internal buffer. The second one is "Stream" itself, which is responsible to convert various values into characters and write them to the end of the "Stream Buffer".
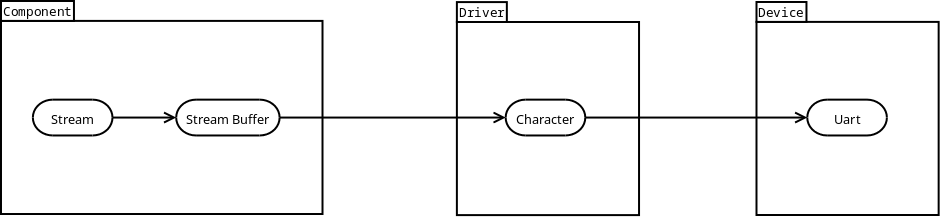
Let’s start with "Output Stream Buffer" first. It needs to receive reference to the Driver it’s going to use:
template <typename TDriver>
class OutStreamBuf
{
public:
    OutStreamBuf(TDriver& driver)
      : driver_(driver)
    {
    }

private:
   TDriver& driver_;
   ...
};
There is also a need to have a buffer, where characters are stored before they are written to the device. Remember that we are trying to create a Component, which can be reused in multiple independent projects, including ones that do not support dynamic memory allocation. Hence, Static (Fixed Size) Queue may be a good choice for it. It means, there is a need to provide size of the buffer as one of the template arguments:
template <typename TDriver,
          std::size_t TBufSize>
class OutStreamBuf
{
public:
   typedef typename TDriver::CharType CharType;
   typedef embxx::container::StaticQueue<CharType, BufSize> Buffer;

private:
   ...
   Buffer buf_;
};
The "Output Stream Buffer" needs to support two main operations:
-
Pushing new single character at the end of the buffer.
-
Flushing all (or part of) written characters, i.e. activate asynchronous write with Driver.
When pushing a new character, there may be a case when the internal buffer is full. In this case,
the pushed character needs to be discarded and there must be an indication whether "push" operation
was successful. The function may return either bool to indicate success of the operation or
std::size_t to inform the caller how may characters where written. If 0 is returned, the
character wasn’t written.
template <...>
class OutStreamBuf
{
public:
   // Add new character at the end of the buffer
   std::size_t pushBack(CharType ch);

   // Get number of written, not-flushed characters
   std::size_t size();

   // Flush number of characters
   void flush(std::size_t count = size());
   ...
};
This limited number of operations is enough to implement "Output Stream" - like interface. However, "Output Stream Buffer" can be useful in writing any serialised data into the peripheral, not only the debug output. For example using standard algorithms:
OutStreamBuf<...> outStreamBuf(...);
std::array<std::uint8_t, 128> data = {{.../* some data*/}};

std::copy(data.begin(), data.end(), std::back_inserter(outStreamBuf));
outStreamBuf.flush();
In the example above, std::back_inserter requires
a container to define push_back() member function:
template <...>
class OutStreamBuf
{
public:
   // Wrap pushBack()
   void push_back(CharType ch)
   {
       pushBack(ch);
   }
   ...
};
There also may be a need to iterate over written, but still not flushed, characters and update some of
them before the call to flush(). In other words the "Output Stream Buffer" must be treated as random
access container:
template <...>
class OutStreamBuf
{
public:
    typedef embxx::container::StaticQueue<CharType, BufSize> Buffer;
    typedef typename Buffer::Iterator Iterator;
    typedef typename Buffer::ConstIterator ConstIterator;
    typedef typename Buffer::ValueType ValueType;
    typedef typename Buffer::Reference Reference;
    typedef typename Buffer::ConstReference ConstReference;

    bool empty() const;
    void clear();
    void resize(std::size_t newSize);

    Iterator begin();
    Iterator end();

    ConstIterator begin() const;
    ConstIterator end() const;

    ConstIterator cbegin() const;
    ConstIterator cend() const;

    Reference operator[](std::size_t idx);
    ConstReference operator[](std::size_t idx) const;
   ...
};
As was mentioned earlier, the OutStreamBuf uses Static (Fixed Size) Queue as its internal buffer and any
characters pushed beyond the capacity gets discarded. There must be a way to identify available capacity
as well as request asynchronous notification via callback when requested capacity becomes available:
template <typename TDriver,
          std::size_t TBufSize,
          typename TWaitHandler =
              embxx::util::StaticFunction<void (const embxx::error::ErrorStatus&)> >
class OutStreamBuf
{
public:
    std::size_t availableCapacity() const;

    template <typename TFunc>
    void asyncWaitAvailableCapacity(
        std::size_t capacity,
        TFunc&& func)
    {
        if (capacity <= availableCapacity()) {
            ... // invoke callback via post() member function of Event Loop
        }
        waitAvailableCapacity_ = capacity;
        waitHandler_ = std::forward<TFunc>(func);

        // The Driver is writing some portion of flushed characters,
        // evaluate the capacity again when Driver reports completion.
    }

private:
    ...
    std::size_t waitAvailableCapacity_;
    WaitHandler waitHandler_;
};
Such "Output Stream Buffer" is already implemented in embxx/io/OutStreamBuf.h file of embxx library.
The next stage would be defining the "Output Stream" class, which will allow printing of null terminated strings as well as various integral values.
template <typename TStreamBuf>
class OutStream
{
public:
    typedef typename TStreamBuf::CharType CharType;

    explicit OutStream(TStreamBuf& buf)
    : buf_(buf)
    {
    }

    OutStream(OutStream&) = delete;
    ~OutStream() = default;

    void flush()
    {
        buf_.flush();
    }

    OutStream& operator<<(const CharType* str)
    {
        while (*str != '\0') {
            buf_.pushBack(*str);
            ++str;
        }
        return *this;
    }

    OutStream& operator<<(char ch)
    {
        buf_.pushBack(ch);
        return *this;
    }

    OutStream& operator<<(std::uint8_t value)
    {
        // Cast std::uint8_t to unsigned and print.
        return (*this << static_cast<unsigned>(value));
    }

    OutStream& operator<<(std::int16_t value)
    {
        ... // Cast std::int16_t to int type and print.
        return *this;
    }

    OutStream& operator<<(std::uint16_t value)
    {
        // Cast std::uint16_t to unsigned and print
        return (*this << static_cast<std::uint32_t>(value));
    }

    OutStream& operator<<(std::int32_t value)
    {
        ... // Print signed value
        return *this;
    }

    OutStream& operator<<(std::uint32_t value)
    {
        ... // Print unsigned value
        return *this;
    }

    OutStream& operator<<(std::int64_t value)
    {
        ... // Print 64 bit signed value
        return *this
    }

    OutStream& operator<<(std::uint64_t value)
    {
        ... // Print 64 bit signed value
        return *this
    }

private:
    TStreamBuf& buf_;
};
We will also require the numeric base representation and manipulator. Unfortunately, usage of
std::oct, std::dec`or `std::hex manipulators will require inclusion of standard library
header <ios>, which in turn includes other standard
stream related headers, which define some static objects, which in turn are defined and instantiated
in standard library. It contradicts our main goal of writing generic code that doesn’t require
standard library to be used. It is better to define such manipulators ourselves:
enum Base
{
    bin, ///< Binary numeric base stream manipulator
    oct, ///< Octal numeric base stream manipulator
    dec, ///< Decimal numeric base stream manipulator
    hex, ///< Hexadecimal numeric base stream manipulator
    Base_NumOfBases ///< Must be last
};

template <typename TStreamBuf>
class OutStream
{
public:
    explicit OutStream(TStreamBuf& buf)
    : buf_(buf)
      base_(dec)
    {
    }

    OutStream& operator<<(Base value)
    {
        base_ = value;
        return *this
    }

private:
    TStreamBuf& buf_;
    Base base_;
};
The value of the numeric base representation must be taken into account when creating string representation of numeric values. The usage is very similar to standard:
OutStream<...> stream;

stream << "var1=" << dec << var1 << "; var2=" << hex << var2 << '\n';
stream.flush();
It may be convenient to support a little bit of formatting, such as specifying minimal width of the output as well as fill character:
class WidthManip : public ValueManipBase<std::size_t>
{
public:
    WidthManip(std::size_t value) : value_(value) {}
    std::size_t value() const { return value_;}
private:
    std::size_t value_;
};

inline
WidthManip setw(std::size_t value)
{
    return WidthManip(value);
}

template <typename T>
class FillManip
{
public:
    FillManip(T value) : value_(value) {}
    T value() const { return value_;}
private:
    T value_;
};

template <typename T>
inline
FillManip<T> setfill(T value)
{
    return FillManip<T>(value);
}

template <typename TStreamBuf>
class OutStream
{
public:
    explicit OutStream(TStreamBuf& buf)
    : buf_(buf)
      base_(dec),
      width_(0),
      fill_(static_cast<CharType>(' ');
    {
    }

    OutStream& operator<<(WidthManip manip)
    {
        width_ = manip.value();
        return *this;
    }

    template <typename T>
    OutStream& operator<<(details::FillManip<T> manip)
    {
        fill_ = static_cast<CharType>(manip.value());
        return *this;
    }

private:
    TStreamBuf& buf_;
    Base base_;
    std::size_t width_;
    CharType fill_;
};
The usage is very similar to the base manipulator:
OutStream<...> stream;

stream << "var1=" << dec << setw(4) << var1 << "; var2=" << hex
       << setfill('0') << var2 << '\n';
stream.flush();
Another useful manipulator is adding '\n' at the end as well as calling flush(), just like
std::endl does when using standard output streams:
enum Endl
{
    endl ///< End of line stream manipulator
};

template <typename TStreamBuf>
class OutStream
{
public:

    OutStream& operator<<(Endl manip)
    {
        static_cast<void>(manip);
        buf_.pushBack(static_cast<CharType>('\n');
        flush();
        return *this;
    }


private:
    ...
};
Then usage example may be changed to:
OutStream<...> stream;

stream << "var1=" << dec << setw(4) << var1 << "; var2=" << hex
       << setfill('0') << var2 << endl;
To summarise: The "Output Stream" object converts given integer value into the printable
characters and uses pushBack() member function of "Output Stream Buffer" to pass these characters
further. The request to flush() is also passed on. When "Output Stream Buffer" receives a request
to flush internal buffer it activates the "Character" Driver, which it turn uses "UART" Device
to write characters to serial interface one by one. As the result of such cooperation, the "printing"
statement is very quick, there is no wait for all the characters to be written before the function
returns, like it is usually done with printf(). All the characters are written at the background
using interrupts, while the main thread of the application continues its execution without stalling.
Such "Output Stream" is already implemented in embxx/io/OutStream.h file of embxx library.
Logging
In general, debug logging should be under conditional compilation, for example only in DEBUG mode, while the printing code is excluded when compiling in RELEASE mode.
#ifndef NDEBUG
    stream << "Some info massage" << endl;
#endif
Sometimes there is a need to easily change the amount of debug messages being printed. For that purpose, the concept of logging levels is widely used:
namespace log
{

enum Level
{
    Trace, ///< Use for tracing enter to and exit from functions.
    Debug, ///< Use for debugging information.
    Info, ///< Use for general informative output.
    Warning, ///< Use for warning about potential dangers.
    Error, ///< Use to report execution errors.
    NumOfLogLevels ///< Number of log levels, must be last
};

}  // namespace log
The logging statement becomes a macro:
const auto MinLogLevel = log::Info;

#define LOG(stream__, level__, output__) \
    do { \
        if (MinLevel <= (level__)) { \
            (stream__).stream() << output__; \
        } \
    } while (false)
In this case all the logging attempts for level below log::Info get optimised away by the compiler,
because the if statement known to evaluate to false at compile time:
LOG(stream, log::Debug, "This message is not printed." << endl);
LOG(stream, log::Info, "This message IS printed." << endl);
LOG(stream, log::Warning, "This message IS printed also." << endl);
It would be nice to be able to add some automatic formatting to the logged statements, such as printing the log level and/or adding '\n' and flushing at the end. For example, the code below
LOG(stream, log::Debug, "This is DEBUG message.");
LOG(stream, log::Info, "This is INFO message.");
LOG(stream, log::Warning, "This is WARNING message.");
to produce the following output
[DEBUG]: This is DEBUG message.
[INFO]: This is INFO message.
[WARNING]: This is WARNING message.
with '\n' character and call to flush() at the end.
It is easy to achieve when using some kind of wrapper logging class around the output stream as well as relevant formatters. For example:
template <log::Level TLevel, typename TStream>
class StreamLogger
{
public:

    typedef TStream Stream;

    static const log::Level MinLevel = TLevel;

    explicit StreamLogger(Stream& outStream)
      : outStream_(outStream)
    {
    }

    Stream& stream()
    {
        return outStream_;
    }

    // Begin output. This function is called before requested
    // output is redirected to stream. It does nothing.
    void begin(log::Level level)
    {
        static_cast<void>(level);
    }

    // End output. This function is called after requested
    // output is redirected to stream. It does nothing.
    void end(log::Level level)
    {
        static_cast<void>(level);
    }

private:
    Stream& outStream_;
};
The logging macro will look like this:
#define SLOG(log__, level__, output__) \
    do { \
        if ((log__).MinLevel <= (level__)) { \
            (log__).begin(level__); \
            (log__).stream() << output__; \
            (log__).end(level__); \
        } \
    } while (false)
A formatter can be defined by exposing the same interface, but wraps the original StreamLogger or
another formatter. For example let’s define formatter that calls flush() member function of the
stream when output is complete:
template <typename TNextLayer>
class StreamFlushSuffixer
{
public:

    // Constructor, forwards all the other parameters to the constructor
    // of the next layer.
    template<typename... TParams>
    StreamFlushSuffixer(TParams&&... params)
      : nextLavel_(std::forward<TParams>(params)...)
    {
    }

    Stream& stream()
    {
        return nextLavel_.stream();
    }

    void begin(log::Level level)
    {
        nextLavel_.begin(level);
    }

    void end(log::Level level)
    {
        nextLavel_.end(level);
        stream().flush();
    }

private:
    TNextLavel nextLavel_;
};
The definition of such logger would be:
typedef ... OutStream; // type of the output stream
typedef
    StreamFlushSuffixer<
        StreamLogger<
            log::Debug,
            OutStream
        >
    > Log;
The same SLOG() macro will work for this logger with extra formatting:
OutStream stream(... /* construction params */);
Log log(stream);
SLOG(log, log::Debug, "This is DEBUG message.\n");
Let’s also add a formatter that capable of printing any value (and '\n' in particular) at the end of the output.
template <typename T, typename TNextLayer>
class StreamableValueSuffixer
{
public:

    template<typename... TParams>
    explicit StreamableValueSuffixer(T&& value, TParams&&... params)
      : value_(std::forward<T>(value)),
        nextLevel_(std::forward<TParams>(params)...)
    {
    }

    Stream& stream()
    {
        return nextLavel_.stream();
    }

    void begin(log::Level level)
    {
        nextLavel_.begin(level);
    }

    void end(log::Level level)
    {
        nextLavel_.end(level);
        stream() << value_;
    }


private:
    T value_;
    TNextLavel nextLavel_;
};
The definition of the logger that adds '\n' character and then calls flush() member function of
the underlying stream would be:
typedef embxx::io::OutStream<...> OutStream;
typedef
StreamFlushSuffixer<
StreamableValueSuffixer<
char,
StreamLogger<
log::Debug,
OutStream
>
>
> Log;While the construction will require to specify the character which is going to be printed at the end,
but before call to flush().
OutStream stream(...);
Log log('\n', stream);
SLOG(log, log::Debug, "This is DEBUG message.");As the last formatter, let’s do the one that prefixes the output with log level information:
template <typename TNextLayer>
class LevelStringPrefixer
{
public:
template<typename... TParams>
LevelStringPrefixer(TParams&&... params);
: next_value(std::forward<TParams>(params)...)
{
}
Stream& stream()
{
return nextLavel_.stream();
}
void begin(Level level)
{
static const char* const Strings[NumOfLogLevels] = {
"[TRACE] ",
"[DEBUG] ",
"[INFO] ",
"[WARNING] ",
"[ERROR] "
};
if ((level < NumOfLogLevels) && (Strings[level] != nullptr)) {
stream() << Strings[level];
}
nextLavel_.begin(level);
}
void end(log::Level level)
{
nextLavel_.end(level);
}
private:
TNextLavel nextLavel_;
};The definition of the logger that prints such a prefix at the beginning and '\n' at the end together
with call to flush() would be:
typedef
StreamFlushSuffixer<
StreamableValueSuffixer<
char,
LevelStringPrefixer<
StreamLogger<
log::Debug,
OutStream
>
>
>
> Log;Such StreamLogger together with multiple formatters is already implemented in
embxx/util/StreamLogger.h file of
embxx library.
Logging Application
The app_uart1_logging application in embxx_on_rpi project implements logging of simple counter that gets incremented once a second:
namespace log = embxx::util::log;
template <typename TLog, typename TTimer>
void performLog(TLog& log, TTimer& timer, std::size_t& counter)
{
++counter;
SLOG(log, log::Info,
"Logging output: counter = " <<
embxx::io::dec << counter <<
" (0x" << embxx::io::hex << counter << ")");
// Perform next logging after a timeout
static const auto LoggingWaitPeriod = std::chrono::seconds(1);
timer.asyncWait(
LoggingWaitPeriod,
[&](const embxx::error::ErrorStatus& es)
{
GASSERT(!es);
static_cast<void>(es);
performLog(log, timer, counter);
});
}
int main() {
auto& system = System::instance();
auto& log = system.log();
// Configure UART
auto& uart = system.uart();
uart.configBaud(115200);
uart.setWriteEnabled(true);
// Timer allocation
auto timer = system.timerMgr().allocTimer();
GASSERT(timer.isValid());
// Start logging
std::size_t counter = 0;
performLog(log, timer, counter);
// Run event loop
device::interrupt::enable();
auto& el = system.eventLoop();
el.run();
GASSERT(0); // Mustn't exit
return 0;
}The System.h file defines the whole output stack:
class System
{
public:
static const std::size_t EventLoopSpaceSize = 1024;
typedef embxx::util::EventLoop<
EventLoopSpaceSize,
device::InterruptLock,
device::WaitCond> EventLoop;
// Devices
typedef device::Uart1<InterruptMgr> Uart;
...
// Drivers
struct CharacterTraits
{
typedef std::nullptr_t ReadHandler;
typedef embxx::util::StaticFunction<
void(const embxx::error::ErrorStatus&, std::size_t)> WriteHandler;
typedef std::nullptr_t ReadUntilPred;
static const std::size_t ReadQueueSize = 0;
static const std::size_t WriteQueueSize = 1;
};
typedef embxx::driver::Character<
Uart, EventLoop, CharacterTraits> UartDriver;
...
// Components
static const std::size_t OutStreamBufSize = 1024;
typedef embxx::io::OutStreamBuf<
UartDriver, OutStreamBufSize> OutStreamBuf;
typedef embxx::io::OutStream<OutStreamBuf> OutStream;
typedef embxx::util::log::StreamFlushSuffixer<
embxx::util::log::StreamableValueSuffixer<
const OutStream::CharType*,
embxx::util::log::LevelStringPrefixer<
embxx::util::StreamLogger<
embxx::util::log::Debug,
OutStream
>
>
>
> Log;
...
private:
EventLoop el_;
// Devices
Uart uart_;
...
// Drivers
UartDriver uartDriver_;
...
// Components
OutStreamBuf buf_;
OutStream stream_;
Log log_;
...
};This application will produce the following output to the UART interface with new line appearing every second:
[INFO] Logging output: counter = 1 (0x1) [INFO] Logging output: counter = 2 (0x2) [INFO] Logging output: counter = 3 (0x3) ...
Buffered Input
In many systems the UART interfaces are also used to communicate between various microcontrollers on the same board or with external devices. When there are incoming messages, the characters must be stored in some buffer before they can be processed by some Component. Just like we had "Output Stream Buffer" for buffering outgoing characters, we must have "Input Stream Buffer" for buffering incoming ones.
It must obviously have an access to the Character Driver and will probably have a circular buffer to store incoming characters.
template <typename TDriver, std::size_t TBufSize>
class InStreamBuf
{
public:
typedef typename TDriver::CharType CharType;
typedef embxx::container::StaticQueue<CharType, TBufSize> Buffer;
explicit
InStreamBuf(TDriver& driver)
: driver_(driver)
{
}
private:
TDriver& driver_;
Buffer buf_;
};The Driver won’t perform any read operations unless it is explicitly requested to do so with its
asyncRead() member function. Sometimes, there is a need to keep characters flowing in and being
stored in the buffer, even when the Component responsible for processing them is not ready.
In order to make this happen, the "Input Stream Buffer" must be responsible for constantly
requesting the Driver to perform asynchronous read while providing space where these characters are going to be stored.
template <typename TDriver, std::size_t TBufSize>
class InStreamBuf
{
public:
// Start data accumulation in the internal buffer.
void start();
// Stop data accumulation in the internal buffer.
void stop();
// Inquire whether characters are being accumulated.
bool isRunning() const;
};Most of the times the responsible Component will require some number of characters to be accumulated before their processing can be started. There is a need to provide asynchronous notification callback request when appropriate number of characters becomes available. The callback must be stored in the internal data structures of the "Input Stream Buffer" and invoked when needed. Due to the latter being developed as a generic class, there is a need to provide callback storage type as a template parameter.
template <typename TDriver, std::size_t TBufSize, typename TWaitHandler>
class InStreamBuf
{
public:
template <typename TFunc>
void asyncWaitDataAvailable(std::size_t reqSize, TFunc&& func)
{
callback_ = std::forward<TFunc>(func)
...
}
private:
TWaitHandler callback_;
};Once the required number of characters is accumulated, the Component must be able to access and process them. It means that "Input Stream Buffer" must also be a container with random access iterators.
template <typename TDriver, std::size_t TBufSize, typename TWaitHandler>
class InStreamBuf
{
public:
typedef typename Buffer::ConstIterator ConstIterator;
typedef ConstIterator const_iterator;
typedef typename Buffer::ValueType ValueType;
typedef ValueType value_type;
typedef typename Buffer::ConstReference ConstReference;
typedef ConstReference const_reference;
// Get size of available for read data.
std::size_t size() const;
// Check whether number of available characters is 0.
bool empty() const;
//Get full capacity of the buffer.
constexpr std::size_t fullCapacity() const;
ConstIterator begin() const;
ConstIterator end() const;
ConstIterator cbegin() const;
ConstIterator cend() const;
ConstReference operator[](std::size_t idx) const;
};Please note, that all the access to the characters are done using const iterator. It means we do not allow external and uncontrolled update of the characters inside of the buffer.
When the characters inside the buffer got processed and aren’t needed any more, they need to be discarded to free the space inside the buffer for new ones to come.
template <typename TDriver, std::size_t TBufSize, typename TWaitHandler>
class InStreamBuf
{
public:
// Consume part or the whole buffer of the available data for read.
void consume(std::size_t consumeSize = size());
};Morse Code Application
The app_uart1_morse application in embxx_on_rpi project implements buffering of incoming characters in the "Input Stream Buffer" and uses the Morse Code method to display them by flashing the on-board led.
First of all there is a need to have an access to the led to flash, input buffer to store the incoming characters and timer manager to allocate a timer to measure timeouts.
template <typename TLed, typename TInBuf, typename TTimerMgr>
class Morse
{
public:
typedef TLed Led;
typedef TInBuf InBuf;
typedef TTimerMgr TimerMgr;
typedef typename TimerMgr::Timer Timer;
Morse(Led& led, InBuf& buf, TimerMgr& timerMgr)
: led_(led),
buf_(buf),
timer_(timerMgr.allocTimer())
{
GASSERT(timer_.isValid());
}
~Morse() = default;
private:
Led& led_;
InBuf& buf_;
Timer timer_;
};Second, there is a need to define a Morse code sequences in terms of dots and dashes duration as well as mapping an incoming character to the respective sequence.
template <...>
class Morse
{
public:
typedef typename InBuf::CharType CharType;
...
private:
typedef unsigned Duration;
static const Duration Dot = 200;
static const Duration Dash = Dot * 3;
static const Duration End = 0;
static const Duration Spacing = Dot;
static const Duration InterSpacing = Spacing * 2;
const Duration* getLettersSeq(CharType ch) const
{
static const Duration Seq_A[] = {Dot, Dash, End};
static const Duration Seq_B[] = {Dash, Dot, Dot, Dot, End};
...
static const Duration Seq_Z[] = {Dash, Dash, Dot, Dot, End};
static const Duration Seq_0[] = {
Dash, Dash, Dash, Dash, Dash, End};
static const Duration Seq_1[] = {
Dot, Dash, Dash, Dash, Dash, End};
...
static const Duration Seq_9[] = {
Dash, Dash, Dash, Dash, Dot, End};
static const Duration* Letters[] = {
Seq_A,
Seq_B,
...
Seq_Z
};
static const Duration* Numbers[] = {
Seq_0,
...
Seq_9
};
if ((static_cast<CharType>('A') <= ch) &&
(ch <= static_cast<CharType>('Z'))) {
return Letters[ch - 'A'];
}
if ((static_cast<CharType>('a') <= ch) &&
(ch <= static_cast<CharType>('z'))) {
return Letters[ch - 'a'];
}
if ((static_cast<CharType>('0') <= ch) &&
(ch <= static_cast<CharType>('9'))) {
return Numbers[ch - '0'];
}
return nullptr;
}
};Now, the code that is responsible to flash a led is quite simple:
template <...>
class Morse
{
public:
void start()
{
buf_.start();
nextLetter();
}
private:
void nextLetter()
{
buf_.asyncWaitDataAvailable(
1U,
[this](const embxx::error::ErrorStatus& es)
{
if (es) {
GASSERT(buf_.empty());
nextLetter();
return;
}
GASSERT(!buf_.empty());
auto ch = buf_[0];
buf_.consume(1U);
auto* seq = getLettersSeq(ch);
if (seq == nullptr) {
nextLetter();
return;
}
nextSyllable(seq);
});
}
void nextSyllable(const Duration* seq)
{
GASSERT(seq != nullptr);
GASSERT(*seq != End);
auto duration = *seq;
++seq;
led_.on();
timer_.asyncWait(
std::chrono::milliseconds(duration),
[this, seq](const embxx::error::ErrorStatus& es)
{
static_cast<void>(es);
GASSERT(!es);
led_.off();
if (*seq != End) {
timer_.asyncWait(
std::chrono::milliseconds(Duration(Spacing)),
[this, seq](const embxx::error::ErrorStatus& es)
{
static_cast<void>(es);
GASSERT(!es);
nextSyllable(seq);
});
return;
}
timer_.asyncWait(
std::chrono::milliseconds(Duration(InterSpacing)),
[this](const embxx::error::ErrorStatus& es)
{
static_cast<void>(es);
GASSERT(!es);
nextLetter();
});
});
}
};The nextLetter() member function waits until one character becomes available in the buffer,
then maps it to the sequence and removes it from the buffer. If the mapping exists it calls the
nextSyllable() member function to start the flashing sequence. The function activates the led
and waits the relevant amount of time, based on the provided dot or dash duration. After the
timeout, the led goes off and new wait is activated. However if the end of sequence is reached,
the wait will be of InterSpacing duration and nextLetter() member function will be called again,
otherwise the wait will be of Spacing duration and nextSyllable() will be called again to activate
the led and wait for the next period in the sequence.
Summary
After this quite a significant effort we’ve created a full generic stack to perform asynchronous input/output operations over serial interface, such as UART. It may be reused in multiple independent projects while providing platform specific low level device control object at the bottom of this stack.
GPIO
In many cases, the GPIO input doesn’t need to be processed at the same time the interrupt has occured. It can easilily be scheduled for execution in event loop (non-interrupt) context using Device-Driver-Component model.
According to what was written in Device-Driver-Component chapter and to what we’ve seen so far, the Component provides a callback object together with the asynchronous operation request. The callback is executed only once when the operation is compete, canceled or terminated due to some error. If the operation needs to be repeated, another asynchronous operation needs to be issued to the Driver while providing another callback object to be called on operation completion.
The need for GPIO input handling is a bit different though. The line may change its value multiple times between the reporting of the event to the Component and the latter re-requesting asynchronous wait on value change. The Driver must preserve the callback object, provided by the Component, and invoke it every time the GPIO input value changes until the Component cancels the operation.
Let’s go through all the stages in more detail.
Configuration
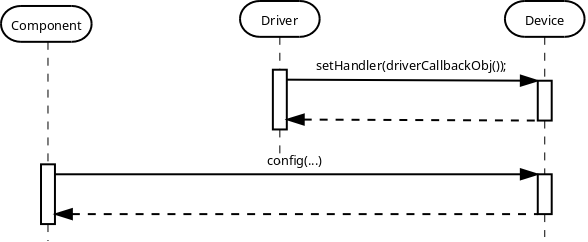
The Device must provide a callback object to handle GPIO interrupts on all the requested input lines.
The hardware must also be configured properly: input/output lines, the interrupts on the rising/falling edges, etc. Such configuration is platform/product specific and is not part of the generic Device-Driver-Component model presented in this book. Hence, the product specific Component must get an access to the device object and configure it as needed.
Start Continuous Asynchronous Read Operation
The Driver must be able to support multiple asynchronous read operations on different inputs. It means that it must protect an access to the internal data structures by requesting the Device to suspend the callback invocation (i.e. disable interrupts). Also to follow the pattern we used so far, there must be a request to start or enable the Device's operation on the first read request and cancel or disable it on the last.
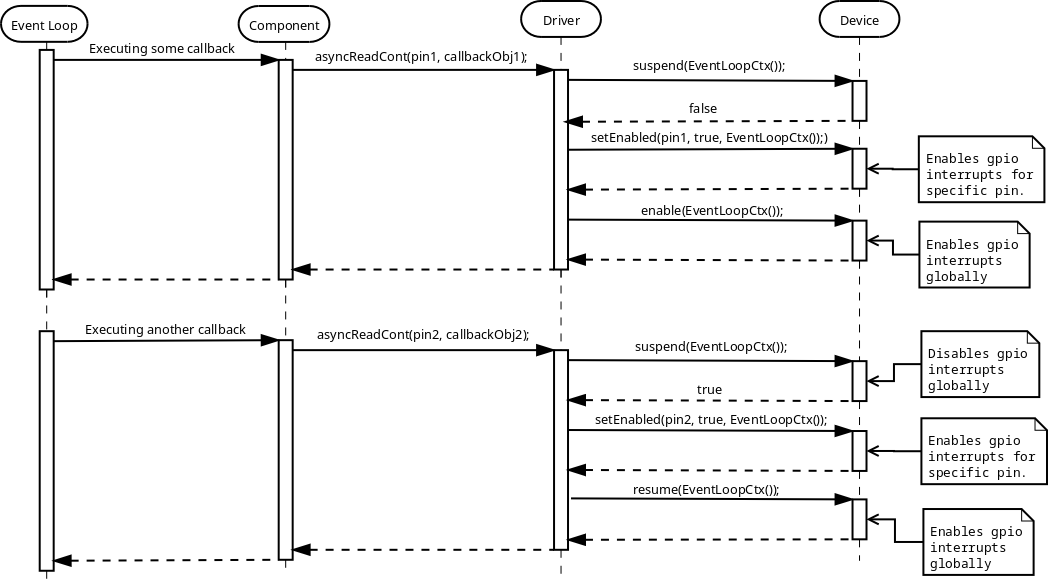
The reader may notice that on the first asyncReadCont() request, the Driver issued
suspend() request to the Device and got false in return. It means that the Device's
monitoring of the GPIO inputs hasn’t been started yet. That’s the reason for the following call to
enable(). On the second asyncReadCont() request the call to suspend() returned true which was
followed by the resume() later.
Reporting GPIO Input Event
Now, every time the relevant GPIO interrupt occurs, the Driver's handler is invoked in interrupt mode context. It is responsible to schedule the execution of Component's handler in event loop (non-interrupt) context.

Cancel Continuous Read Operation
When the there is no need to monitor some input any more, the Component may request the Driver to cancel the continuous asynchronous read operation. In case of last recorded asynchronous read operation being canceled, the Driver is responsible to let the Device know that no more GPIO interrupts are needed:
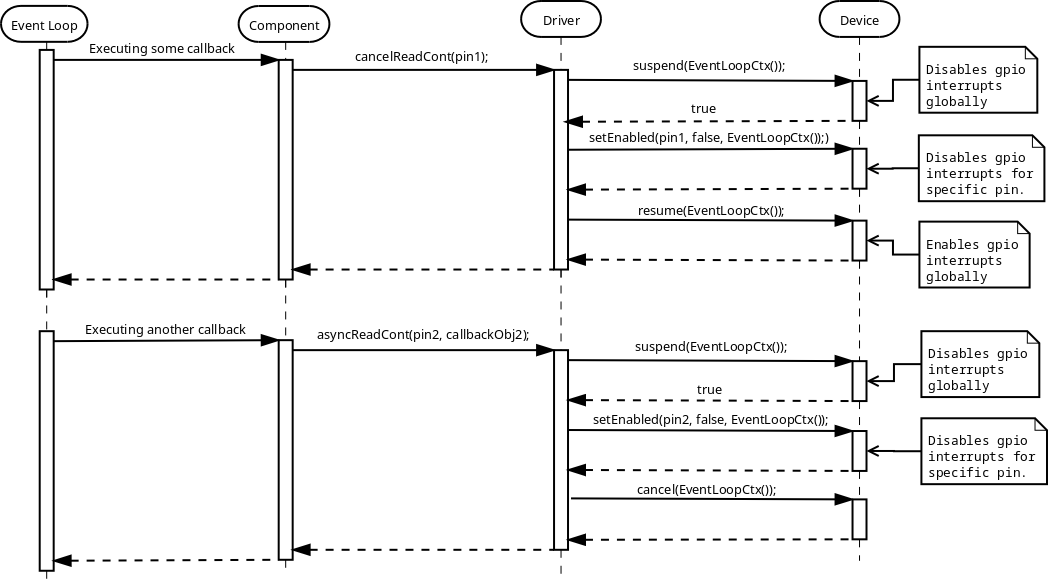
GPIO Device
Based on the information above, the platform specific GPIO control Device object must provide the following public interface:
-
Define pin identification type.
typedef unsigned PinIdType; -
Function to provide a callback object to be called when interrupt occurs. The callback parameters must provide an information of pin as well as final input value that caused the interrupt. The callback object must implement the following signature: "void (PinIdType, bool)" where the first parameter is pin and second parameter is input value.
template <typename TFunc> void setHandler(TFunc&& func); -
Function to start / enable the GPIO input monitoring.
void start(embxx::device::context::EventLoop context); -
Function to cancel / disable the GPIO input monitoring.
bool cancel(embxx::device::context::EventLoop context); -
Function to enable/disable gpio interrupts for single pin.
void setEnabled( PinIdType pin, bool enabled, embxx::device::context::EventLoop context); -
Function to suspend invocation of callback in interrupt mode, i.e. disable gpio interrupts.
bool suspend(embxx::device::context::EventLoop context); -
Function to resume suspended invocation of callback in interrupt mode, i.e. enable gpio interrupts.
void resume(embxx::device::context::EventLoop context);
Such GPIO control Device class for RaspberryPi platform is implemented in src/device/Gpio.h file of embxx_on_rpi project.
GPIO Driver
First of all, we will need references to Device as well as Event Loop objects:
template <typename TDevice, typename TEventLoop>
class MyGpioDriver
{
public:
// During the construction store references to Device
// and Event Loop objects.
MyGpioDriver(TDevice& device, TEventLoop& el)
: device_(device),
el_(el)
{
// Register appropriate interrupt callbacks with device
device_.setHandler(...);
}
...
private:
TDevice& device_;
TEventLoop& el_;
};The Driver must also provide an ability to perform and cancel continuous asynchronous read operations for multiple pins:
template <typename TDevice, typename TEventLoop>
class MyGpioDriver
{
public:
typedef typename TDevice::PinIdType PinIdType;
template <typename TFunc>
void asyncReadCont(PinIdType id, TFunc&& func) { ... }
bool cancelReadCont(PinIdType id) { ... }
};Like with any asynchronous operation so far the callback must receive status information as its
first parameter and probably the value of the input as the second one. When the operation canceled
with cancelReadCont(), the callback must be invoked one last time with status specifying that
operation was Aborted.
The Driver is supposed to be a generic piece of code that can be reused in multiple independent products, including ones without dynamic memory allocation and/or exceptions. It means that the Driver class must receive maximum number of the pins it is going to support and type of the callback storage.
template <typename TDevice,
typename TEventLoop,
std::size_t TNumOfLines,
typename THandler =
embxx::util::StaticFunction<void (const embxx::error::ErrorStatus&, bool)> >
class MyGpioDriver
{
public:
template <typename TFunc>
void asyncReadCont(PinIdType id, TFunc&& func)
{
...
auto* node = ...; // Locate or allocate appropriate node
node->id_ = id;
node->handler_ = std::forward<TFunc>(func);
...
}
private:
struct Node
{
Node() : id_(PinIdType()) {}
PinIdType id_;
THandler handler_;
};
typedef std::array<Node, TNumOfLines> Infos;
Infos infos_;
...
};The Driver doesn’t do anything special, it just receives the notification from the Device that gpio interrupt has occurred, locates the appropriate registered Component's callback object (based on the pin information provided by the Device), and uses Event Loop to schedule an execution of the Component's callback together with information about input’s value in event loop (non-interrupt) context.
Such generic GPIO Driver is already implemented in embxx/driver/Gpio.h file of embxx library.
Button Component
The embxx_on_rpi project has a simple button Component, implemented in src/component/Button.h. It configures provided GPIO line to be an input and to have both rising and falling edges interrupts. It also exposes simple interface to be able to monitor button presses and releases.
template <typename TDriver,
bool TActiveState,
typename THandler = embxx::util::StaticFunction<void ()> >
class Button
{
public:
typedef TDriver Driver;
typedef typename Driver::PinIdType PinIdType;
Button(Driver& driver, PinIdType pin);
~Button();
bool isPressed() const;
template <typename TFunc>
void setPressedHandler(TFunc&& func);
template <typename TFunc>
void setReleasedHandler(TFunc&& func);
};Button Press Monitoring Application
The embxx_on_rpi project also contains a simple application called app_button. It monitors presses and releases of a single button connected to one of the GPIO lines. When the button is pressed, the led is turned on for 1 second and "Button Pressed" string is logged to UART. When the button is released, just "Button Released" string is logged to UART without influencing the led state. If new button press is recognised prior to 1 second timeout for the led being on, the led stays on and a new 1 second timer countdown is started.
Thanks to the Device-Driver-Component model and all levels of abstractions, the application code is quite simple.
int main() {
auto& system = System::instance();
// Configure uart
auto& uart = system.uart();
uart.configBaud(9600);
uart.setWriteEnabled(true);
// Allocate timer
auto& timerMgr = system.timerMgr();
auto timer = timerMgr.allocTimer();
GASSERT(timer.isValid());
// Set handlers for button press / release
auto& button = system.button();
button.setPressedHandler(
std::bind(
&buttonPressed,
std::ref(timer)));
button.setReleasedHandler(&buttonReleased);
// Run event loop with enabled interrupts
device::interrupt::enable();
auto& el = system.eventLoop();
el.run();
GASSERT(0); // Mustn't exit
return 0;
}The code for "button pressed" is as following:
void buttonPressed(System::TimerMgr::Timer& timer)
{
static_cast<void>(timer);
auto& system = System::instance();
auto& el = system.eventLoop();
auto& led = system.led();
auto& log = system.log();
SLOG(log, embxx::util::log::Info, "Button Pressed");
timer.cancel();
auto result = el.post(
[&led]()
{
led.on();
});
GASSERT(result);
static_cast<void>(result);
static const auto WaitTime = std::chrono::seconds(1);
timer.asyncWait(
WaitTime,
[&led](const embxx::error::ErrorStatus& es)
{
if (es == embxx::error::ErrorCode::Aborted) {
return;
}
led.off();
});
}The code for "button release" is very simple:
void buttonReleased()
{
auto& system = System::instance();
auto& log = system.log();
SLOG(log, embxx::util::log::Info, "Button Released");
}I2C
I2C is serial communication bus. It is very popular in embedded development and mostly used to communicate to various low speed peripherals, such as eeproms and various sensors.
The control and use of I2C fits nicely into the Device-Driver-Component model described in this book. It is a serial interface and the controlling Device object will have to read/write characters one by one, just like it was with UART. It would be nice if we coud reuse the Character Driver we implemented before. However, the I2C is multi-master / multi-slave bus and there is a need to specify the slave ID (or address) when initiating read and/or write operation.
ID Adaptor
It is quite clear that some kind of ID Device Adaptor is needed. It will be constructed with additional ID parameter and will be responsible to forward all the API calls from the Character Driver to I2C Device while adding one extra parameter of ID.

The implementation of such adaptor is very simple and straightforward:
template <typename TDevice>
class IdAdaptor
{
public:
// Type of the underlaying device.
typedef TDevice Device;
// Character type defined in the wrapped device
typedef typename TDevice::CharType CharType;
// Device identification type defined in the wrapped device class.
typedef typename TDevice::DeviceIdType DeviceIdType;
IdAdaptor(Device& device, DeviceIdType id)
: device_(device),
id_(id)
{
}
template <typename TFunc>
void setCanReadHandler(TFunc&& func)
{
device_.setCanReadHandler(id_, std::forward<TFunc>(func));
}
template <typename TFunc>
void setCanWriteHandler(TFunc&& func)
{
device_.setCanWriteHandler(id_, std::forward<TFunc>(func));
}
template <typename TFunc>
void setReadCompleteHandler(TFunc&& func)
{
device_.setReadCompleteHandler(id_, std::forward<TFunc>(func));
}
template <typename TFunc>
void setWriteCompleteHandler(TFunc&& func)
{
device_.setWriteCompleteHandler(id_, std::forward<TFunc>(func));
}
template <typename... TArgs>
void startRead(TArgs&&... args)
{
device_.startRead(id_, std::forward<TArgs>(args)...);
}
template <typename... TArgs>
bool cancelRead(TArgs&&... args)
{
return device_.cancelRead(id_, std::forward<TArgs>(args)...);
}
template <typename... TArgs>
void startWrite(TArgs&&... args)
{
device_.startWrite(id_, std::forward<TArgs>(args)...);
}
template <typename... TArgs>
bool cancelWrite(TArgs&&... args)
{
return device_.cancelWrite(id_, std::forward<TArgs>(args)...);
}
template <typename... TArgs>
bool suspend(TArgs&&... args)
{
return device_.suspend(id_, std::forward<TArgs>(args)...);
}
template <typename... TArgs>
void resume(TArgs&&... args)
{
device_.resume(id_, std::forward<TArgs>(args)...);
}
template <typename... TArgs>
bool canRead(TArgs&&... args)
{
return device_.canRead(id_, std::forward<TArgs>(args)...);
}
template <typename... TArgs>
bool canWrite(TArgs&&... args)
{
return device_.canWrite(id_, std::forward<TArgs>(args)...);
}
template <typename... TArgs>
CharType read(TArgs&&... args)
{
return device_.read(id_, std::forward<TArgs>(args)...);
}
template <typename... TArgs>
void write(TArgs&&... args)
{
device_.write(id_, std::forward<TArgs>(args)...);
}
private:
Device& device_;
DeviceIdType id_;
};The same adaptor class is implemented in embxx/device/IdDeviceCharAdapter.h file of embxx library.
Operations Queue
The I2C protocol allows existence of multiple independent slaves on the same bus. It means there may be several independent Components that communicate to different I2C devices (for example EEPROM and temperature sensor), but must share the same Device control object and may issue read/write requests to it in parallel. To resolve this problem, there must be some kind of operation queuing facility that is responsible to queue all the read/write requests to the Device and issue them one by one.
The objects' usage map looks like this:
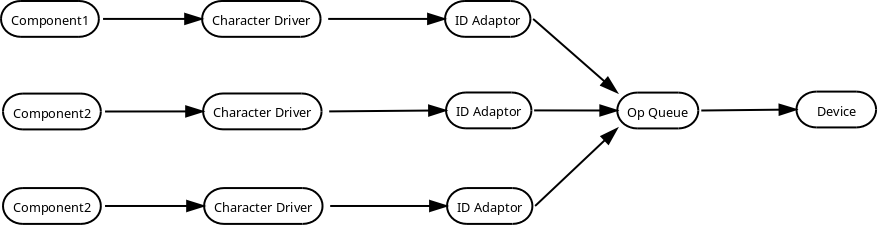
Such queue is a platform/product independent piece of code and it should be implemented without using dynamic memory allocation and/or exceptions. It means that it should receive number of various Driver objects, that may issue independent read/write requests to it (i.e. size of the internal queue), as a template parameter and probably use Static (Fixed Size) Queue to queue all the requests that are coming in. It should also receive callback storage types to report when a new character can be read/written, as well as when read/write operation is complete.
template <typename TDevice,
std::size_t TSize,
typename TCanDoOpHandler = embxx::util::StaticFunction<void()>,
typename TOpCompleteHandler =
embxx::util::StaticFunction<void (const embxx::error::ErrorStatus&)> >
class DeviceOpQueue
{
public:
DeviceOpQueue(TDevice& device);
...
private:
typedef embxx::container::StaticQueue<..., TSize> Queue;
Queue queue_;
};When the TSize template parameter is set to 1, there is no need for all the queuing facility
and the DeviceOpQueue class may become a simple pass-through inline class using template specialisation:
template <typename TDevice>
class DeviceOpQueue<TDevice, 1>
{
public:
typedef typename TDevice::PinIdType PinIdType;
template <typename... TArgs>
void startRead(TArgs&&... args)
{
device_.startRead(std::forward<TArgs>(args)...)
}
template <typename... TArgs>
bool cancelRead(PinIdType id, TArgs&&... args)
{
static_cast<void>(id); // No use for id in the Device itself
return device_.cancelRead(std::forward<TArgs>(args)...)
}
template <typename... TArgs>
bool suspend(PinIdType id, TArgs&&... args)
{
static_cast<void>(id); // No use for id in the Device itself
return device_.suspend(std::forward<TArgs>(args)...)
}
...
};Such queue is also implemented in embxx library. It resides in the embxx/device/DeviceOpQueue.h file.
Please note that ID Adaptor and [peripherals-i2c-operations_queue] are both Device layer classes. The serve as wrappers to actual peripheral control Device in order to expose the right interface to the upper layer Driver.
I2C Device
The only thing that remains is to properly implement I2C control device, which can be used by the DeviceOpQueue,
which in turn is used by the IdAdaptor. The IdAdaptor object can be used with the existing Character
Driver implemented to be used with the UART peripheral.
Based on the information above, the platform specific I2C control Device object must provide the following public interface:
class I2CDevice
{
public:
// Single character type
typedef std::uint8_t CharType;
// ID type
typedef std::uint8_t DeviceIdType;
// Context types
typedef embxx::device::context::EventLoop EventLoopContext;
typedef embxx::device::context::Interrupt InterruptContext;
// Set various interrupt handlers
template <typename TFunc>
void setCanReadHandler(TFunc&& func);
template <typename TFunc>
void setCanWriteHandler(TFunc&& func);
template <typename TFunc>
void setReadCompleteHandler(TFunc&& func);
template <typename TFunc>
void setWriteCompleteHandler(TFunc&& func);
// Start read for both contexts.
void startRead(DeviceIdType address, std::size_t length, EventLoopContext);
void startRead(DeviceIdType address, std::size_t length, InterruptContext);
// Cancel read for both contexts.
bool cancelRead(EventLoopContext);
bool cancelRead(InterruptContext);
// Start write for both contexts.
void startWrite(DeviceIdType address, std::size_t length, EventLoopContext);
void startWrite(DeviceIdType address, std::size_t length, InterruptContext);
TContext context);
// Cancel write for both contexts.
bool cancelWrite(EventLoopContext);
bool cancelWrite(InterruptContext);
// Suspend/Resume
bool suspend(EventLoopContext);
void resume(EventLoopContext);
// Helper functions to manage read/write during the interrupt
bool canRead(InterruptContext);
bool canWrite(InterruptContext);
CharType read(InterruptContext);
void write(CharType value, InterruptContext);
};Such device to control I2C0 interface on RaspberryPi platform is implemented in src/device/I2C0.h file of embxx_on_rpi project.
EEPROM Access Application
The embxx_on_rpi project contains an application called
app_i2c0_eeprom. It
implements a parallel access to 2 EEPROMs connected to the same I2C0 bus, but having different addresses.
The EEPROMs are accessed independently at the same time with read/write operations. These operations are
queued and managed by the DeviceOpQueue object that wraps actual I2C control Device and forwards
the requests one by one.
SPI
SPI is also quite popular serial communication interface. It is very similar to I2C in terms of using it the Device-Driver-Component model described in this book. The main differences are:
-
SPI uses "chip select" identification method instead of "address" of the peripheral.
-
SPI is a double direction link - there are always read and write operations that are executed in parallel (instead of only read or only write).
The "chip select" slave identefication will require the same "ID Adaptor" that was used for I2C integration.
Just like with I2C, the SPI is a multi-slave bus. It allows connection of multiple independent devices to the same MISO/MOSI/CLK lines of the SPI interface. It means there is a need for the same "Operations Queue" that was used for I2C integration. Due to the fact that SPI is a double direction link, the "Operations Queue" must be able to forward, say, read operation request to the actual Device even if "write" operation to the same slave device is already in progress.
It means that the objects' usage map is exactly the same as with I2C.
All the intermediate layers (Character Driver, ID Adaptor, Operations Queue) in the map above must allow issuing read and write operations at the same time. It becomes a responsibility of the product specific Component to be aware what kind of the Device is used and not to issue these requests in parallel if the actual Device (such as I2C) doesn’t support it.
SPI Device
Based on the information above, the platform specific SPI control Device object must provide and implement exactly the same interface as I2C Device:
class SpiDevice
{
public:
// Single character type
typedef std::uint8_t CharType;
// ID type - chip select index
typedef unsigned DeviceIdType;
// Context types
typedef embxx::device::context::EventLoop EventLoopContext;
typedef embxx::device::context::Interrupt InterruptContext;
// Set various interrupt handlers
template <typename TFunc>
void setCanReadHandler(TFunc&& func);
template <typename TFunc>
void setCanWriteHandler(TFunc&& func);
template <typename TFunc>
void setReadCompleteHandler(TFunc&& func);
template <typename TFunc>
void setWriteCompleteHandler(TFunc&& func);
// Start read for both contexts.
void startRead(DeviceIdType chipSelect, std::size_t length, EventLoopContext);
void startRead(DeviceIdType chipSelect, std::size_t length, InterruptContext);
// Cancel read for both contexts.
bool cancelRead(EventLoopContext);
bool cancelRead(InterruptContext);
// Start write for both contexts.
void startWrite(DeviceIdType chipSelect, std::size_t length, EventLoopContext);
void startWrite(DeviceIdType chipSelect, std::size_t length, InterruptContext);
TContext context);
// Cancel write for both contexts.
bool cancelWrite(EventLoopContext);
bool cancelWrite(InterruptContext);
// Suspend/Resume
bool suspend(EventLoopContext);
void resume(EventLoopContext);
// Helper functions to manage read/write during the interrupt
bool canRead(InterruptContext);
bool canWrite(InterruptContext);
CharType read(InterruptContext);
void write(CharType value, InterruptContext);
};Such device to control SPI0 interface on RaspberryPi platform is implemented in src/device/Spi0.h file of embxx_on_rpi project.
Other Nuances
SPI is quite often used with external persistent storage, such as SD card. Such devices may have some
significant delays between the block write operation on the MOSI line and the time they send an
acknowledgement about operation completion on the MISO line. The SPI Device must constantly read
the incoming bytes until the expected ACK/NACK byte is received without de-asserting the CS
(chip select). If the Component, responsible for managing SPI flash memory, issues only single
"read" operation to wait for such an acknowledgement, the provided buffer may get full before the
required byte is received. In this case the SPI control Device object is not aware that the new
"read" request may follow and has to de-assert the CS, which is undesireble.
In order to solve this problem, the Character Driver described in UART chapter must
be extended to support issuing multiple read/write operations at the same time. Such extension is
based on the values of ReadQueueSize/WriteQueueSize in the provided Traits class. These
values indicate maximal number of simultaneous read/write operations that may be issued to the
Driver. The responsible Component, in turn, must perform 2 or 3 "read until" operations at
the same time to wait for the expected response. Once the first buffer is full, the Driver will
post the Component's callback object for execution in the event loop context, while calling
startRead() member function of the Device for the next pending "read until" operation still
in interrupt context to fill the second buffer. The Device is responsible to continue its read
operation without de-asserting the CS line. While the second buffer being filled, the Component
has enough time to identify that there is no response in the filled buffer and re-issue the "read until"
request to the Driver while reusing the same buffer. This circle of "read until" requests must
continue until expected response is encountered or until operation timeout, which is measured independently
by the asynchronous wait request to the [Timer](timer.md). It is up to the responsible Component object
to manage the operations to the Character Driver as well as the Timer in event loop context and cancel
one upon execution of callback from another.
External Storage
As was mentioned in previous section, SPI is often used with external persistent storage, such as
SD card. In order to properly support it, there must be some kind of SpiFlash management Component,
that is responsible to implement proper
communication protocol while
providing necessary public interface. The minimal required interface will have to be able to:
-
Asynchronously initialise the device.
-
Asynchronously read block of data.
-
Asynchronously write block of data.
Once such Component is implemented and tested, the next stage would be implementing proper file system (FAT32) management Component, using the asynchronous functions of the former. It will allow processing time consuming file system reads and writes while still allowing processing of all other events without creating any performance bottlenecks and without requiring any complex independent task scheduling.
Other
There are many other peripherals and/or protocols (such as I2S, USB, one wire). The implementation and the main concepts should be pretty similar to the peripherals covered so far. At this stage I do not plan to do it in this book. At least not in the near future.
Various micro-controllers may also support DMA access
to some peripherals. In this case the Character Driver that was covered in UART
chapter must be replaced with some kind of Block Driver, that will allow issuing of multiple
read/write requests at the same time and will receive only "operation complete" notifications from
the Device. I leave implementation of it as an excercise for the reader. At least for now.